Don’t Try This At Home…

So I tried making fried rice. I make a pretty mean fried rice normally, but I wanted try something new. I know many fried rice recipes call for “day-old” rice because it is dryer, and I do often find that my rice ends up kinda glue-y when it’s fresh. So I wanted to try drying it and seeing if that helps (because I’m never organised enough to prepare rice the day before, and I don’t often eat plain rice).

So off I go to cook my rice. I acquired a pressure cooker when I moved out of home a year ago. I had never used one and I’m still not entirely convinced that it made cooking faster–either it didn’t or our stove is terrible at heating it… Probably our stove. Anyway. I tried cooking my rice to “al dente” BUT I didn’t have enough water. So I had to put the cooker back on. This is where it gets scary. About 20 mins into the cooking we hear a loud bang and pshhhhh of air and water escaping the pressure release valve. It must’ve been blocked by starch until it actually got enough pressure to actually unblock and release. Unfortunately it also released a stream of boiling water into my kitchen and all over my extractor fan…

Well, I removed it from the heat of course, waited for it to depressurise and then found this mess:

Mmmmm rice starch….

Well, that was a clean stainless steel lid before cooking rice. Not fun to clean.

Needless to say, this experience scared the goodness out off me (what little there was left) and I decided that it was time for this cooker to go. At least my rice was coocked! ¯\_(ツ)_/¯

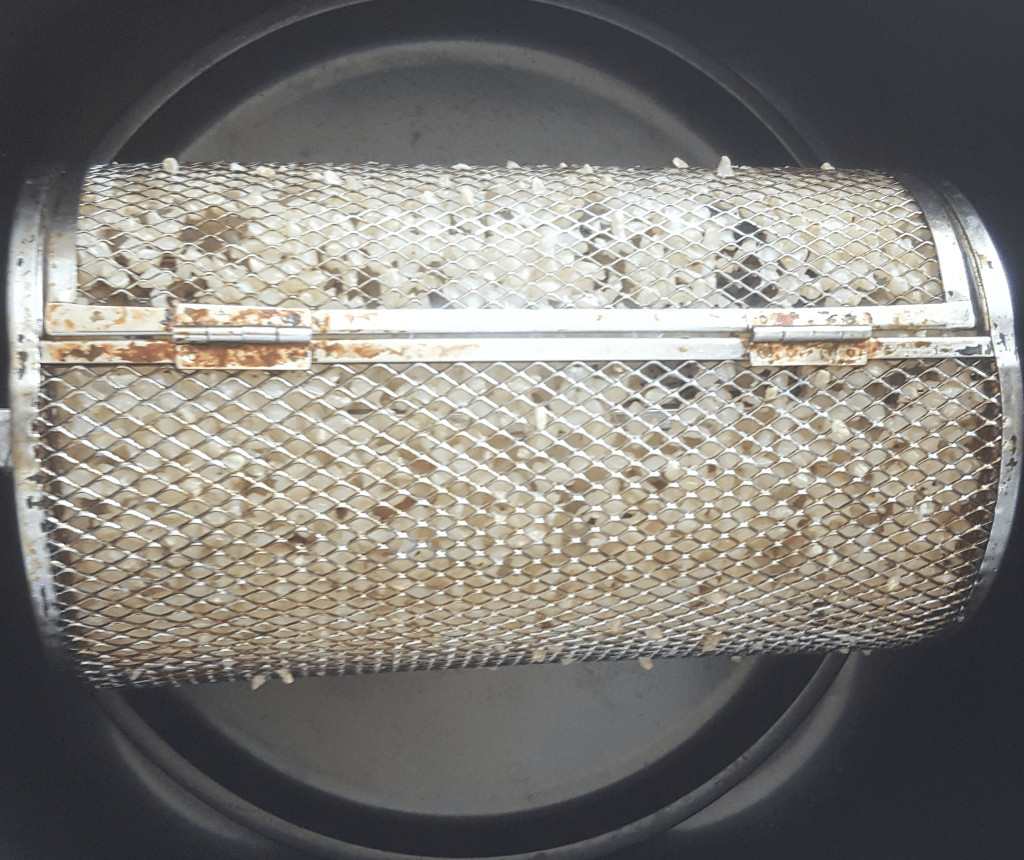
But it was overcooked. So I thought, why not dry it out in my air fryer? I have this basket that rotates and cooks chips really well. Yeah, great idea Beth! It stuck. Badly. All around the cage on the inside and on the little bits that help turn the chips over… It was gross. I spent ages trying to scrape it out using a spatula. The rice was dry though so I guess that’s a small win.

Cooked rice stuck on my air fryer basket

I ended up making fried rice and it was pretty good. I just wanted to share this ridiculous journey. Do not air fry rice in a basket and always clean your pressure cooker between each use!!!!

Strawberry and White Chocolate Swiss Roll

I was inspired by the Great British Bake Off to make a swiss roll. As a child, I loved the overly sweet chocolate “snail cake” my Mum would sometimes get. We never made them at home they were “too hard” to make. Spoiler: They’re not that hard. Sure, my first attempt could have looked much better (rather than looking like a hunk of my thigh), but it tasted good. I wanted a pink sponge using fresh strawberries (I had 2kg of jamming strawberries to use) with white chocolate filling, and do you think I could find a recipe?! So this on is cobbled together from a few different places: the basic recipe from Taste.com, the idea and ratio of strawberry sauce from Sugar Geek Show and the recipe for the cream from Carve Your Craving. Here is the recipe I ended up with.

Strawberry and white chocolate… I promise.

Using the strawberries that I had was important. I love using fresh ingredients rather than pre-processed stuff–if I had the time and ability I would probably make my own flour! That’s never going to happen, but I can do strawberry flavouring myself. I had actually make strawberry topping from Sally’s Baking Addiction, and after finding the recipe from Sugar Geek, I decided that using directly fresh strawberries wouldn’t be a great idea. Instead, I spooned out 5 tablespoons (as in, spoons, not the measurement) of the sauce and sieved it to remove chunks and seeds. I was concerned that it would make my roll too wet, but the batter was fine and the cake tasted great.

Goop left over from straining out the strawberry sauce

I followed the steps for creating the sponge to the letter (and added in my sauce), and I was surprised at the thickness/depth of the sponge. But after baking, that’s where I panicked a little. I didn’t read the recipe properly and used my own knowledge of how to roll these things. So I rolled it straight away, because that is meant to make it easier. However where a recipe says “roll along the long side” it doesn’t mean tuck under the long side and have the swirl on the short side…Oops. I didn’t have the lovely swirl. So I unrolled it. It was sticky and ended up splitting a bit, but I managed to unroll it with minimal damage. I then rolled it the correct way…but still without the sugar. For those who are oblivious like I was, the sugar helps to dry out the outside of the roll and stops it being so sticky. So I finally got my sponge rolled, and I set it aside to cool.

Time for the filling. It was a very simple mix of white chocolate and cream. Everything was going swimmingly except my hand mixer was taking aagesssss to whip my cream/chocolate. So I put it in my food processor (which had a whisk attachment) and let it go. Guess what I ended up with! Butter! Yum! Just what you want in a sweet swiss roll. Or not. It was pretty gross honestly. So that went in the bin and I went to bed, thinking about how I would do it better for dinner the next day.

Whipped…Butter? White chocolate makes cream very temperamental and difficult to whip.

The solution was obvious: Do it AT dinner! I figured using the stick blender I have always used should help me make thick cream, not butter. It did not. Even though I did the first step of melting the chocolate and cream together about 8 hours before I whipped it (giving it plenty of time to cool), I still almost made butter when I whipped it. It was decent enough to put on the sponge, so I slathered it on, rolled up the sponge and voila! One white choc and strawberry swiss roll. It tasted pretty good. Not amazing, but there was only 1 slice left, which I am pretty happy with. I think next time I’ll use a bit more chocolate in the cream. The sponge was very sweet, so I’ll need to think of another way to make that work.

Strawberry and White Chocolate Swiss Roll Recipe

Adapted from Taste.com, Sugar Geek Show and Carve Your Craving.

Total Time: Sponge: 30 minutes; Cream 5 minutes making, 15 minutes resting.

Ingredients

Sponge:

  • 4 eggs, separated
  • 125 g caster sugar
  • 1 tsp vanilla essence
  • 1/2 cup plain flour
  • Icing sugar to dust (I forgot to do this, do not forget!)
  • 4 tbsp strawberry syrup (Sally’s baking Adiction’s recipe)

Cream:

  • 300 mL whipping cream
  • 100 g / half a block of white chocolate

Method

Sponge

  1. Separate the eggs and whip the egg whites until stiff peaks form. Set aside.
  2. Strain the strawberry syrup through a sieve to remove chunks and seeds.
  3. Add the egg yolks, caster sugar, vanilla essence to the syrup and beat until light.
  4. Gently fold in the egg whites and then the flour.
  5. Pour into a long baking pan lined with baking paper and oil. You may need to encourage the batter into the corners
  6. Bake for 15 minutes or until a skewer inserted comes out clean.
  7. Cool for 5 mins then sprinkle with icing sugar. Roll along the long edge (as in, tuck the shortest side under for your first roll), keeping the baking paper on the sponge. Roll it firmly. A tight roll here gives a tight roll when you add the cream.
  8. Set aside to cool on top of the edge of the sponge.

Cream

  1. Melt the white chocolate and about half a cup of cream in the microwave. Be careful not to overdo it 30 sec burst at first, white chocolate burns easily. Mix between heating until chocolate is smooth.
  2. Allow the chocolate and cream mix to cool (I left it for 8 hours, probably only really needs 30 mins).
  3. Add in the rest of the cream and whip. Be careful not to over-whip, as it is very easy to do with the white chocolate incorporated. I over-whipped it twice…

Assemble

  1. Allow for both the cream and the sponge to be at room temperature (if not cooler).
  2. Carefully unroll the sponge and slather on the cream. Make sure to go all the way to the edge.
  3. Roll the sponge back up without the baking paper. Serve and enjoy!!
Completed product

Orange and Almond Cake

I’m back! But just because all is quiet on the blog front doesn’t mean I haven’t been cooking! I have tried a few different things out, but I have always wanted to make Orange and Almond cake. I first had this cake 8 years ago, when I worked in a small bakery. I had recently found out that I am intolerant to wheat, so I was super excited to find a delicious, moist, gluten free cake. Well, I finally made it myself and it turned out pretty well. I used this site as a basis for my recipe. Continue reading to see the baking journey (not too many photos, sorry!) or just skip straight to the recipe!

Orange and Almond cake close-up

Orange and Almond cake has no wheat flour and uses the whole orange. Before trying this recipe I had no idea how expensive almond meal is! Sorry Mum! But it is definitely worth it for this cake as almond meal lends a nutty taste to the tart citrus of the oranges. The oranges I used were juicing oranges–they were super sour! (Despite my future father-in-law insisting that they are sweet). I am very lucky to have access to organic oranges, picked straight from the tree. But really any orange will do (though preferably unblemished).

You start by boiling the life out of the oranges. Remove the green stem bit and wash to your satisfaction. I used a pressure cooker and it took 20 minutes once it reached full pressure. Recipes otherwise suggest about 2 hours on the stove top. When cooked, the oranges should become soft and squishy. I didn’t want to wait for them to cool, so I used tongs to remove them from the pot and hold them as I cut the oranges into quarters. Remove any seeds, then you blend the life out of them! Yup, the peel, pith and flesh all get blended together. Smoother is better, but you may still see small “chunks” of peel (5mm by 5mm and very thin). Don’t worry, these kinda disappear once baked.

Beat the heck out of the eggs–they turn lighter in colour and will thicken but nowhere near as much as if they were just egg whites. Mix everything together (I used 2/3 cup of sugar and 1/3 cup of icing sugar…I kinda ran out…oops), pop it into a lined pan and cook. It doesn’t rise, so I could have made both these cakes into one. It ended up being kinda sour, but seemed to sweeten after a few days. It’s been over a week and my cake is still in the fridge and lookin’ fine, so there’s no need to rush eating it!

Bake on,

Beth x

2 cakes which could have been one…

Orange and Almond Cake Recipe

Adapted from Robyn Russell’s recipe on Taste.

Total Time: 2 hours, 1 hour prep, 1 hour cooking

Makes 1 thick cake or 2 thin cakes (about 3cm deep)

Ingredients

  • 3 medium-small oranges, unblemished
  • 5 eggs
  • 1 cup sugar
  • 2 1/2 cups almond meal
  • 1 tsp baking powder
  • sliced almonds for the top.
Orange and Almond Cake straight from the oven!

Method

  1. Wash the 3 oranges and place them in your pressure cooker with enough water to cover the oranges (the oranges will float, but that’s fine). Cook for 30 minutes until soft.
  2. Preheat oven to 170 degrees celcius.
  3. While boiling the oranges, beat the eggs until thick and lighter in colour.
  4. once oranges are cooked, remove and slice into quarters, removing any seeds. Place into a blender and puree until smooth.
  5. Add all other ingredients except the sliced almonds and mix until combined.
  6. Line a pan with baking paper and grease. Pour the cake mix into the pan, sprinkle the sliced almonds on top for added texture and bake for 1 hour. The cake shouldn’t rise (or only a tiny bit).
  7. Once cooked, the cake should bounce back slowly from being pressed. This is a very moist cake, but it shouldn’t be runny.
  8. Let the cake sit for 20 minutes and turn out onto a cooling rack to fully cool. Store in an airtight container for… a long time. Mines is still 2 weeks strong in the fridge. Note that the cake is best prepared in advance (2 days is good), as I found it sweetened over time.

Banana Cupcakes with the Essential Chocolate

I often cook something for family dinners, but sometimes they don’t go as planned. My cinnamon scrolls became a bit burnt on the base, so I nearly made something completely different. However I ran out of time and ingredients, so my family had slightly burnt scrolls. I ended up finishing off the banana cake I started though.

I planned to make a banana cake and use the cream cheese frosting from the cinnamon scrolls. I creamed butter, sugar and egg together and I started mashing bananas. They weren’t ripe enough 😥. So I put the mix aside to be used later.

When my bananas were ready, I wasn’t. It was late at night and I didn’t have the hour needed to cook a full cake. So instead of putting it off again, I made cupcakes instead! Being smaller, they took about 15 minutes to cook.

I also had some left over chocolate. Normally chocolate wouldn’t last long around me, but I’m trying to improve my eating habits. So the chocolate was chopped up and plonked on top of the cupcake/muffins. Best. Decision. Ever. The chocolate went beautifully with the banana but didn’t overpower it.

After setting a couple aside for personal eating, I took the rest into work to be devoured by my fellow scientists. I was told I could bring them in anytime!

Bake on,

Beth

Bulk Food Shop Time!

While this blog is about baking, I think it is relevant to talk about where I get my ingredients. Bulk food shops, like The Source are shops where you bring your own containers (or use their paper bags) and scoop out your own groceries. There are several reasons for this, but for me the main reason is to try and limit the use of plastic packaging. Now, I wanted to go to one of these places for ages (ie. 4 months, since I moved out of home) and yesterday I managed to go.

So off I went, armed with my 4 jars and can-do attitude. Now, not all bulk food shops are the same. Apparently, some only weigh your container after you place your ingredients in it. Imagine using a glass container, which can easily weigh 500g by itself. That can quickly add up.

Happily, The Source weighs your containers before you put your groceries in them, so all you’re buying is the product itself.

I spent a good 20 minutes or so just looking at the products they had on offer. Lots of flours, sugars, sweets, herbs spices and teas (including Rooibus! Yum!). There was also dishwashing liquid, shampoo, conditioner and oils. They even had a “make your own peanut/almond butter” station, where the machine grinds peanuts or almonds depending on the day and smooshes it out. So many different things were on offer! It definitely did not cover all the things that I would get during my normal grocery shop, but it will be great for my baking.

I got a few things to try–spelt flour, corn pasta, choc covered macadamias and some little Easter eggs. The macadamias were delicious! The right ratio of chocolate to nut (ie 1000000:1), and the chocolate was good quality too. I wasn’t keen on the Easter egg, it tasted like Raw food, which I don’t enjoy. I’m looking forward to trying out my spelt flour, I haven’t cooked with it yet, so I’m curious to see if it is any different to basic wheat flour.

Now, to make ANZAC cookies!

Bake on,

Beth

Bread Rolls first try

I was having the family over and wanted to wow them with some homemade bread rolls for our burgers. I had made bread before, so how different can rolls be really?

As always, I trawled through Pinterest to find a recipe I liked. I landed on this one. Crunchy but soft in the middle. Perfect.

I’ll say it again: I don’t follow recipes. So instead of mixing and kneading the dough myself, I got my bread maker to do it. Now is a good time to mention that I have a single measuring jug, so the amount of water I use is always a guesstimate. However, despite my first class honours, I thought 1.5 cups of water equated to 425ml, instead of 375ml. Not a huge difference, but when I came back to my dough an hour amd a half later, I found it overflowing the baking tin and sticking to the sides of the bread oven. Oops.

The dough was also incredibly sticky and had huge bubbles of air in it. I tried using it as is, but that wasn’t going to happen. I ended up using probably an extra cup of flour just so I could handle the dough. I portioned out the rolls and let them rise again (I had to really work th dough. So much for low effort). I baked the rolls, and was intrigued to see the process. I have only made bread in my bread machine, so I never really see it cook.

The rolls came out pretty well, some I cooked for longer to get a darker crust on them. I actually prefered the lighter crust ones, and I had them over the next few days warmed up in the microwave with a chunk of butter melted in. My family were all suitably impressed, although the rolls were a bit small and flat to be good burger rolls. I think I might need more practice 😉

Bake on,

Beth x

Continue reading “Bread Rolls first try”

Zucchini Brownie Cake Pops

This recipe is adapted from iFoodReal.

Total Time: 2 hours, 25 mins baking, 1 hour setting

Brownie Time: 45 mins for the brownie base

Makes approx. 20 cake pops

Ingredients

Zucchini Not-Brownies

  • 2 cups zucchini, grated (~1 zucchini)
  • 1 egg
  • 1/2 cup olive oil
  • 1/2 cup brown sugar
  • 1 tsp vanilla essence
  • 1/2 cup cocoa powder
  • 1 1/2 tsp baking soda
  • 1/2 tsp salt
  • 1 cup plain flour

Cake Pops

  • ~1 1/2 cups Icing Mix
  • ~1/2 cups Margerine
  • Dash of Milk
  • 500g White chocolate

Method

Zucchini Not-Brownies

  1. Grate zucchini and set aside. Preheat oven to 180 degrees celcius and line a baking dish with baking paper and butter.
  2. In a large bowl, add egg, oil, brown sugar and vanilla essence; whisk to combine. Add cocoa, baking soda and salt; mix well.
  3. Give zucchini a decent squeeze (do not ring out completely). Over-doing it leads to drier brownies, which is somewhat helpful for the cake pops, less so for brownies (this recipe is not suitable for straight brownies).
  4. Add zucchini to the bowl and stir. Add flour and mix gently until combined.
  5. Transfer batter into prepared baking dish and level with spatula. Bake for approx. 25 minutes. You want them to be more cake-y and less brownie-y. A skewer inserted should come out clean.
  6. Remove from the oven and baking dish, and let cool.

Cake Pops

  1. Combine the icing mix and the margerine. I never actually measure my buttercream ingredients, so these are estimates from Taste. Add milk (tiny amounts at a time, maybe 1/4 tsp.) until the buttercream is a spreadable consistency.
  2. Line a baking tray (or some other flat surface that can be placed in the freezer) with baking paper.
  3. Place the now cool brownies into a bowl and mash with a fork. I did this the next day, so the brownies were easier to smoosh than if they were fresh.
  4. Add approx. 1 cup of buttercream to the brownie mash and mix. This is easiest with your hands so you can really distrubute the buttercream. The mix should stick together but not be so sloppy that it can’t hold it’s shape.
  5. Form balls, approx. 2-3cm in diameter (or however big you want really. Just remember: bigger balls means a smaller chocolate to brownie ratio). Place the on the baking tray/bal receptacle and set in the freezer for about 30 mins, depending on the size of your balls.
  6. Melt half the white chocolate in the microwave, starting off at 30 seconds and then in 10 second bursts until melted. Add in the other half of the chocolate and stir until melted. This will temper your chocolate (give it a nice *snap* when you bite into it).
  7. Place the balls into the white chocolate, coat and place back on the baking tray. Traditionally cake pops are made with a stick in the ball, like a lollipop. I chose not to do this, however I think this resulted in messier balls. I used a fork to remove the balls from the chocolate and place them on the tray.
  8. Freeze for a further 30 mins or until the chocolate has set. Enjoy!

I have kept mine in the freezer, uncovered for 2 weeks, so as long as they’re kept chilled they will keep for a long time. Imagine if I actually looked after the food and put it in an air-tight container!

Cinnamon Scrolls

This week’s experiment was Cinnamon Scrolls. I looked up recipes and the first four were all the same. I liked the explanation from Fun, Cheap or Free the best. Now, you can’t believe everything you read on the internet, because one site said this recipe takes 45 mins to make. It took me more like 3 hours. Most of that was waiting for my bread machine to do it’s thing, but I’m glad I started these early!

First off, I added everything to the bread machine (after a early morning walk to the ahops for some milk) and waited for 1.5 hours while it kneeded the dough and allowed it to rise. The dough then needed to be rolled out into a rectangle. I don’t have a rolling pin, so I improvised (See the jar at the top of the pic? Yeah. That.). I smooshed margerine all over it with my fingers, as Fun, Cheap or Free suggests, which was totally fun but the end result was…messy.

Sprinkle the cinnamon and brown sugar mix over with a sieve and roll the dough! I cut each roll to be about 2cm wide…tall?…long? Anyway I got a lovely even 21 scrolls out of this recipe! I let them sit in a warm oven for about 15 minutes (I couldn’t wait the suggested 30 minutes. I wanted my scrolls!). They cooked for about 20 minutes, but didn’t brown. To check if they were cooked, I cut into one of them. Is there a better way? I’ve never made dough things before! Besides pizza. Mmmm… pizza…

Where the magic happens. This is all the bench space I have…
The rolls I cut are on the left and my “rolling pin” is in the middle.

While the scrolls were cooking, I mixed about four fifths of a philly cheese block, one cup of icing mix and a glob of butter together to make the delicious icing. The icing had a slightly tart taste using this ratio, which I thought offset the sweetness of the sugar piled into the scrolls.

After proving in the oven, but prior to baking. The ones in the round container were in for the longest and at the warmest temp.

They’re best served warm, either straight out of the oven or microwaved for 20 seconds, as I discovered the next day ;). Probably some icecream would be amazing, but I haven’t tried that…yet. I was too busy eating them to take a pic of the final product 😛

Bake on,

Beth x