Hey everyone! I have chosen to move my site to Wix instead, as I feel like it offers me more editing options. Same content (I even copied all my old posts across), just a new space. Here is the link: https://eaculverhouse.wixsite.com/beths-baking.
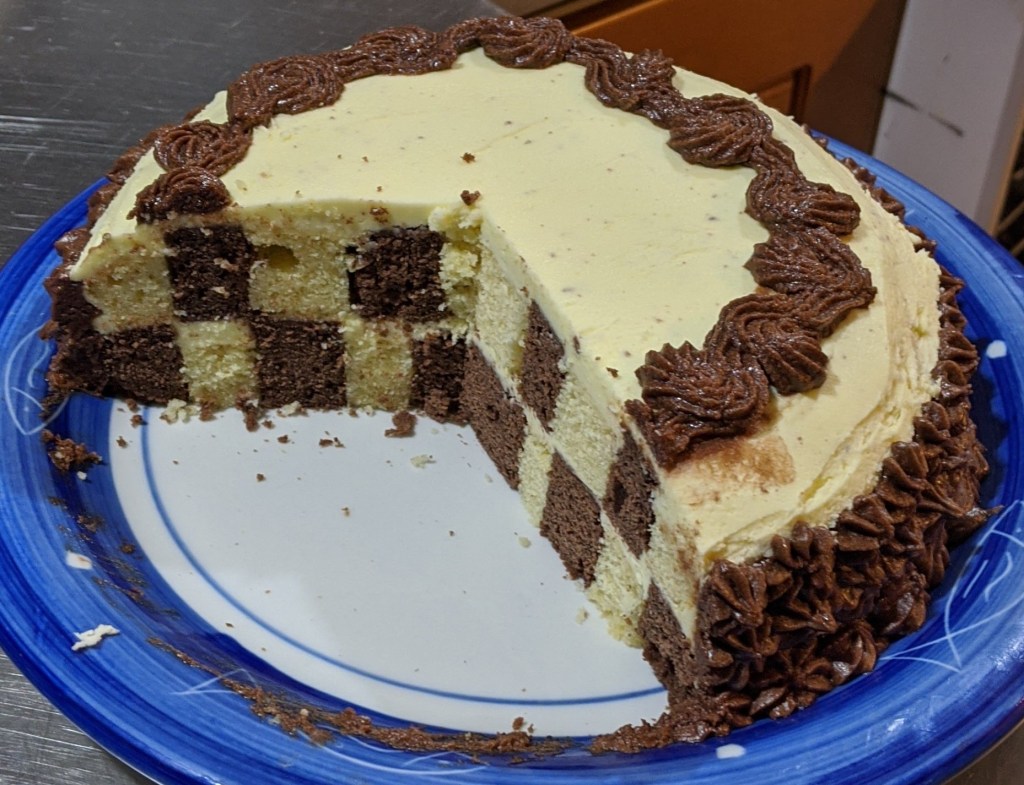
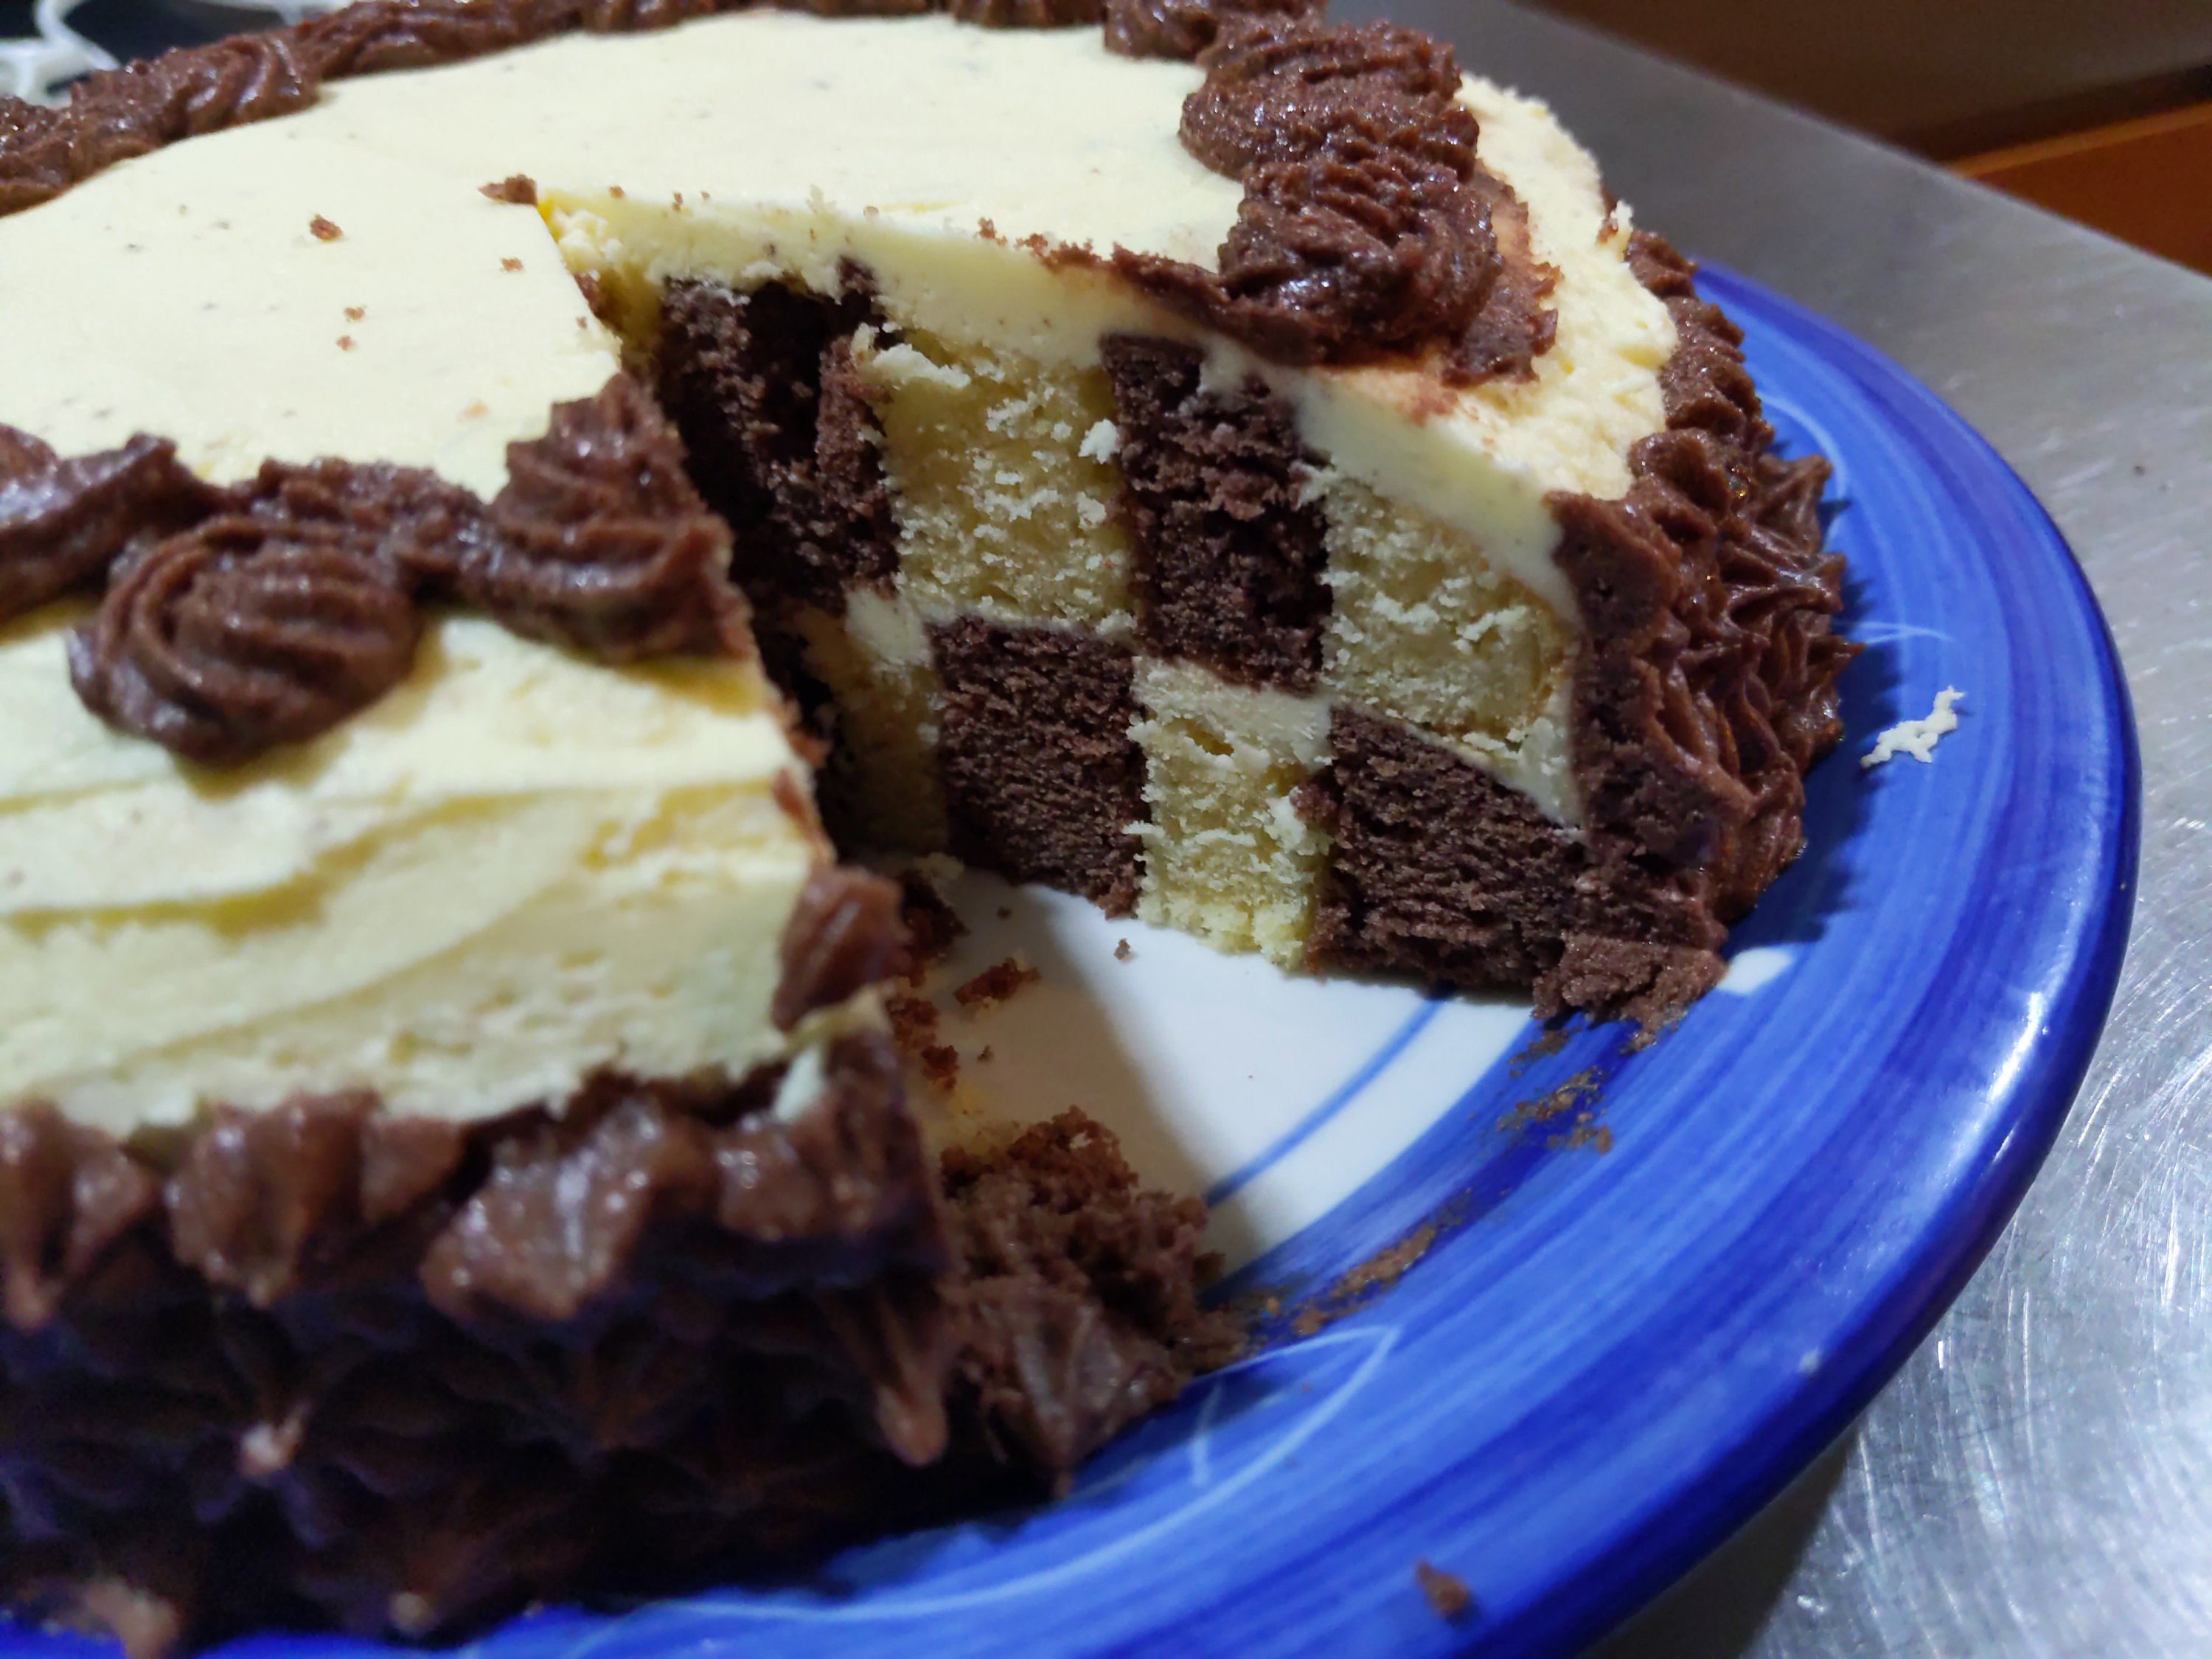
I wanted to make cake. But not just any cake. A fun cake. With a challenge (ish). I’ve wanted to try a checkered cake for years, so I finally did! And it turned out well!! A checkered cake lives up to it’s name, when cut it has a distinctive pattern, often in brown and white but can be in other colours too (even 3 colours or rainbows!).
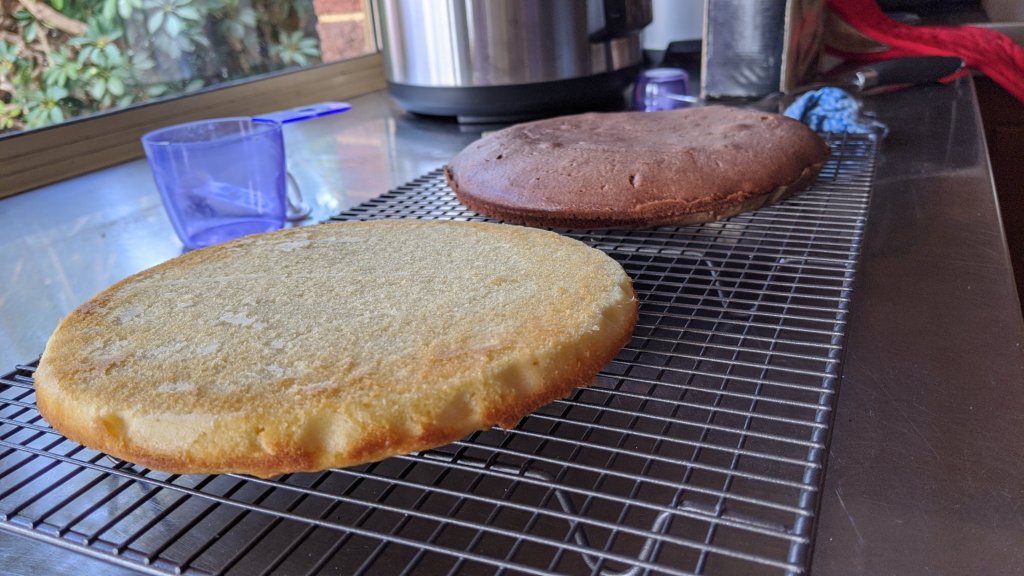
As there are only 2 people in my house, I didn’t want to make a huge cake. But this cake requires at lease 2 layers. Instead of making 2 batches, I divided 1 batch in half. It resulted in quite thin cakes, but this just meant a better buttercream to cake ratio!
Two kinda thin cakes, made from a single batch of batter
I used a simple butter cake recipe from Women’s Weekly Quick Mix Cakes (actually it’s a cupcake recipe but we’ve always used it for cakes too). I added cocoa to the second batch for colour and flavour, which didn’t change the texture too much.
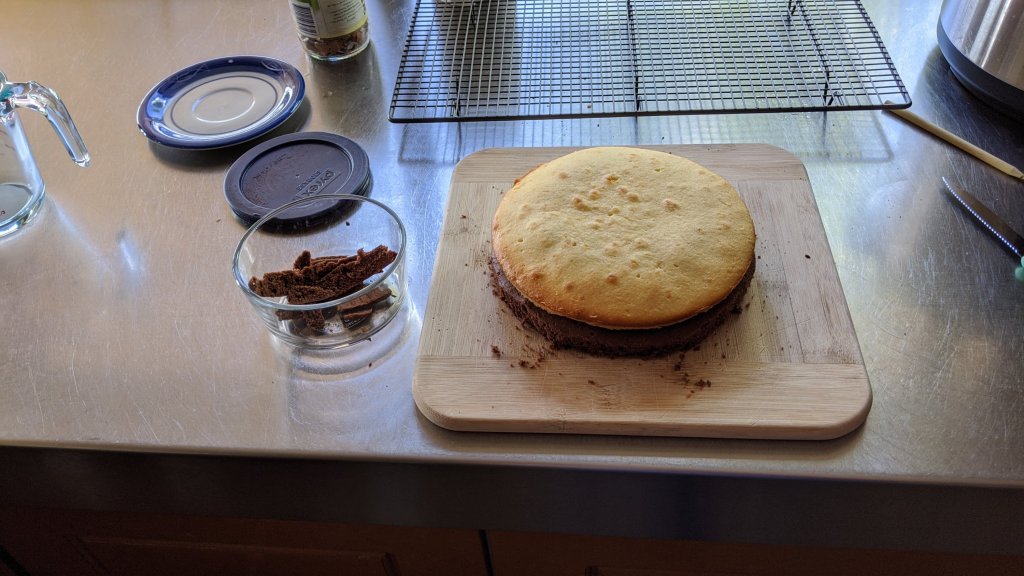
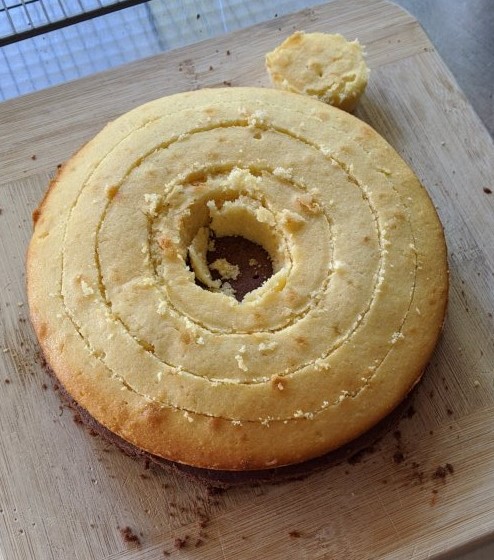
I baked in similar sized pans (I don’t have the same sized round pans), so after they cooked for 15 to 20 mins and were cool, I had to trim them to size. I also didn’t measure half the batter, so the vanilla cake was slightly lower than the chocolate. This was easily disguised by buttercream 😉 (if it were the reverse, I could have used chocolate buttercream to disguise it).
Note the different levels of the cakes
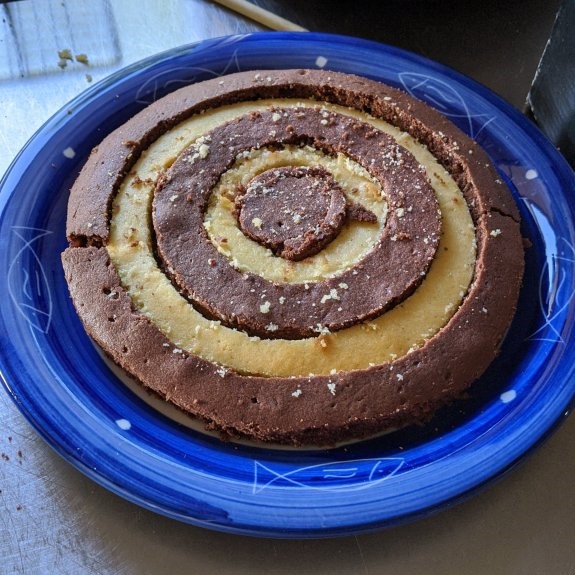
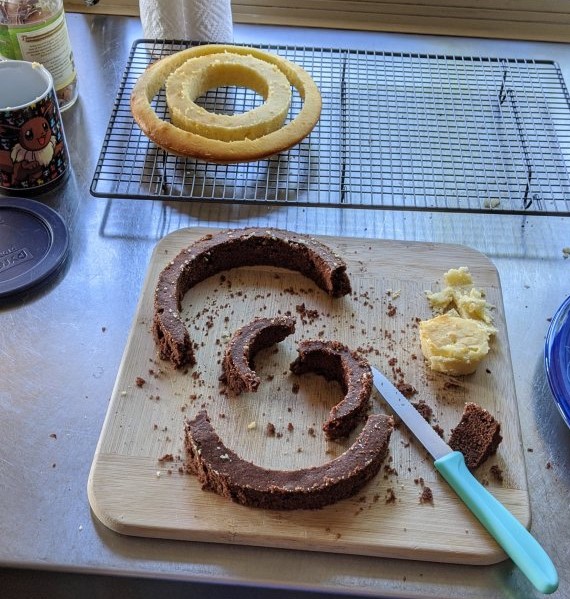
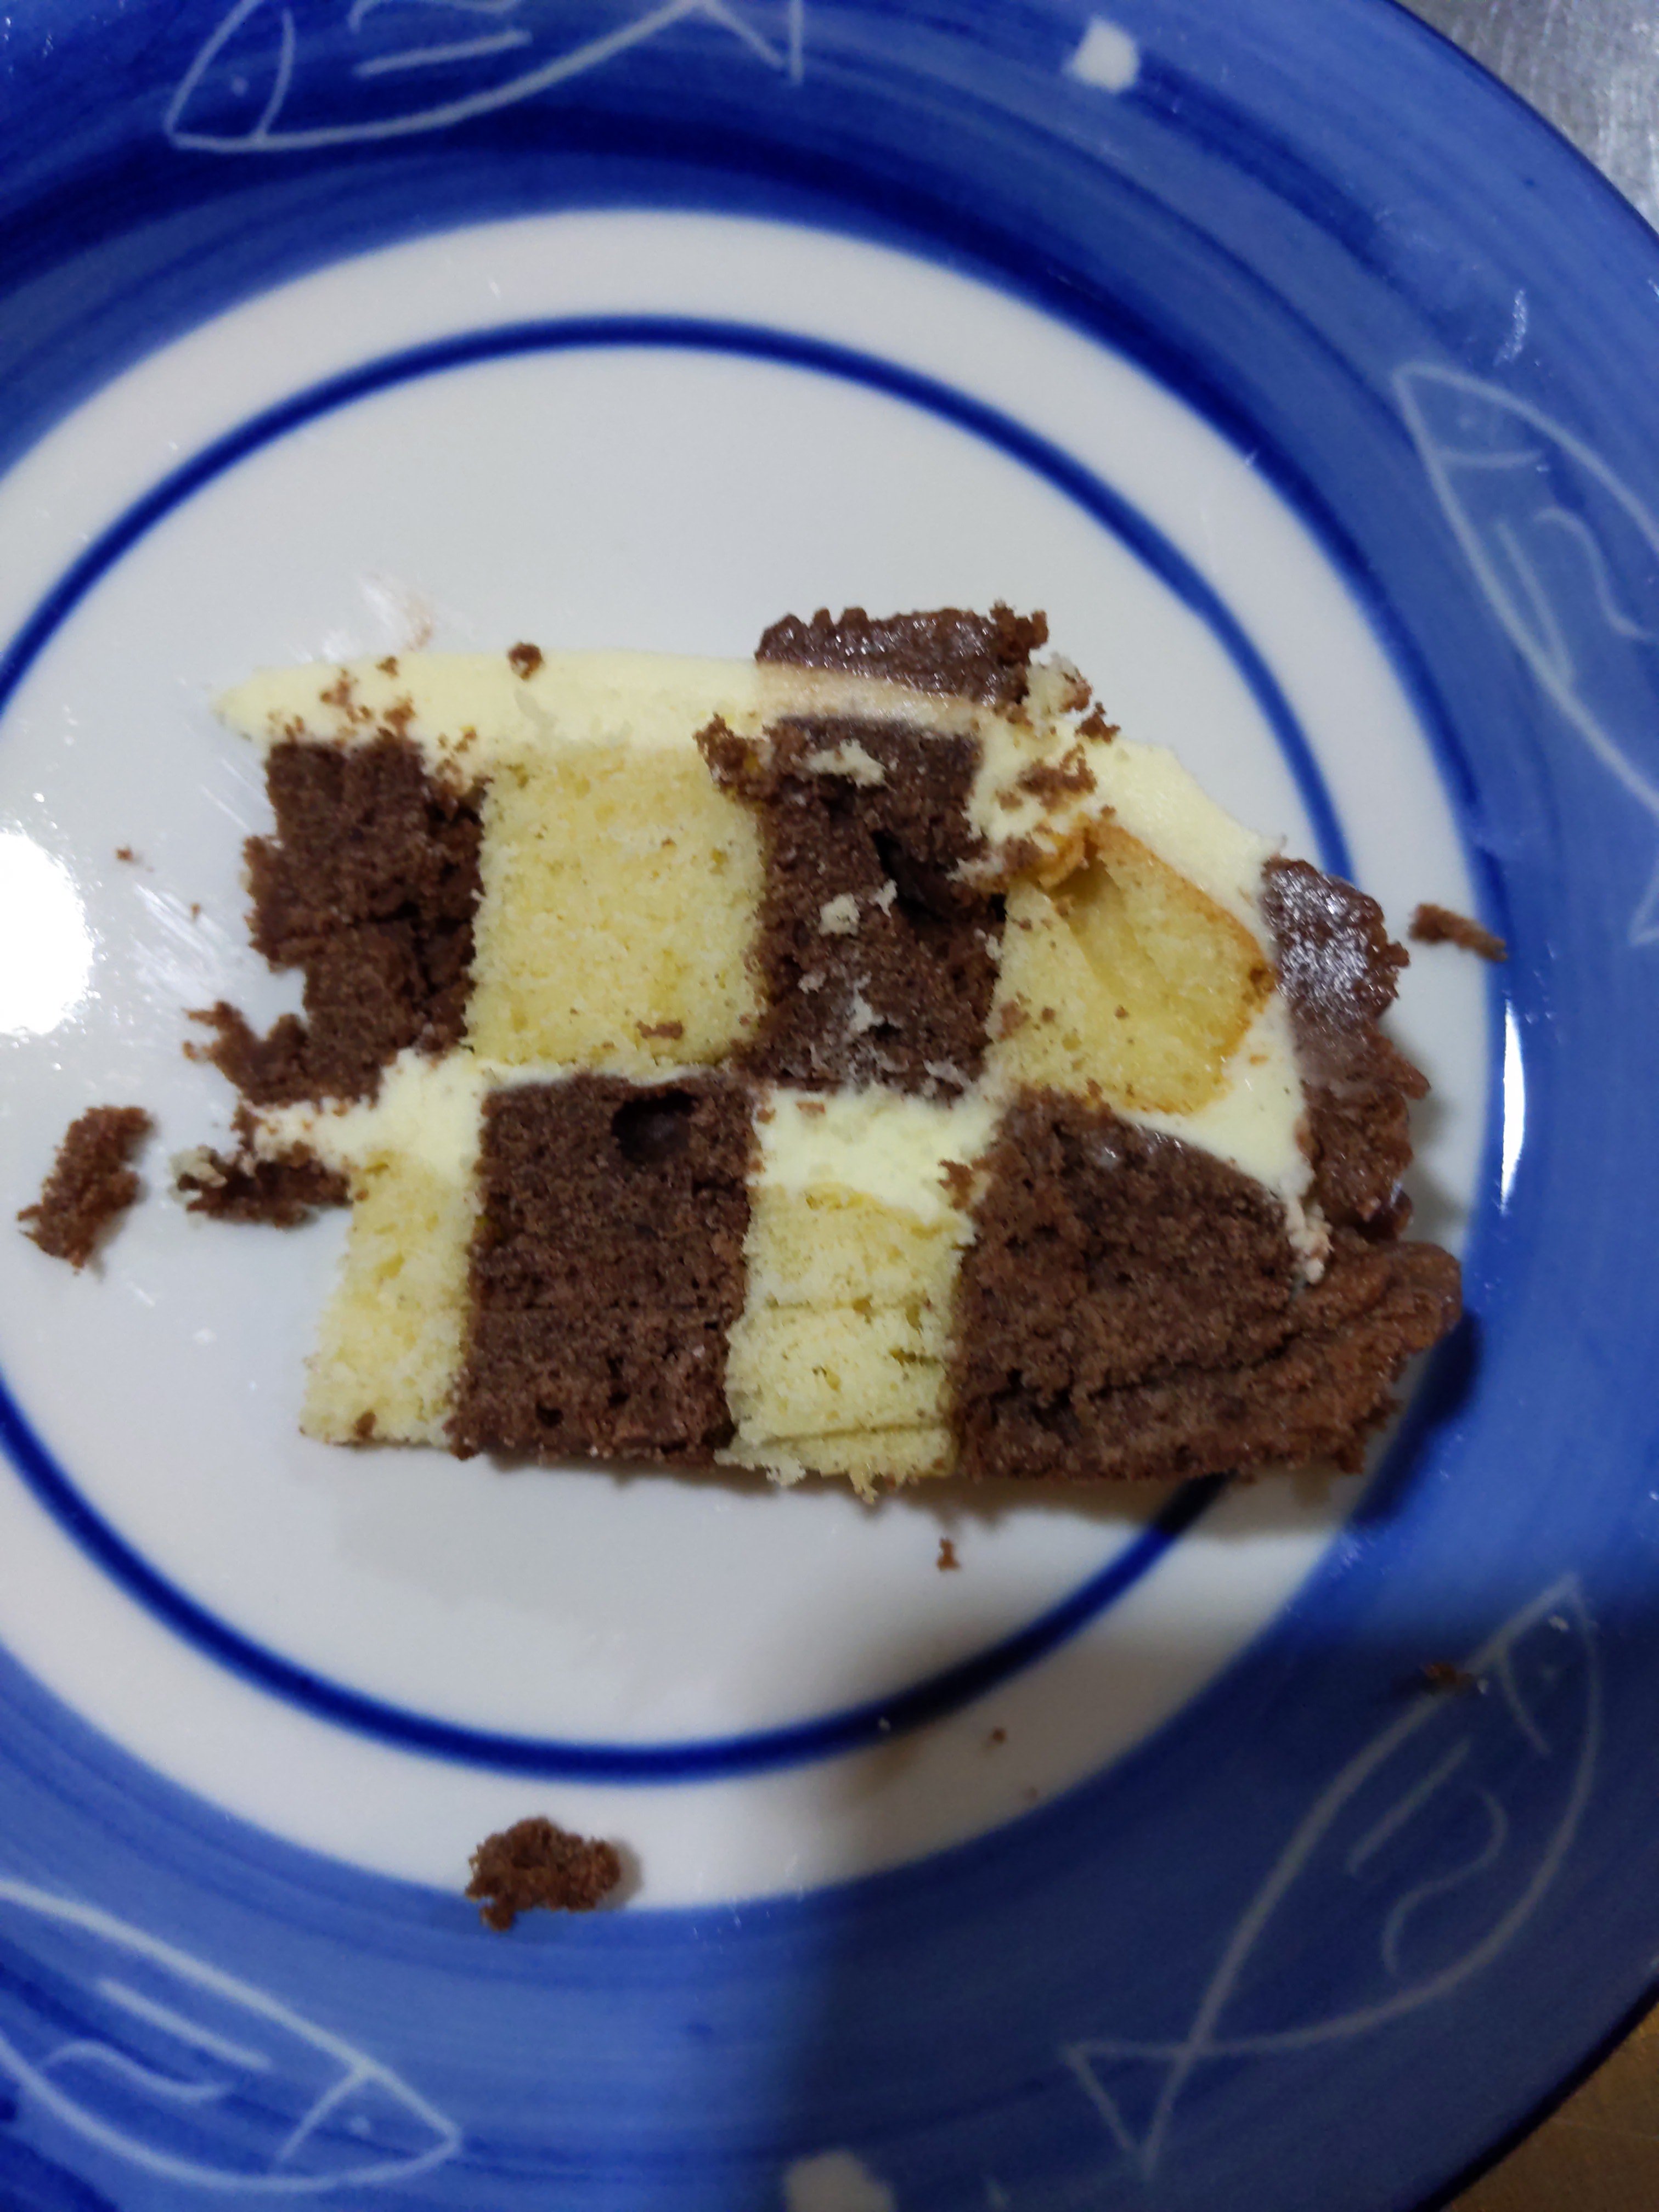
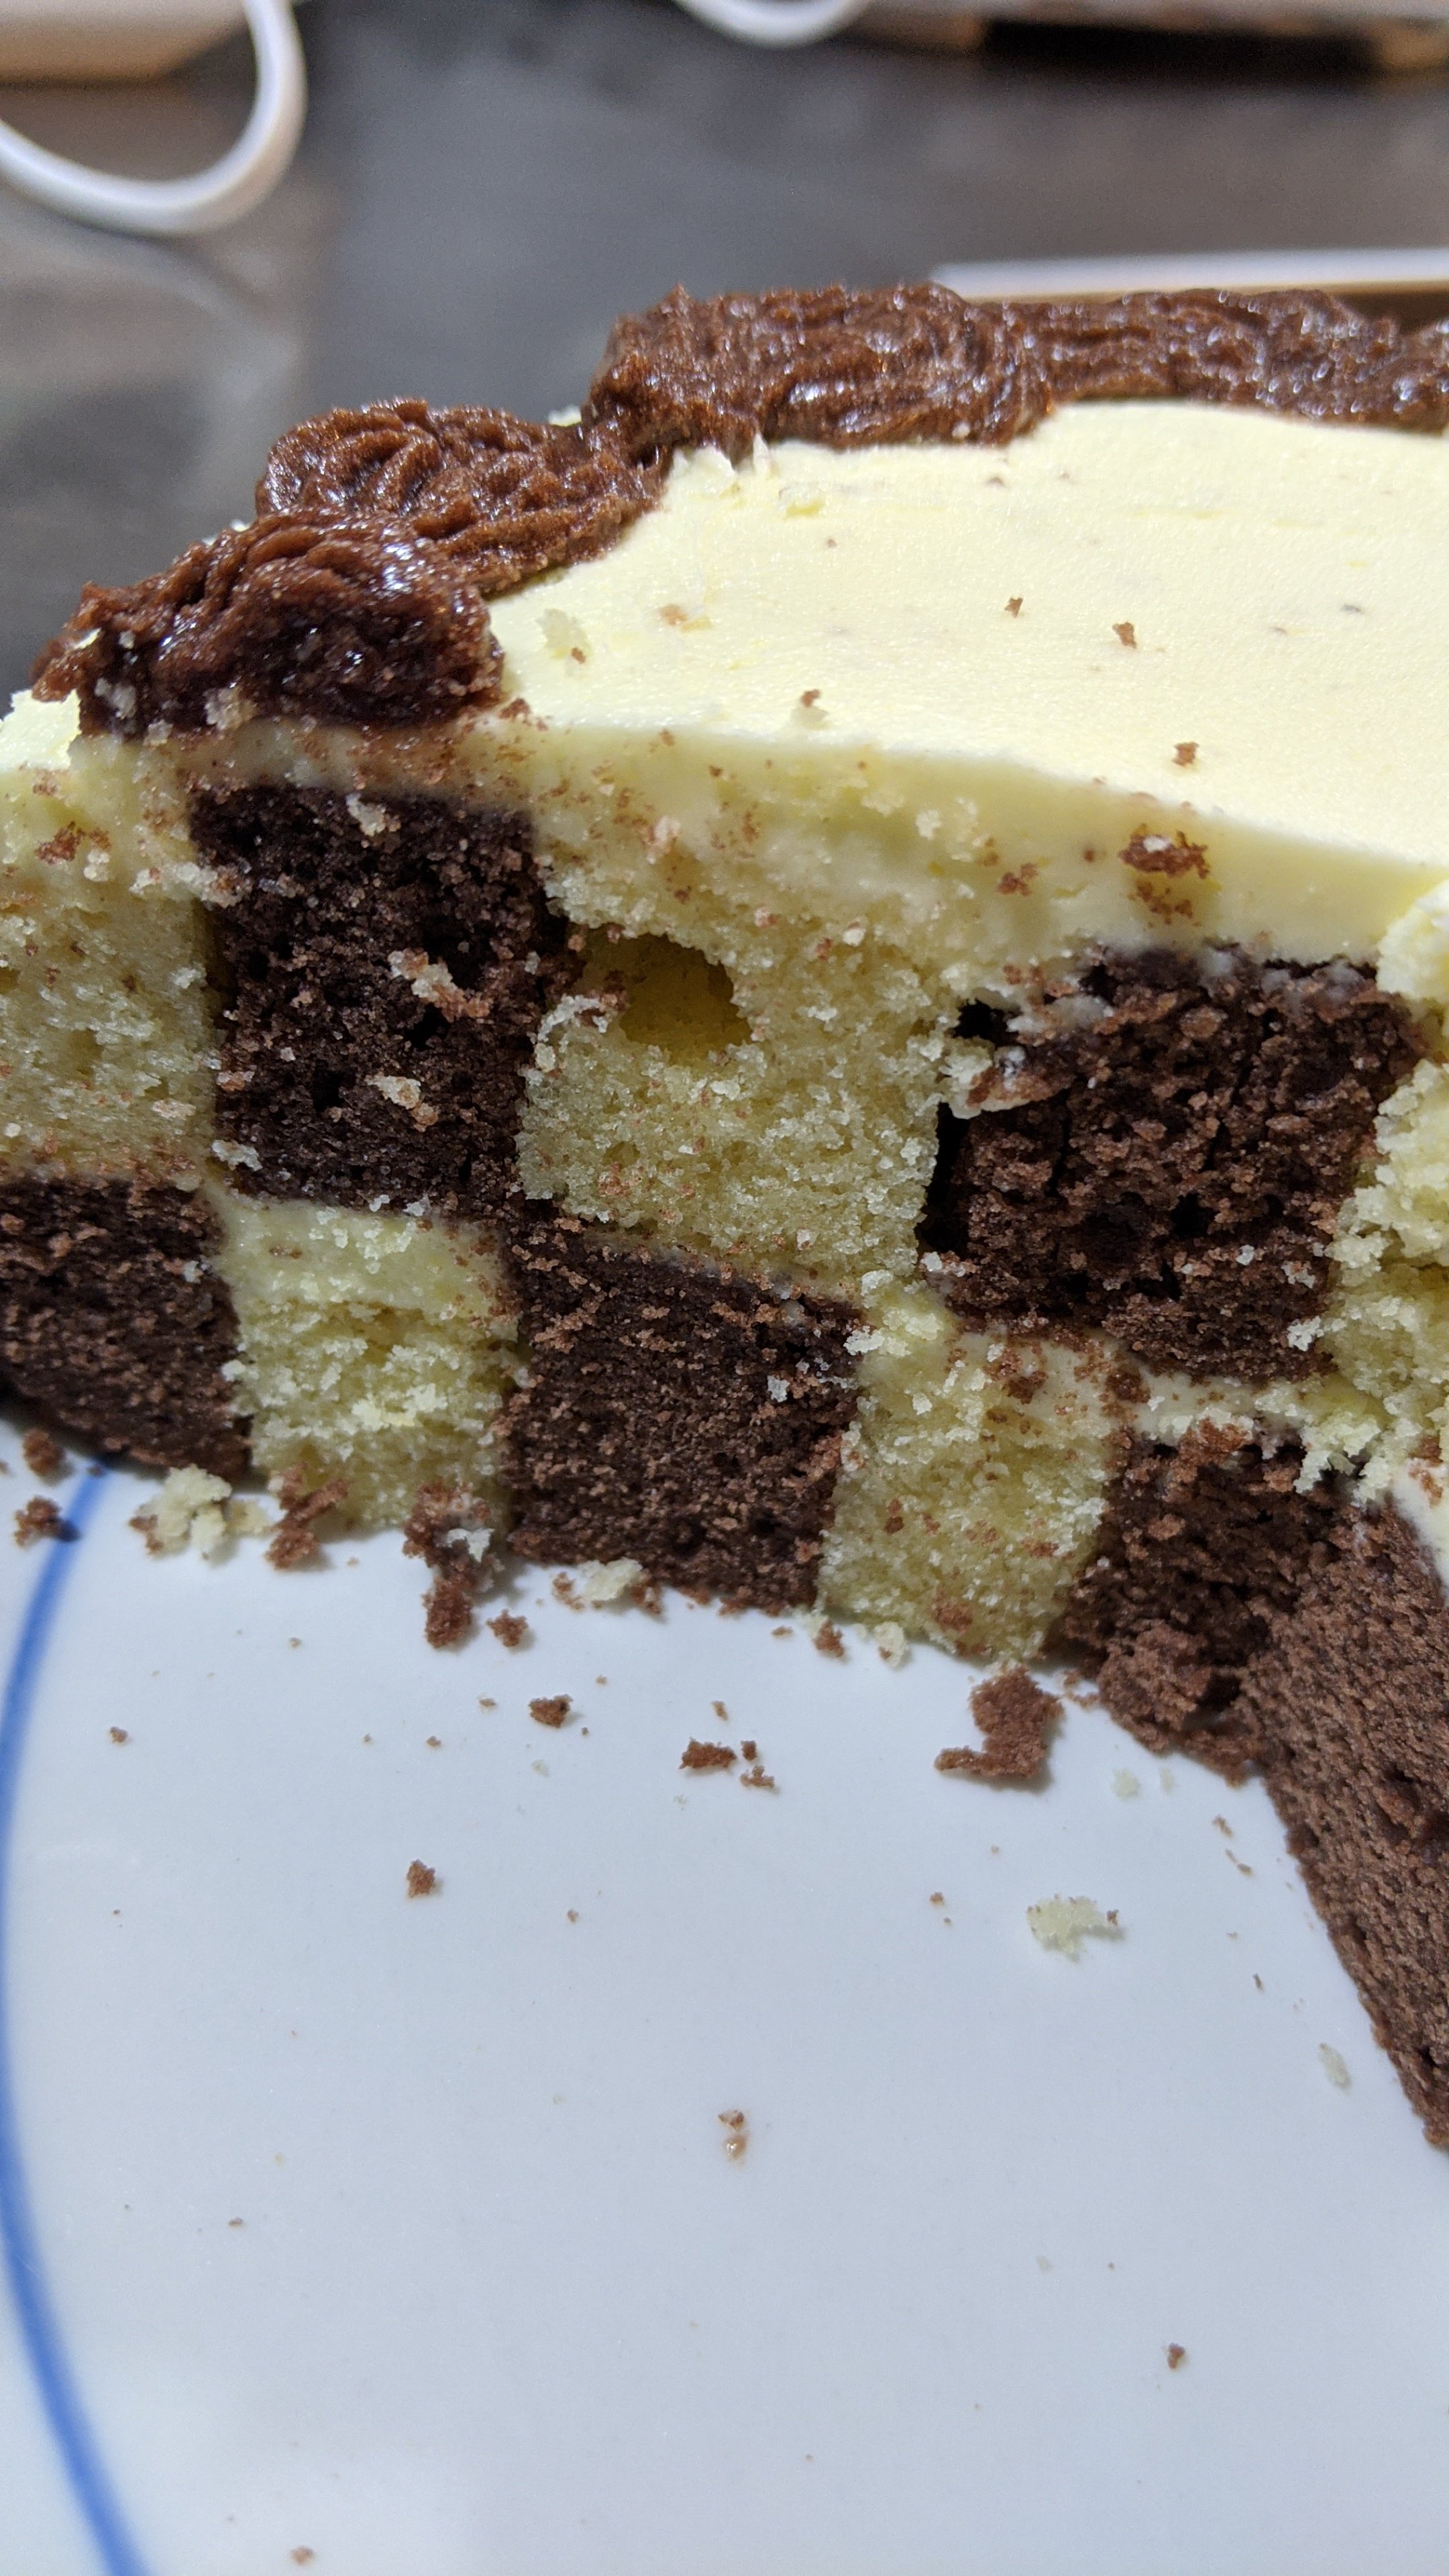
To assemble the checkered pattern, I had to cut concentric circles from the cakes of the same size, then swap the rings around so it alternated like in the picture above. I used various crockery as guides to cut my 2 stacked cakes. Then, very carefully, I separated the rings and restacked them as shown. A layer of buttercream and then the next layer of cake. My chocolate rings kept breaking in half, but it didn’t matter too much as they fit snugly together.
Stack and trim the edges, ready to be cut in concentric circles
Chop chop! I used crockery to help guide my circles
Oops. It broke. No worries, it still worked!
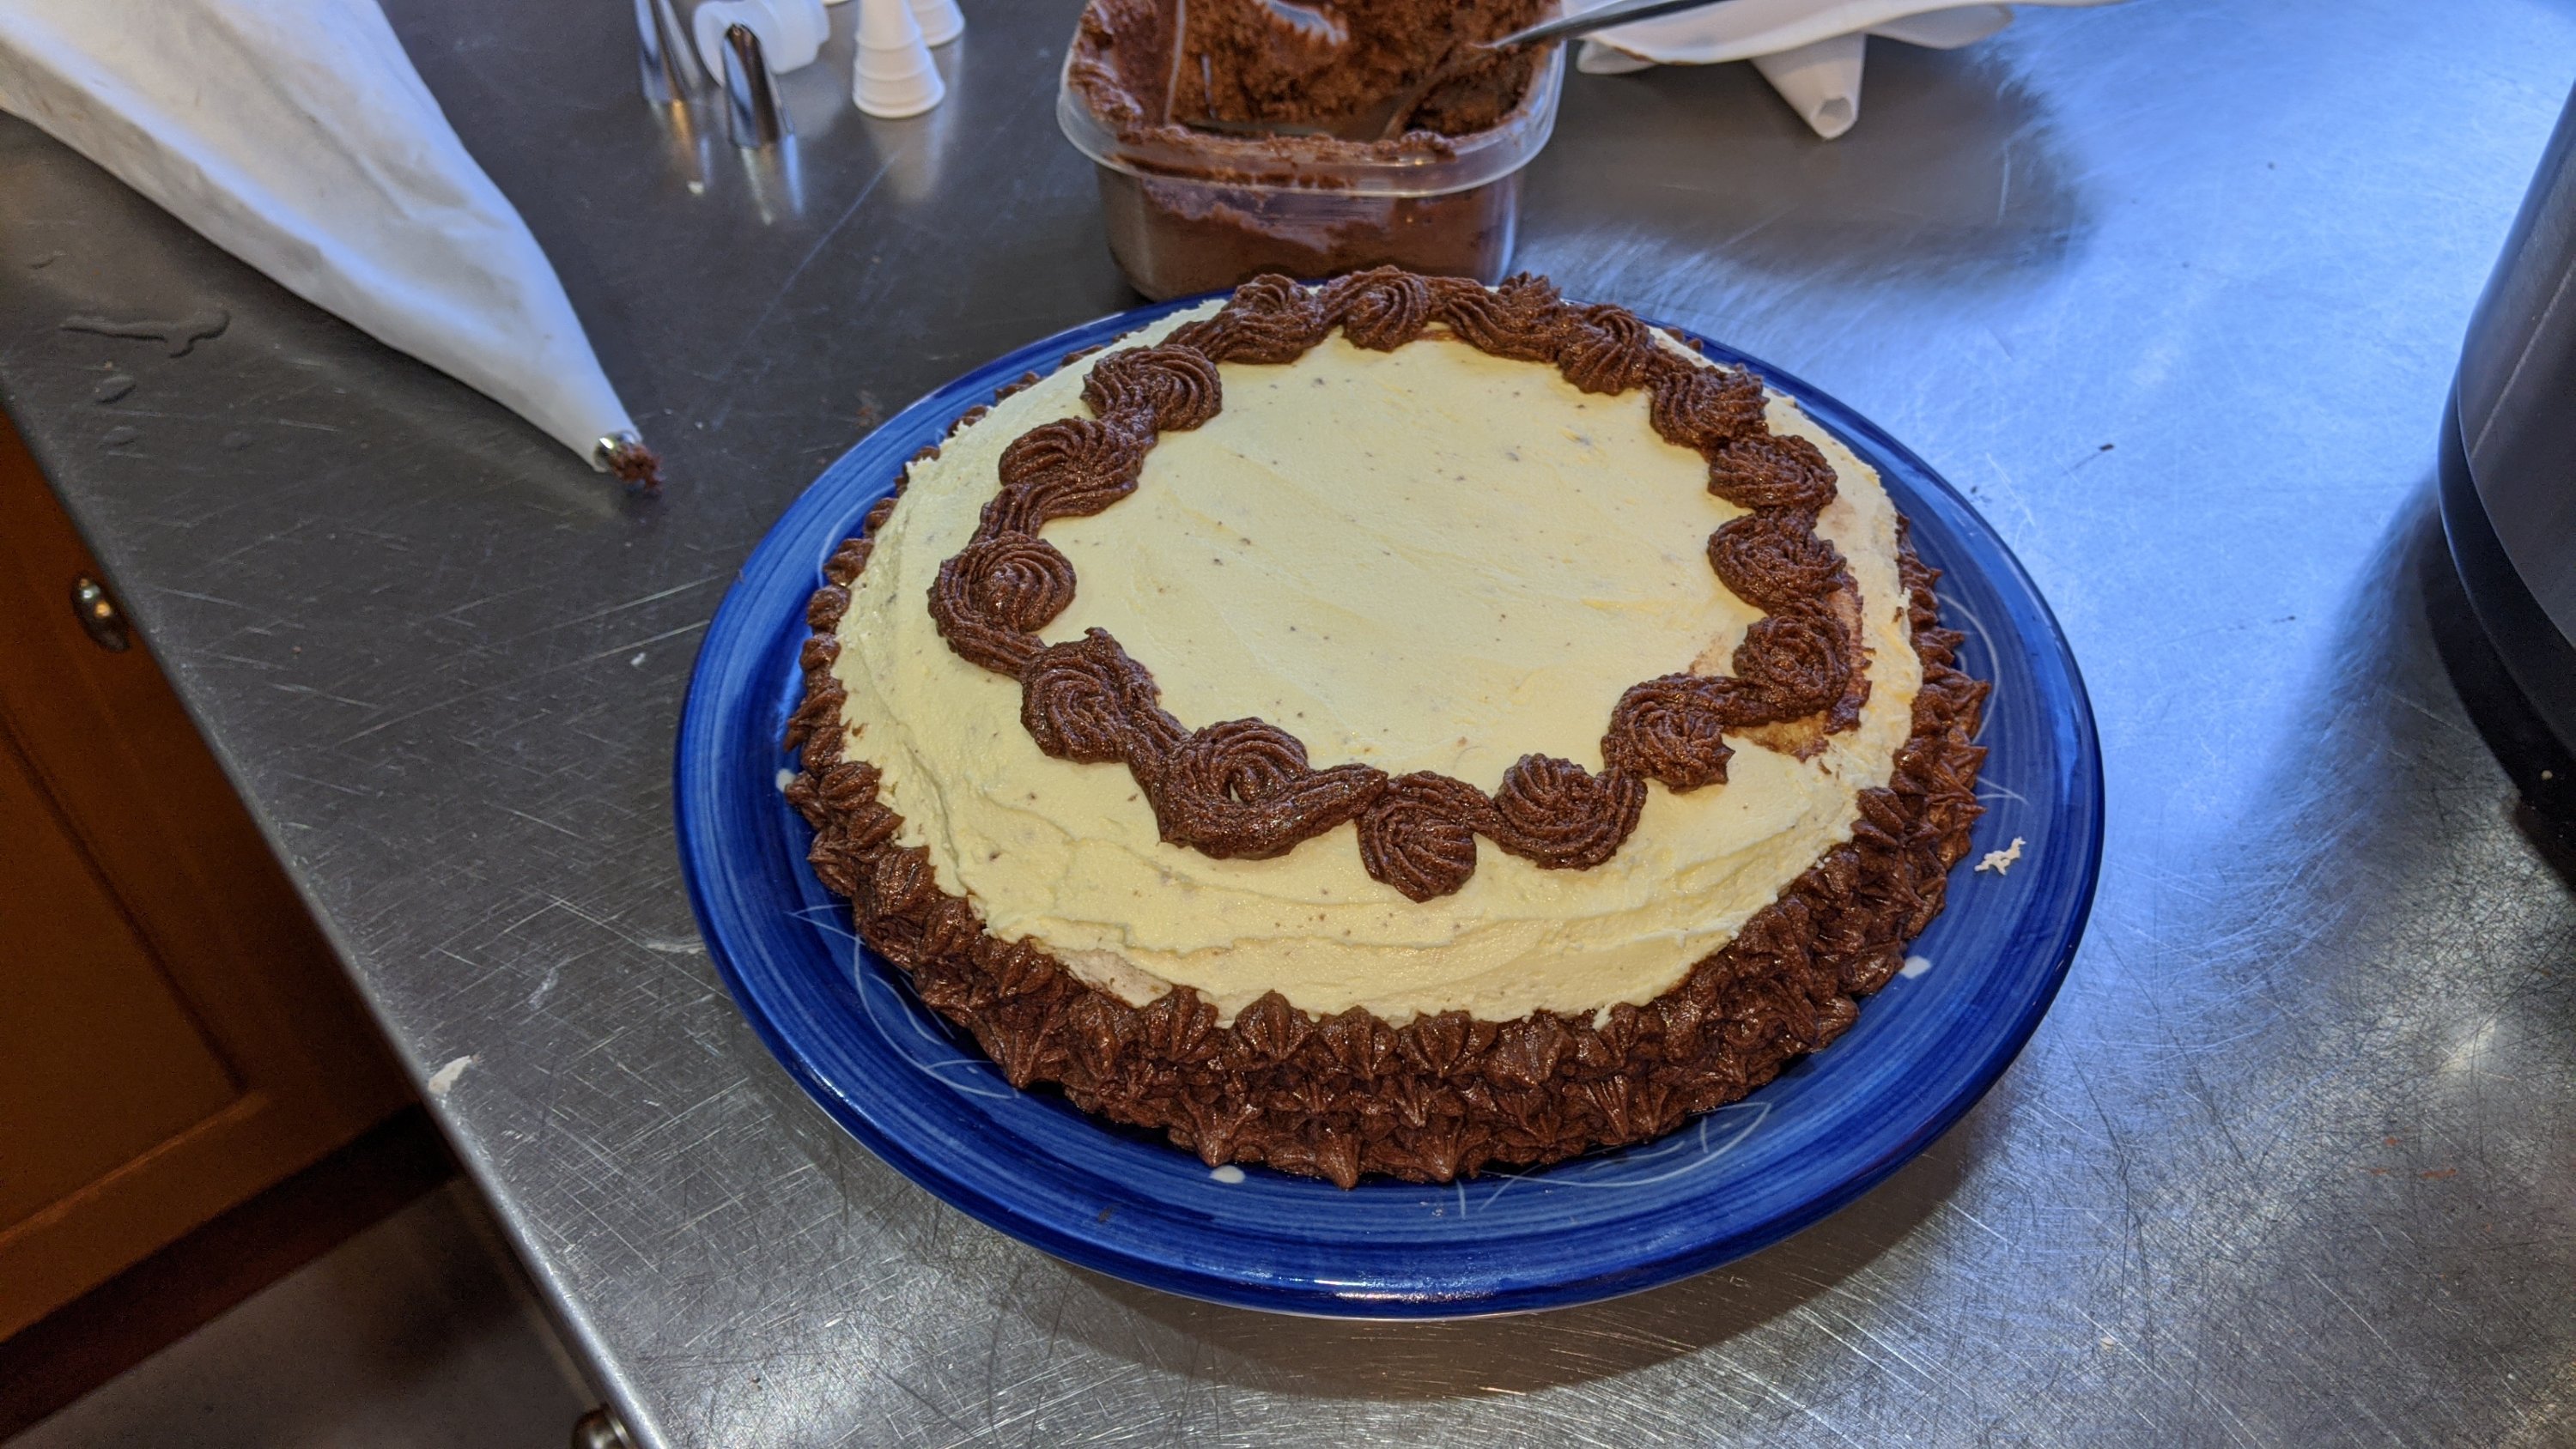
Finally, I iced it and used chocolate buttercream to decorate (and hide the lack of white buttercream around the edges). I wanted to have the edges covered so that cutting into it would reveal a surprise! I am impressed how well it stays together, considering there is nothing binding the rings together. I guess the layers of buttercream are strong in this one.
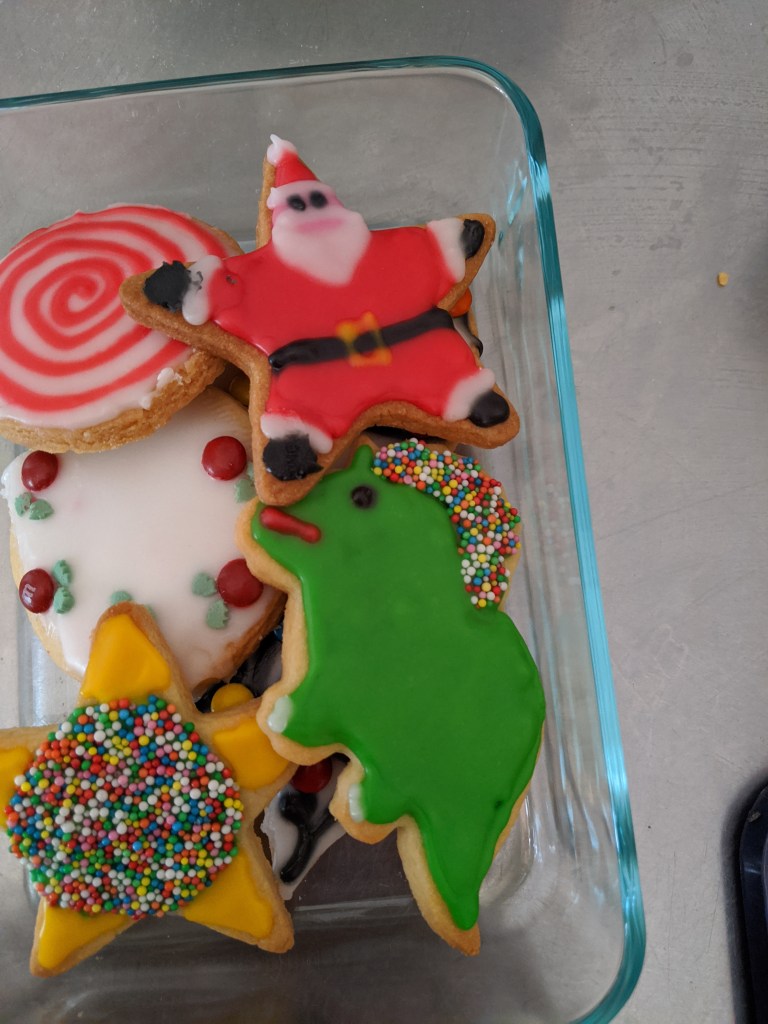
Sugar cookies are a staple for Christmas (for me anyway). But not so much the eating of them as the decorating. As kids we’d get a bunch of coloured icing, knives for spreading it and decorations like mini m&m’s, sprinkles and those shiny sugar balls. Now I’m all grown up and I finally have a decent sized kitchen to make these sugary treats. I used this recipe by Alton Brown to make the cookies, but I wanted to also share my tips on icing (well, mostly I just want to show off these cute things!).
My dough was pretty dry and was cracking as I tried to roll it out, so my support network (thanks Mum!) said I needed more butter, and all was good. I made the recipe twice and it made over 72 cookies… it took 4 hours to ice them all with my amazing support network. Just because it was Christmas didn’t stop me from enjoying some of the super cute cookie cutters I recently acquired – dinos for the win!!
The main this to start with when icing is having a good consistency with your icing mix. You want it to be fairly thick so that it holds it’s shape, but when you want to flood (fill in) a large area of the cookie, it needs to be runny enough that it will end up nice and smooth. Now, theoretically you should have 2 different lots of icing, one for decorating and one for flooding. But stuff that, that’s way too much effort for me. You just have to find a happy medium. Of course, after a day the icing starts bleeding into each other, but maybe it does that anyway?
Once you’ve got your happy medium, you need to outline the area that you’re decorating. Whether that is the whole cookie, or a certain section like in my disco dino design. I outlined the afro bit first, flooded it then dipped it in sprinkles. That’s why it has such a neat edge. Then I iced the rest of the cookie. That’s also how you do the Santa. Outline the red section and flood, then pink, white and finally black. That design is from here.
Dino cookie rocking a sweet disco afro
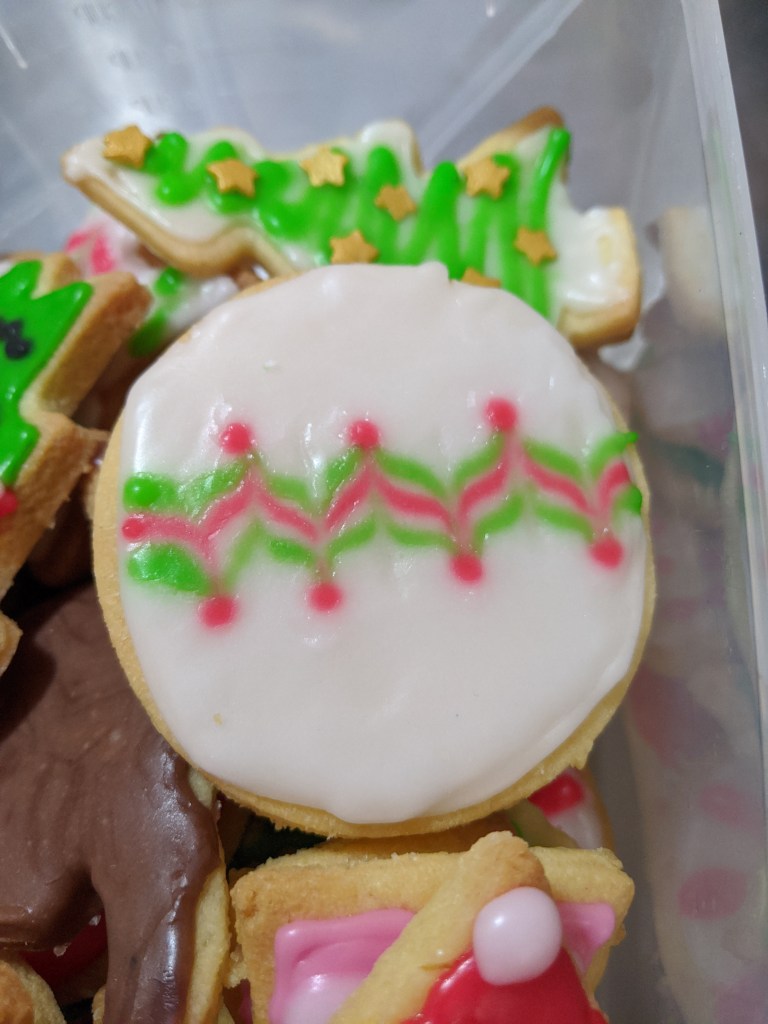
One of my favourite effects when icing is one that I learnt when making vanilla slices. All you do is draw straight lines over and iced surface and then run a skewer perpendicular to them. It creates a pretty wavy/zig-zaggy pattern like on this bauble cookie. I finished off the “points” with a small dot of red. This technique requires icing that is fairly runny, otherwise it will just crack and not flow to create the wave. You can also use this technique to make love hearts. Instead of a line, put a spot of icing on the cookie and run a skewer through it.
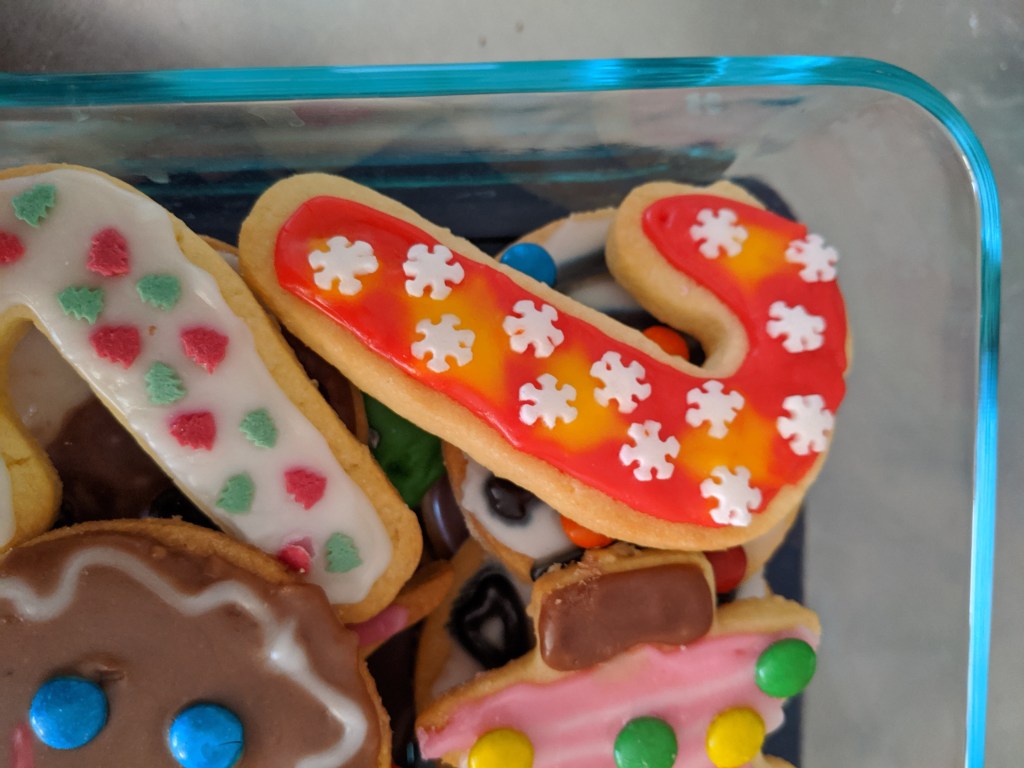
We also used various sprinkle shapes, which worked great at embellishing the cookies like the tree above. It also helped hide mistakes, like this candy cane.
Something I tried out was using icing as an embellishment in itself. By letting the background icing dry, I was able to pipe designs on top of that, and it stayed raised. I’ll have to keep testing this one out, initial attempts are a bit wonky for my liking 😉
Use icing to help embellish cookies. Maybe use a finer tip than mine…
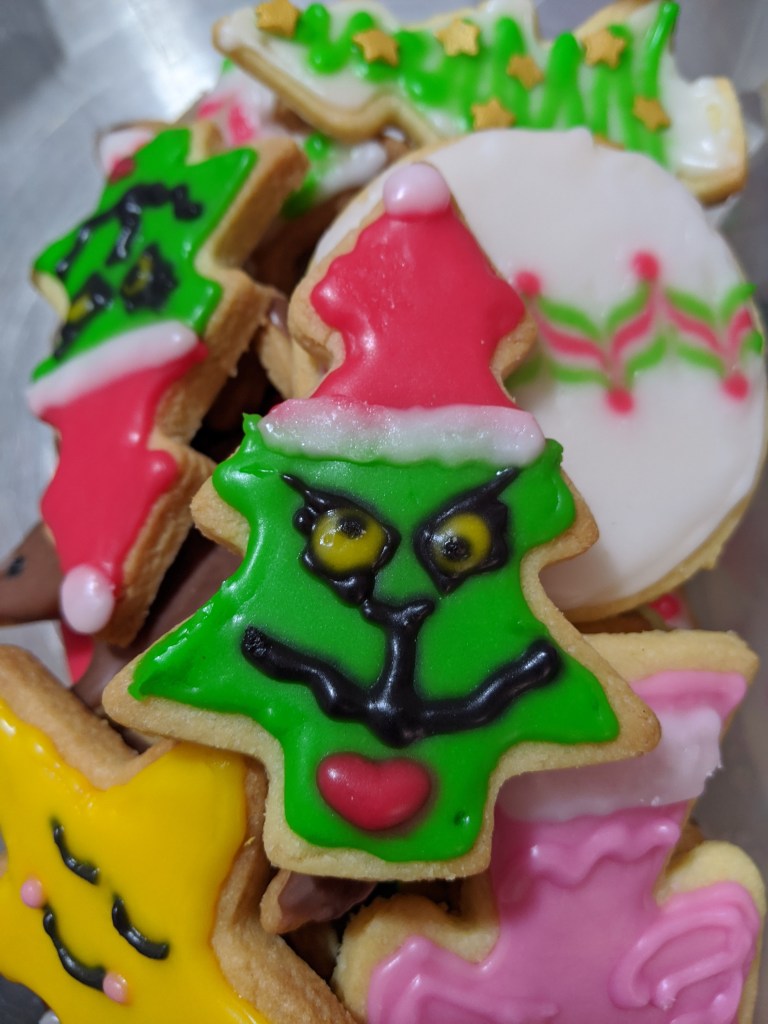
Finally I just want to show off this super cute Grinch that I did. The design was from here.
So I tried making fried rice. I make a pretty mean fried rice normally, but I wanted try something new. I know many fried rice recipes call for “day-old” rice because it is dryer, and I do often find that my rice ends up kinda glue-y when it’s fresh. So I wanted to try drying it and seeing if that helps (because I’m never organised enough to prepare rice the day before, and I don’t often eat plain rice).
So off I go to cook my rice. I acquired a pressure cooker when I moved out of home a year ago. I had never used one and I’m still not entirely convinced that it made cooking faster–either it didn’t or our stove is terrible at heating it… Probably our stove. Anyway. I tried cooking my rice to “al dente” BUT I didn’t have enough water. So I had to put the cooker back on. This is where it gets scary. About 20 mins into the cooking we hear a loud bang and pshhhhh of air and water escaping the pressure release valve. It must’ve been blocked by starch until it actually got enough pressure to actually unblock and release. Unfortunately it also released a stream of boiling water into my kitchen and all over my extractor fan…
Well, I removed it from the heat of course, waited for it to depressurise and then found this mess:
Mmmmm rice starch….
Well, that was a clean stainless steel lid before cooking rice. Not fun to clean.
Needless to say, this experience scared the goodness out off me (what little there was left) and I decided that it was time for this cooker to go. At least my rice was coocked! ¯\_(ツ)_/¯
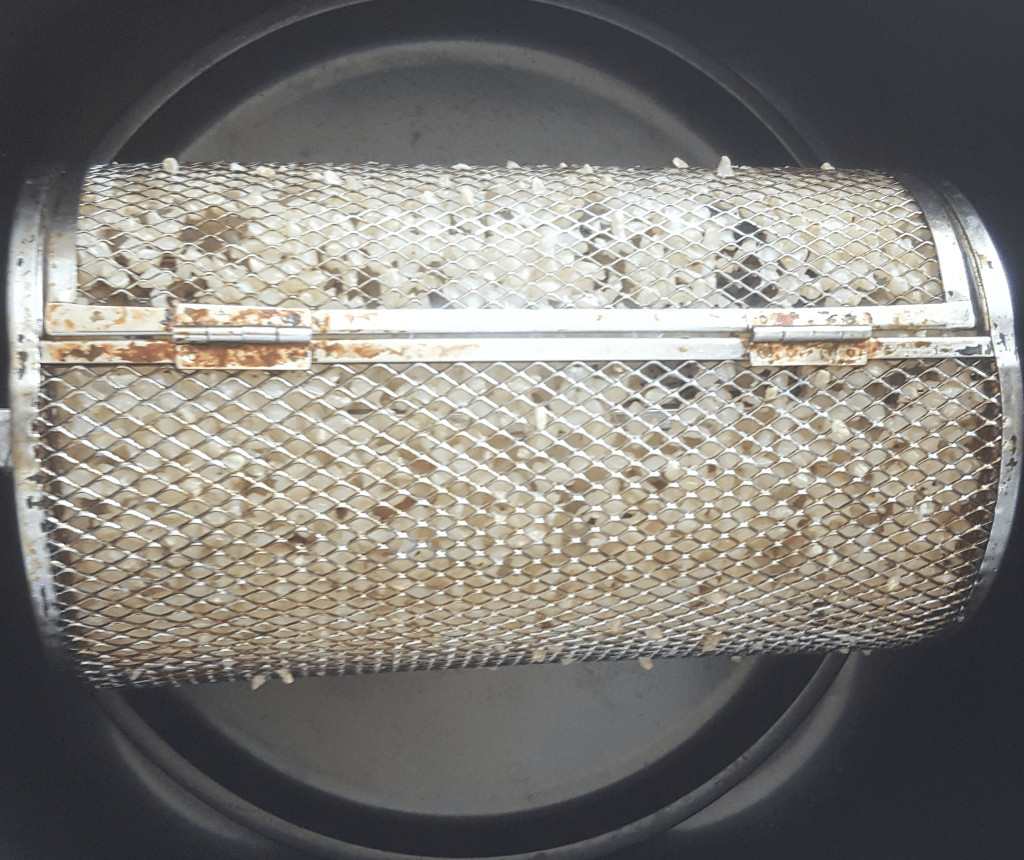
But it was overcooked. So I thought, why not dry it out in my air fryer? I have this basket that rotates and cooks chips really well. Yeah, great idea Beth! It stuck. Badly. All around the cage on the inside and on the little bits that help turn the chips over… It was gross. I spent ages trying to scrape it out using a spatula. The rice was dry though so I guess that’s a small win.
Cooked rice stuck on my air fryer basket
I ended up making fried rice and it was pretty good. I just wanted to share this ridiculous journey. Do not air fry rice in a basket and always clean your pressure cooker between each use!!!!
Separate the eggs and whip the egg whites until stiff peaks form. Set aside.
Strain the strawberry syrup through a sieve to remove chunks and seeds.
Add the egg yolks, caster sugar, vanilla essence to the syrup and beat until light.
Gently fold in the egg whites and then the flour.
Pour into a long baking pan lined with baking paper and oil. You may need to encourage the batter into the corners
Bake for 15 minutes or until a skewer inserted comes out clean.
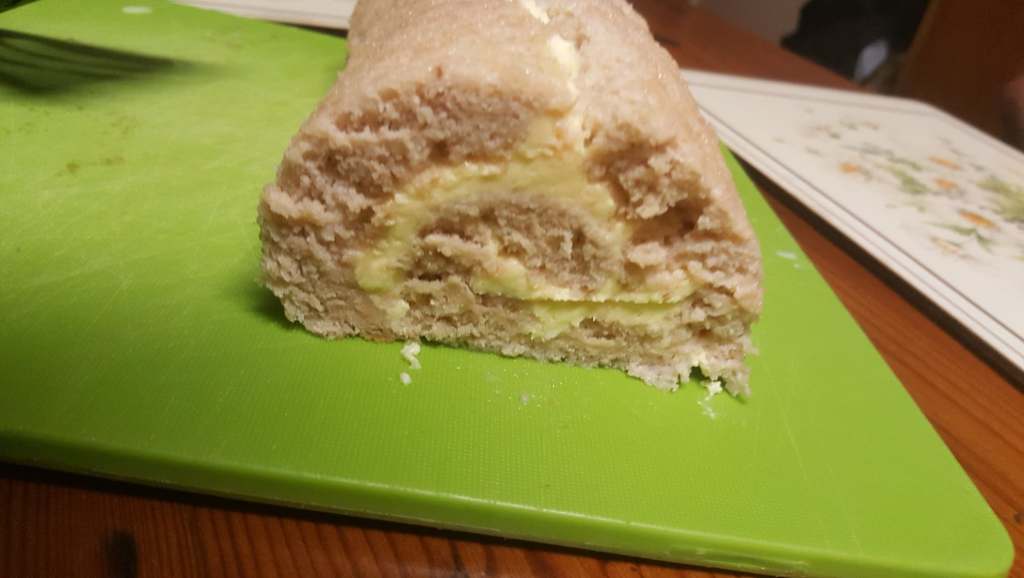
Cool for 5 mins then sprinkle with icing sugar. Roll along the long edge (as in, tuck the shortest side under for your first roll), keeping the baking paper on the sponge. Roll it firmly. A tight roll here gives a tight roll when you add the cream.
Set aside to cool on top of the edge of the sponge.
Cream
Melt the white chocolate and about half a cup of cream in the microwave. Be careful not to overdo it 30 sec burst at first, white chocolate burns easily. Mix between heating until chocolate is smooth.
Allow the chocolate and cream mix to cool (I left it for 8 hours, probably only really needs 30 mins).
Add in the rest of the cream and whip. Be careful not to over-whip, as it is very easy to do with the white chocolate incorporated. I over-whipped it twice…
Assemble
Allow for both the cream and the sponge to be at room temperature (if not cooler).
Carefully unroll the sponge and slather on the cream. Make sure to go all the way to the edge.
Roll the sponge back up without the baking paper. Serve and enjoy!!
While this blog is about baking, I think it is relevant to talk about where I get my ingredients. Bulk food shops, like The Source are shops where you bring your own containers (or use their paper bags) and scoop out your own groceries. There are several reasons for this, but for me the main reason is to try and limit the use of plastic packaging. Now, I wanted to go to one of these places for ages (ie. 4 months, since I moved out of home) and yesterday I managed to go.
So off I went, armed with my 4 jars and can-do attitude. Now, not all bulk food shops are the same. Apparently, some only weigh your container after you place your ingredients in it. Imagine using a glass container, which can easily weigh 500g by itself. That can quickly add up.
Happily, The Source weighs your containers before you put your groceries in them, so all you’re buying is the product itself.
I spent a good 20 minutes or so just looking at the products they had on offer. Lots of flours, sugars, sweets, herbs spices and teas (including Rooibus! Yum!). There was also dishwashing liquid, shampoo, conditioner and oils. They even had a “make your own peanut/almond butter” station, where the machine grinds peanuts or almonds depending on the day and smooshes it out. So many different things were on offer! It definitely did not cover all the things that I would get during my normal grocery shop, but it will be great for my baking.
I got a few things to try–spelt flour, corn pasta, choc covered macadamias and some little Easter eggs. The macadamias were delicious! The right ratio of chocolate to nut (ie 1000000:1), and the chocolate was good quality too. I wasn’t keen on the Easter egg, it tasted like Raw food, which I don’t enjoy. I’m looking forward to trying out my spelt flour, I haven’t cooked with it yet, so I’m curious to see if it is any different to basic wheat flour.
I was having the family over and wanted to wow them with some homemade bread rolls for our burgers. I had made bread before, so how different can rolls be really?
As always, I trawled through Pinterest to find a recipe I liked. I landed on this one. Crunchy but soft in the middle. Perfect.
I’ll say it again: I don’t follow recipes. So instead of mixing and kneading the dough myself, I got my bread maker to do it. Now is a good time to mention that I have a single measuring jug, so the amount of water I use is always a guesstimate. However, despite my first class honours, I thought 1.5 cups of water equated to 425ml, instead of 375ml. Not a huge difference, but when I came back to my dough an hour amd a half later, I found it overflowing the baking tin and sticking to the sides of the bread oven. Oops.
The dough was also incredibly sticky and had huge bubbles of air in it. I tried using it as is, but that wasn’t going to happen. I ended up using probably an extra cup of flour just so I could handle the dough. I portioned out the rolls and let them rise again (I had to really work th dough. So much for low effort). I baked the rolls, and was intrigued to see the process. I have only made bread in my bread machine, so I never really see it cook.
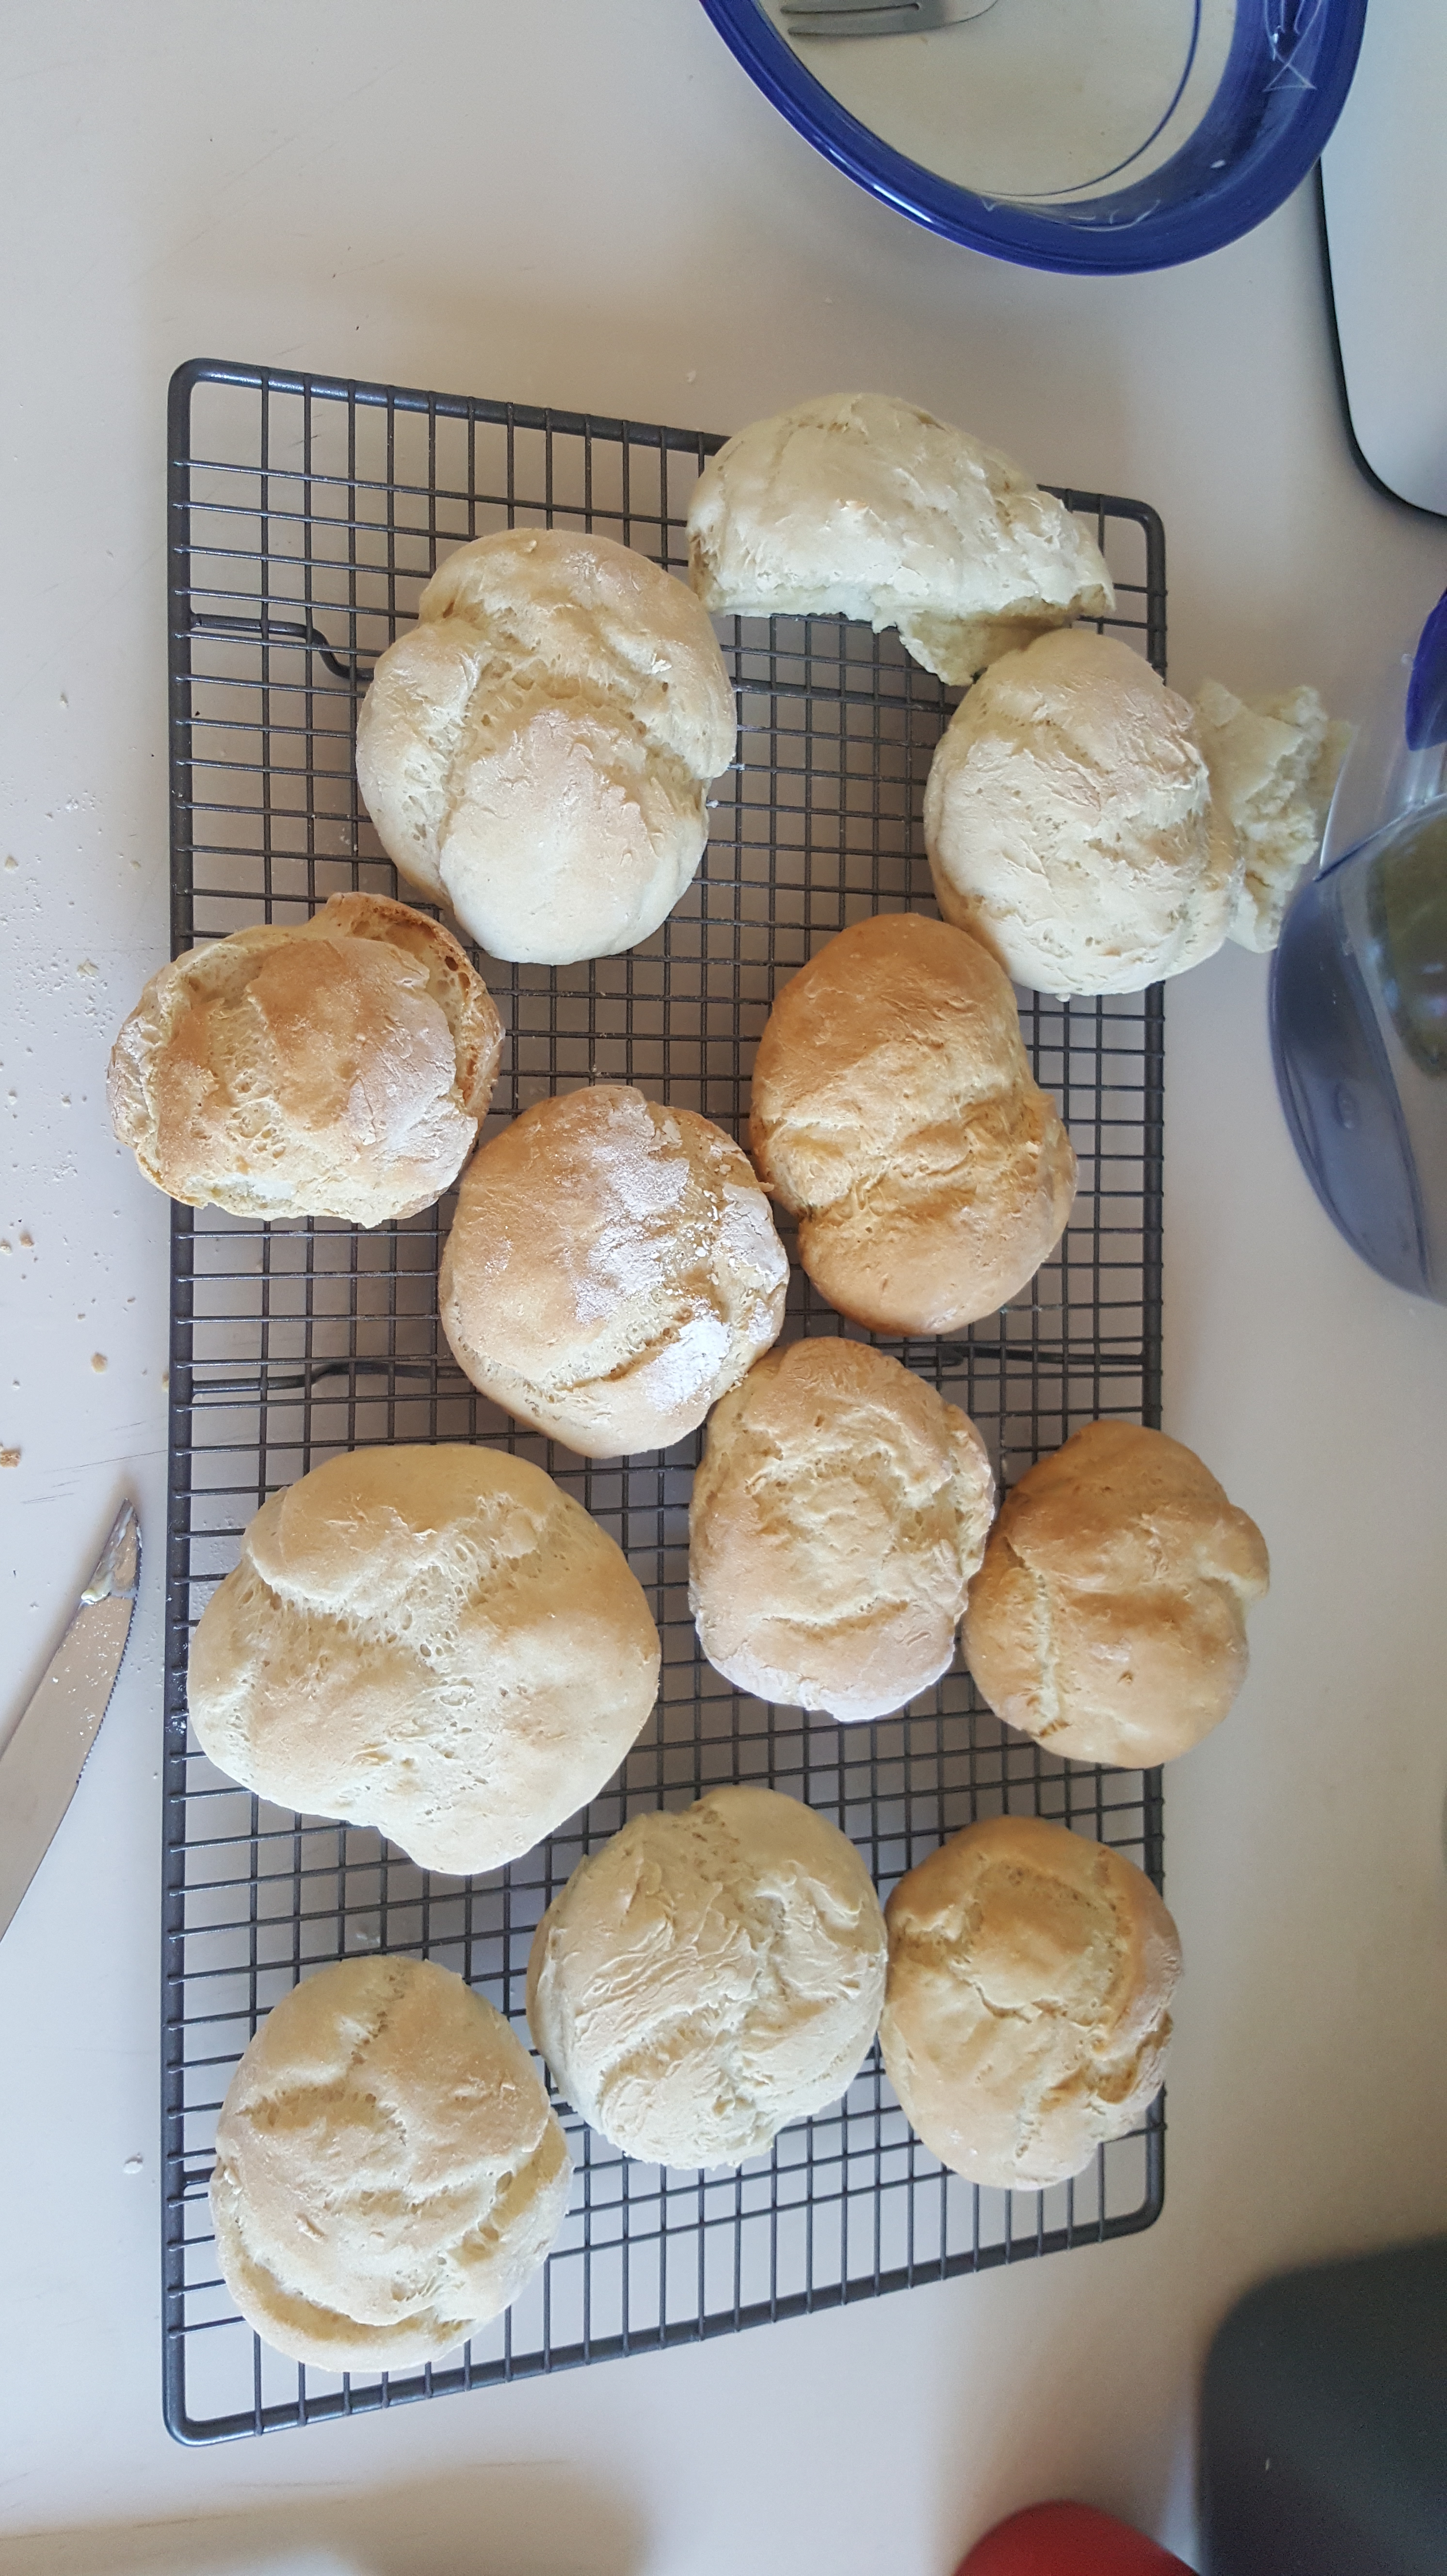
The rolls came out pretty well, some I cooked for longer to get a darker crust on them. I actually prefered the lighter crust ones, and I had them over the next few days warmed up in the microwave with a chunk of butter melted in. My family were all suitably impressed, although the rolls were a bit small and flat to be good burger rolls. I think I might need more practice 😉