Melt butter, honey and vanilla essence in a saucepan over medium heat. Simmer until mixture thickens and goes a darker honey colour. Remove from heat
Add the rice bubbles and mix to combine.
Line a baking tray with baking paper and spread mixture evenly. I wanted to press it down with my hands, but it seemed too hot, so I chickened out and used the spoon.
Refrigerate until set. Mine only took an hour, but was quite thinly spread.
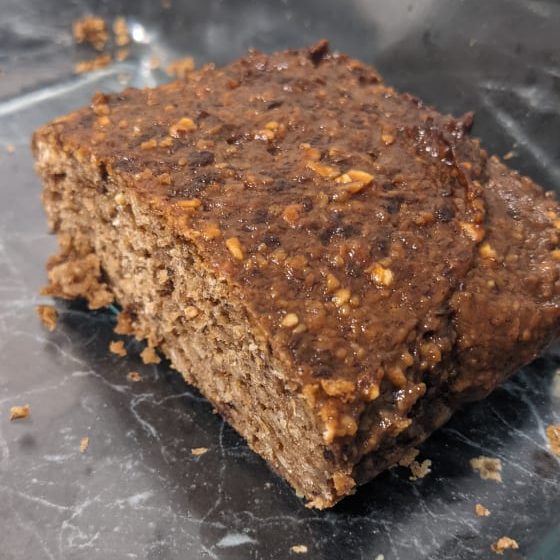
My partner and I have recently bought our very first home. We love it, especially the giant backyard! Our lemon tree is prolific, but I generally don’t like lemon flavour. It makes avoiding waste somewhat tricky! I happened to also have some frozen strawberries in my freezer from last season which needed to get used. I came across this recipe for Strawberry Lemon Bread by TastyOven, which was a huge hit at a family gathering. I like it because it has less sugar than many other recipes AND it uses olive oil instead of butter (one less thing for me to change!). I have made it a few times since then with varying results. This is today’s rendition (the recipe is here):
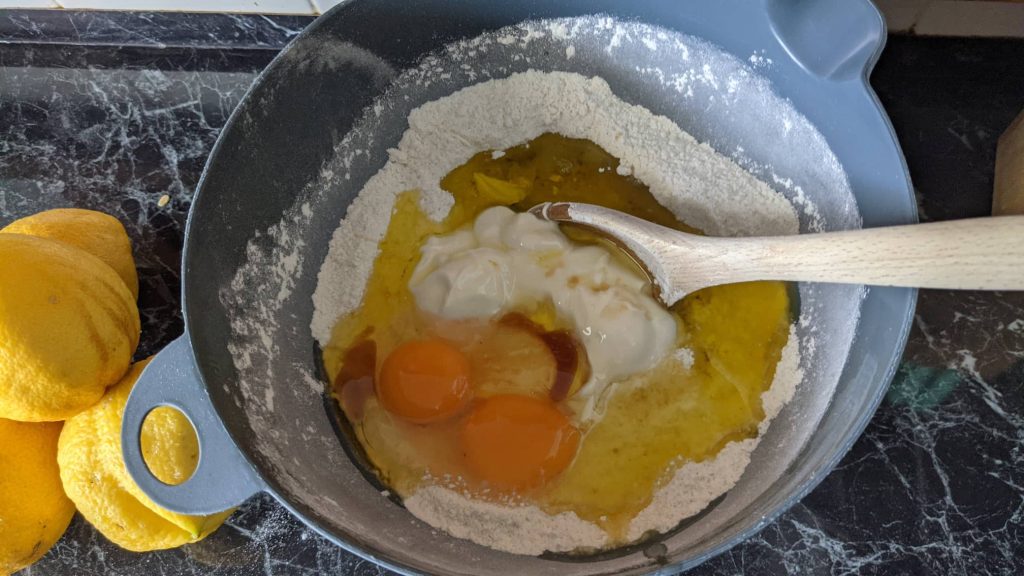
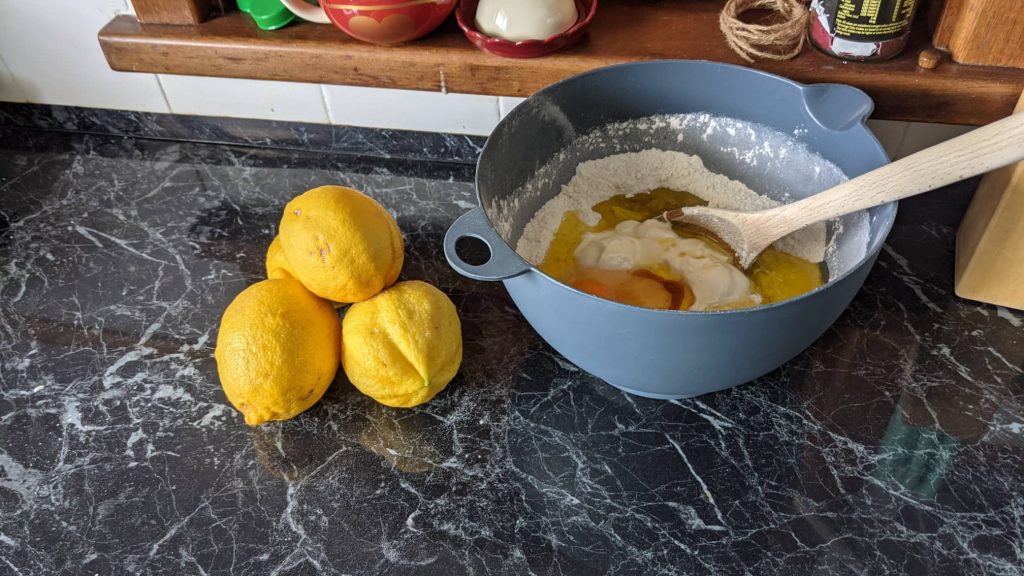
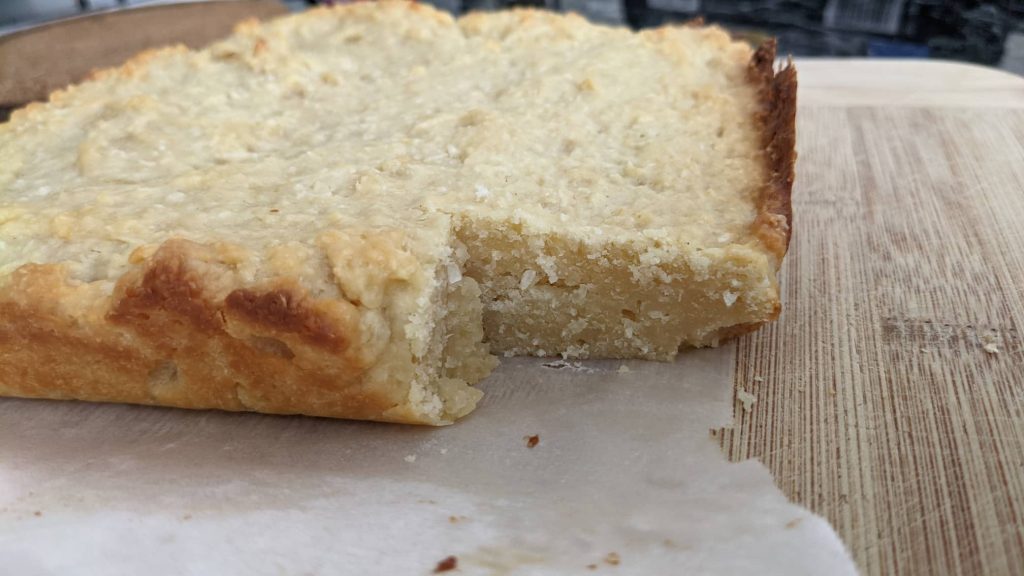
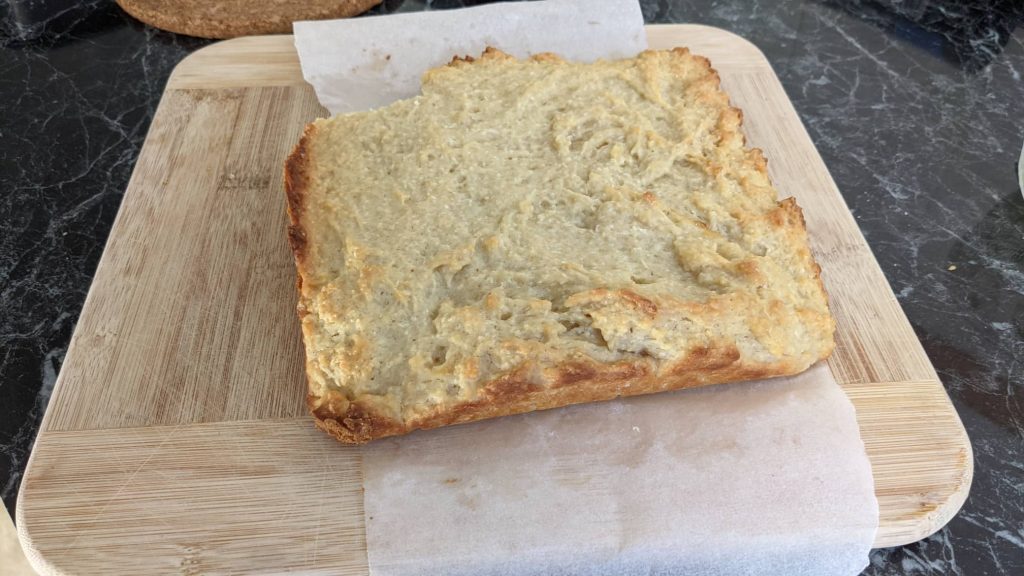
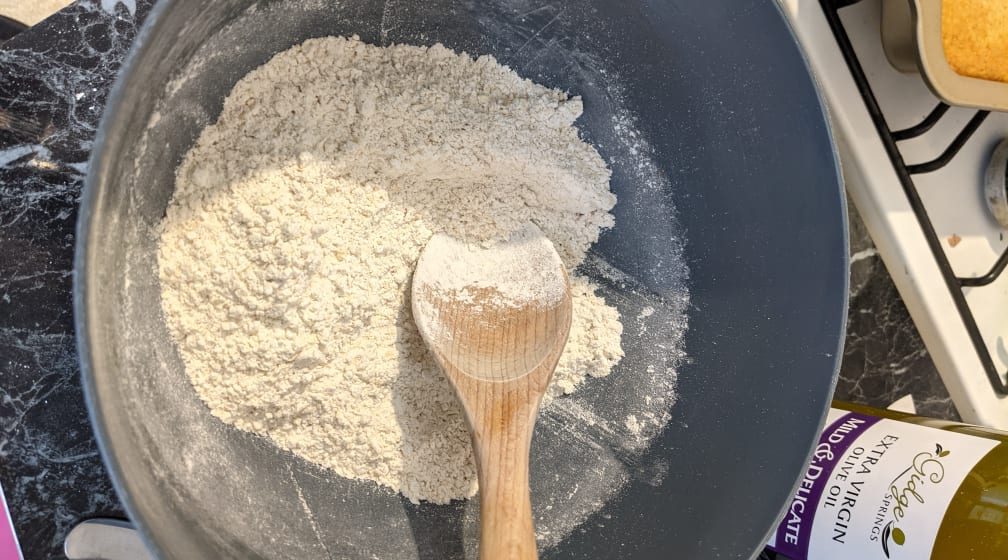
I didn’t have strawberries, so this is just Lemon Bread. It’s such a simple recipe: combine dry ingredients, add wet ingredients, stir and bake. I still managed to muck it up. I forgot to add baking powder and turn my plain flour into self-raising flour. Doh! That is why the finished product is so flat. I also had to substitute the milk for yoghurt, as my milk had turned sour yesterday. I decided to add a half cup of dessicated coconut too, just for fun 😉
The batter is happy to see me!Yes I legitimately stacked those lemons there before deciding to write this as a post.
The cake turned out very dense and flat (thanks to the lack of rising agent), but very flavourful. Almost too flavourful for me! For the full recipe click here.
Psych! I’m still here! I’ve been busy moving house and changing jobs, but I’ve still been baking! (Except that month where we bought take out almost every night and ate it in bed because we hadn’t set up the lounge room…)
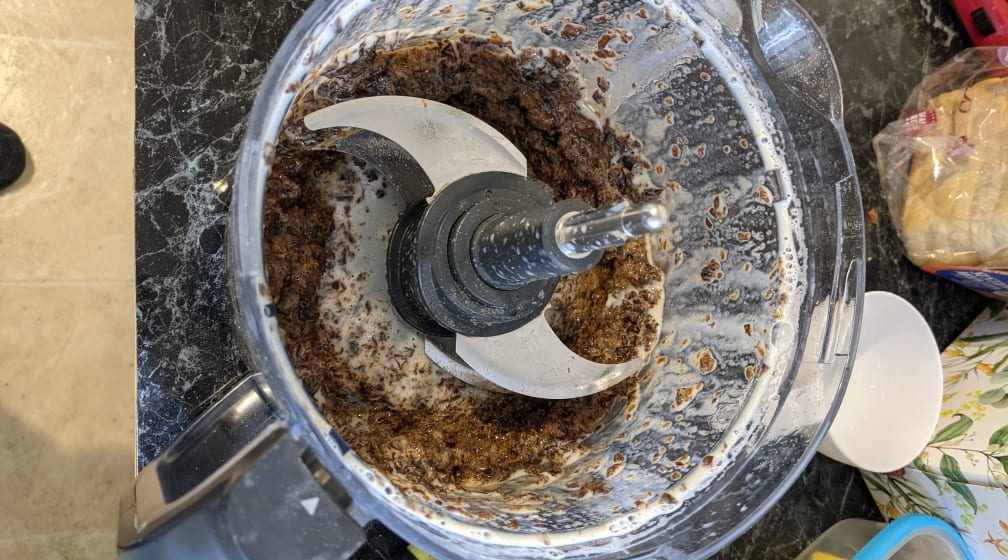
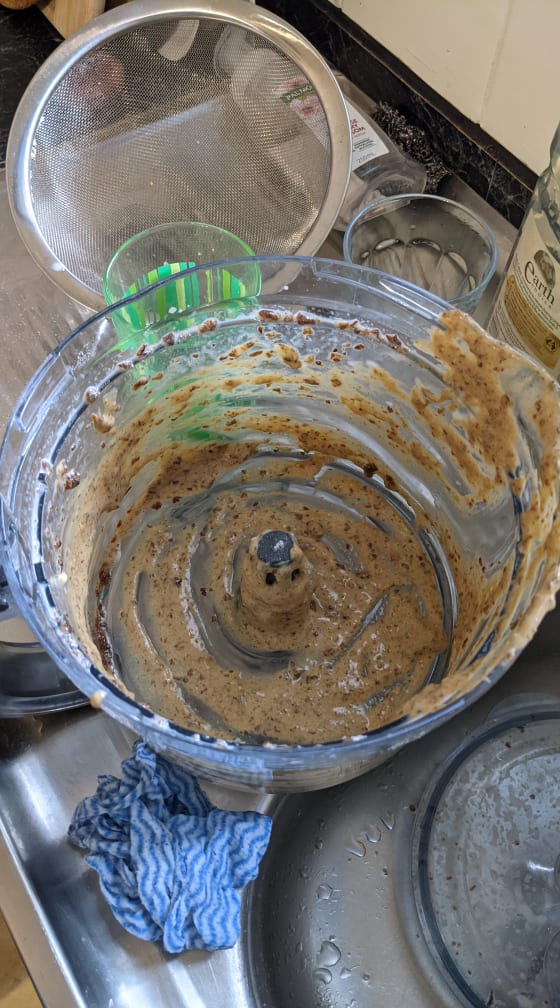
Recently, I got some old bananas off my Buy Nothing page and I have discovered the joys of non-refined sweetners! At work the cook makes this date loaf that is SO SWEET but has no sugar! Totally blew my mind. So I thought I’d give it a go. I used this recipe from Yummy Addiction as a base, but guess what! I changed it. I’m good at this following the instructions thing. I’ve had prunes in my cupboard for over a year (back when I was gonna try more high fibre foods. Yeah that never happened…), so I substituted the dates for prunes. Waste not, want not!
I can’t comment on the difference because I have never made this recipe before (or cooked with dates/prunes). The loaf definitely had a different taste to ‘normal’ banana bread, less banana, more prune. Still pretty darn yum though, considering there’s no refined sugar 😀
So mix the dry ingredients. Ok flour… uh oh. I used all but a cup of flour for a different recipe not an hour ago. Bahh. Never fear! I always have oats, so I chucked them in my blender to try and make flour (this is how the pros do it right? XD ) It wasn’t terrible, but there were definitely large chunks of oats in the finished product. Ok, salt, powder, oh cinnamon? Easy. Oh I don’t have any, well, I’ll use a little extra nutmeg. Oh look, there’s the cinnamon. time to try and spoon out some nutmeg and replace it with cinnamon. *face palm*.
Right, so blend the dates and butter milk (ie. milk with a dash of vinegar, coz I don’t have space for another carton in my fridge!), till smooth… or not crazy chunky. My blender didn’t quick get it to the stage where I would call it ‘smooth’ but it turned out fine.
mmm chunky
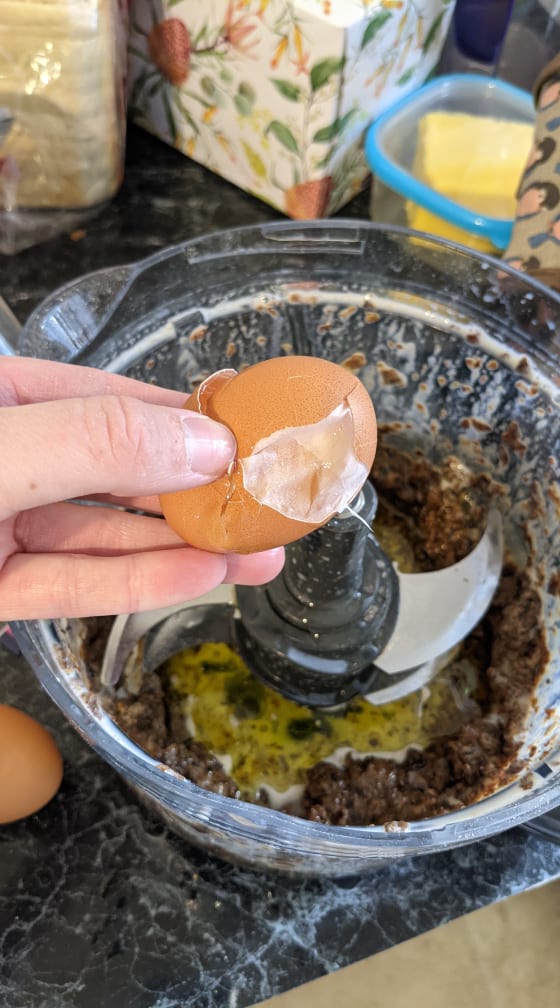
I added the other ‘wet’ ingredients to the blender (probably could’ve done it all at the same time) but replaced the butter with olive oil, fresh from the farm 2 weeks ago. I’ve never had an egg refuse to crack, but this one almost got the better of me.
Add it all together, but don’t overmix! Time to cook! No need to preheat the oven, what with my fancy (and very old, but new to me) gas oven. I’m not scared of it at all, what are you on about?
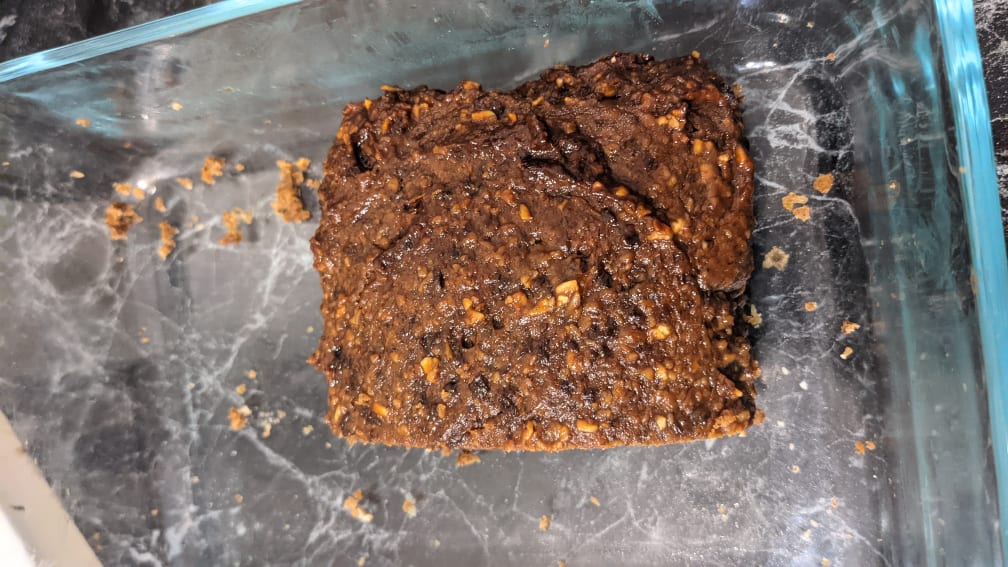
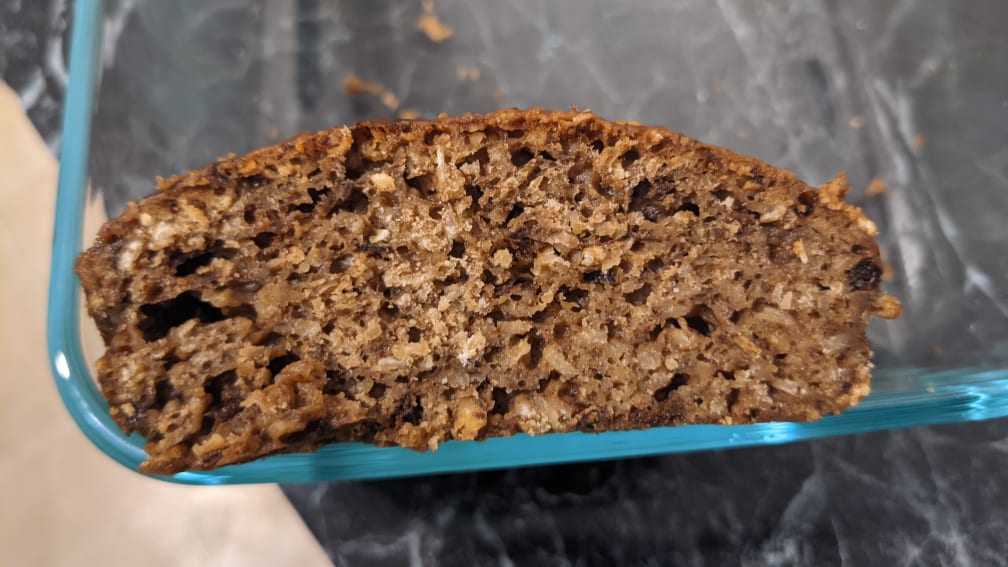
It looked and smelt gross going into the oven and coming out. But it actually tasted quite good. I honestly didn’t expect to enjoy it, but this morning I toasted some and put some butter on it an oh my goodness it was good. It’s stayed out on my bench for the past week and is still ok, still moist and ok to eat fresh.
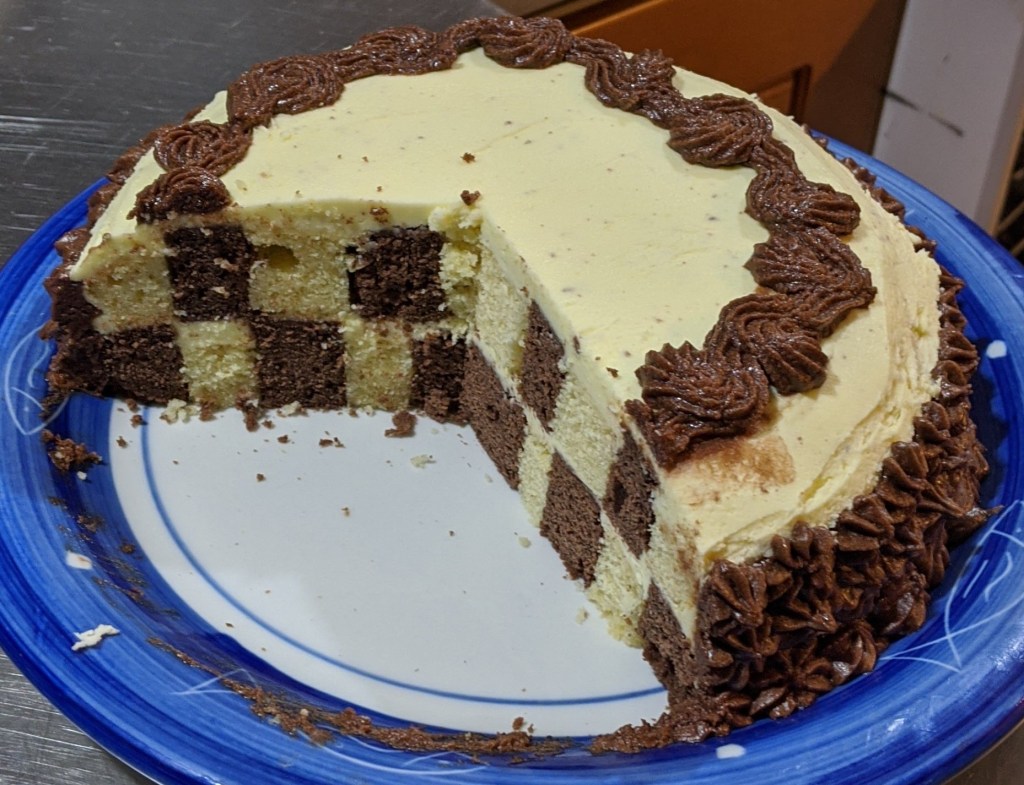
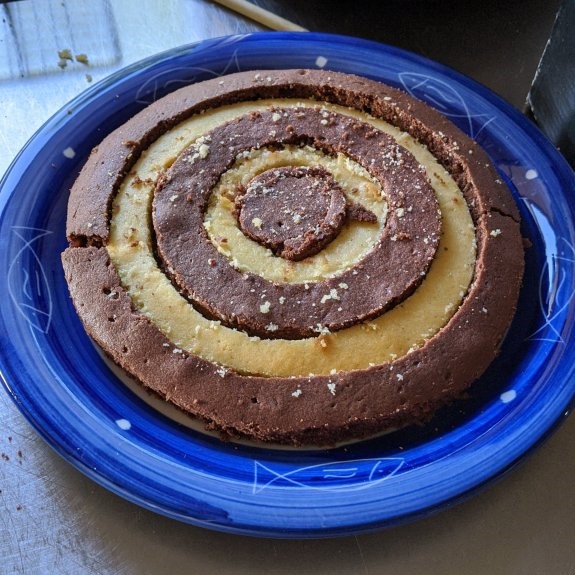
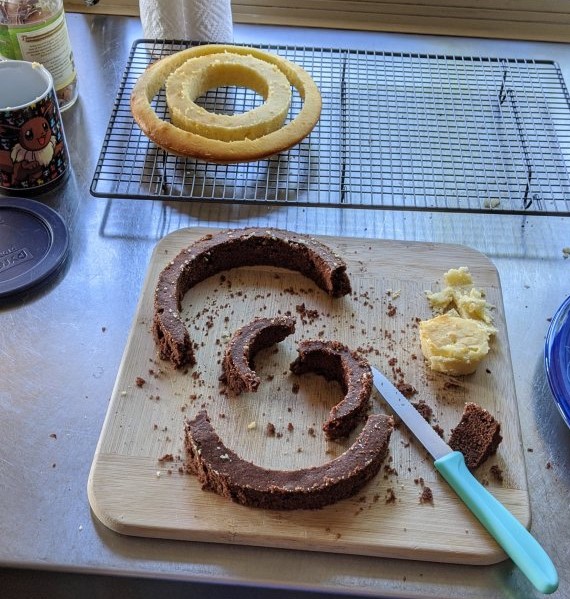
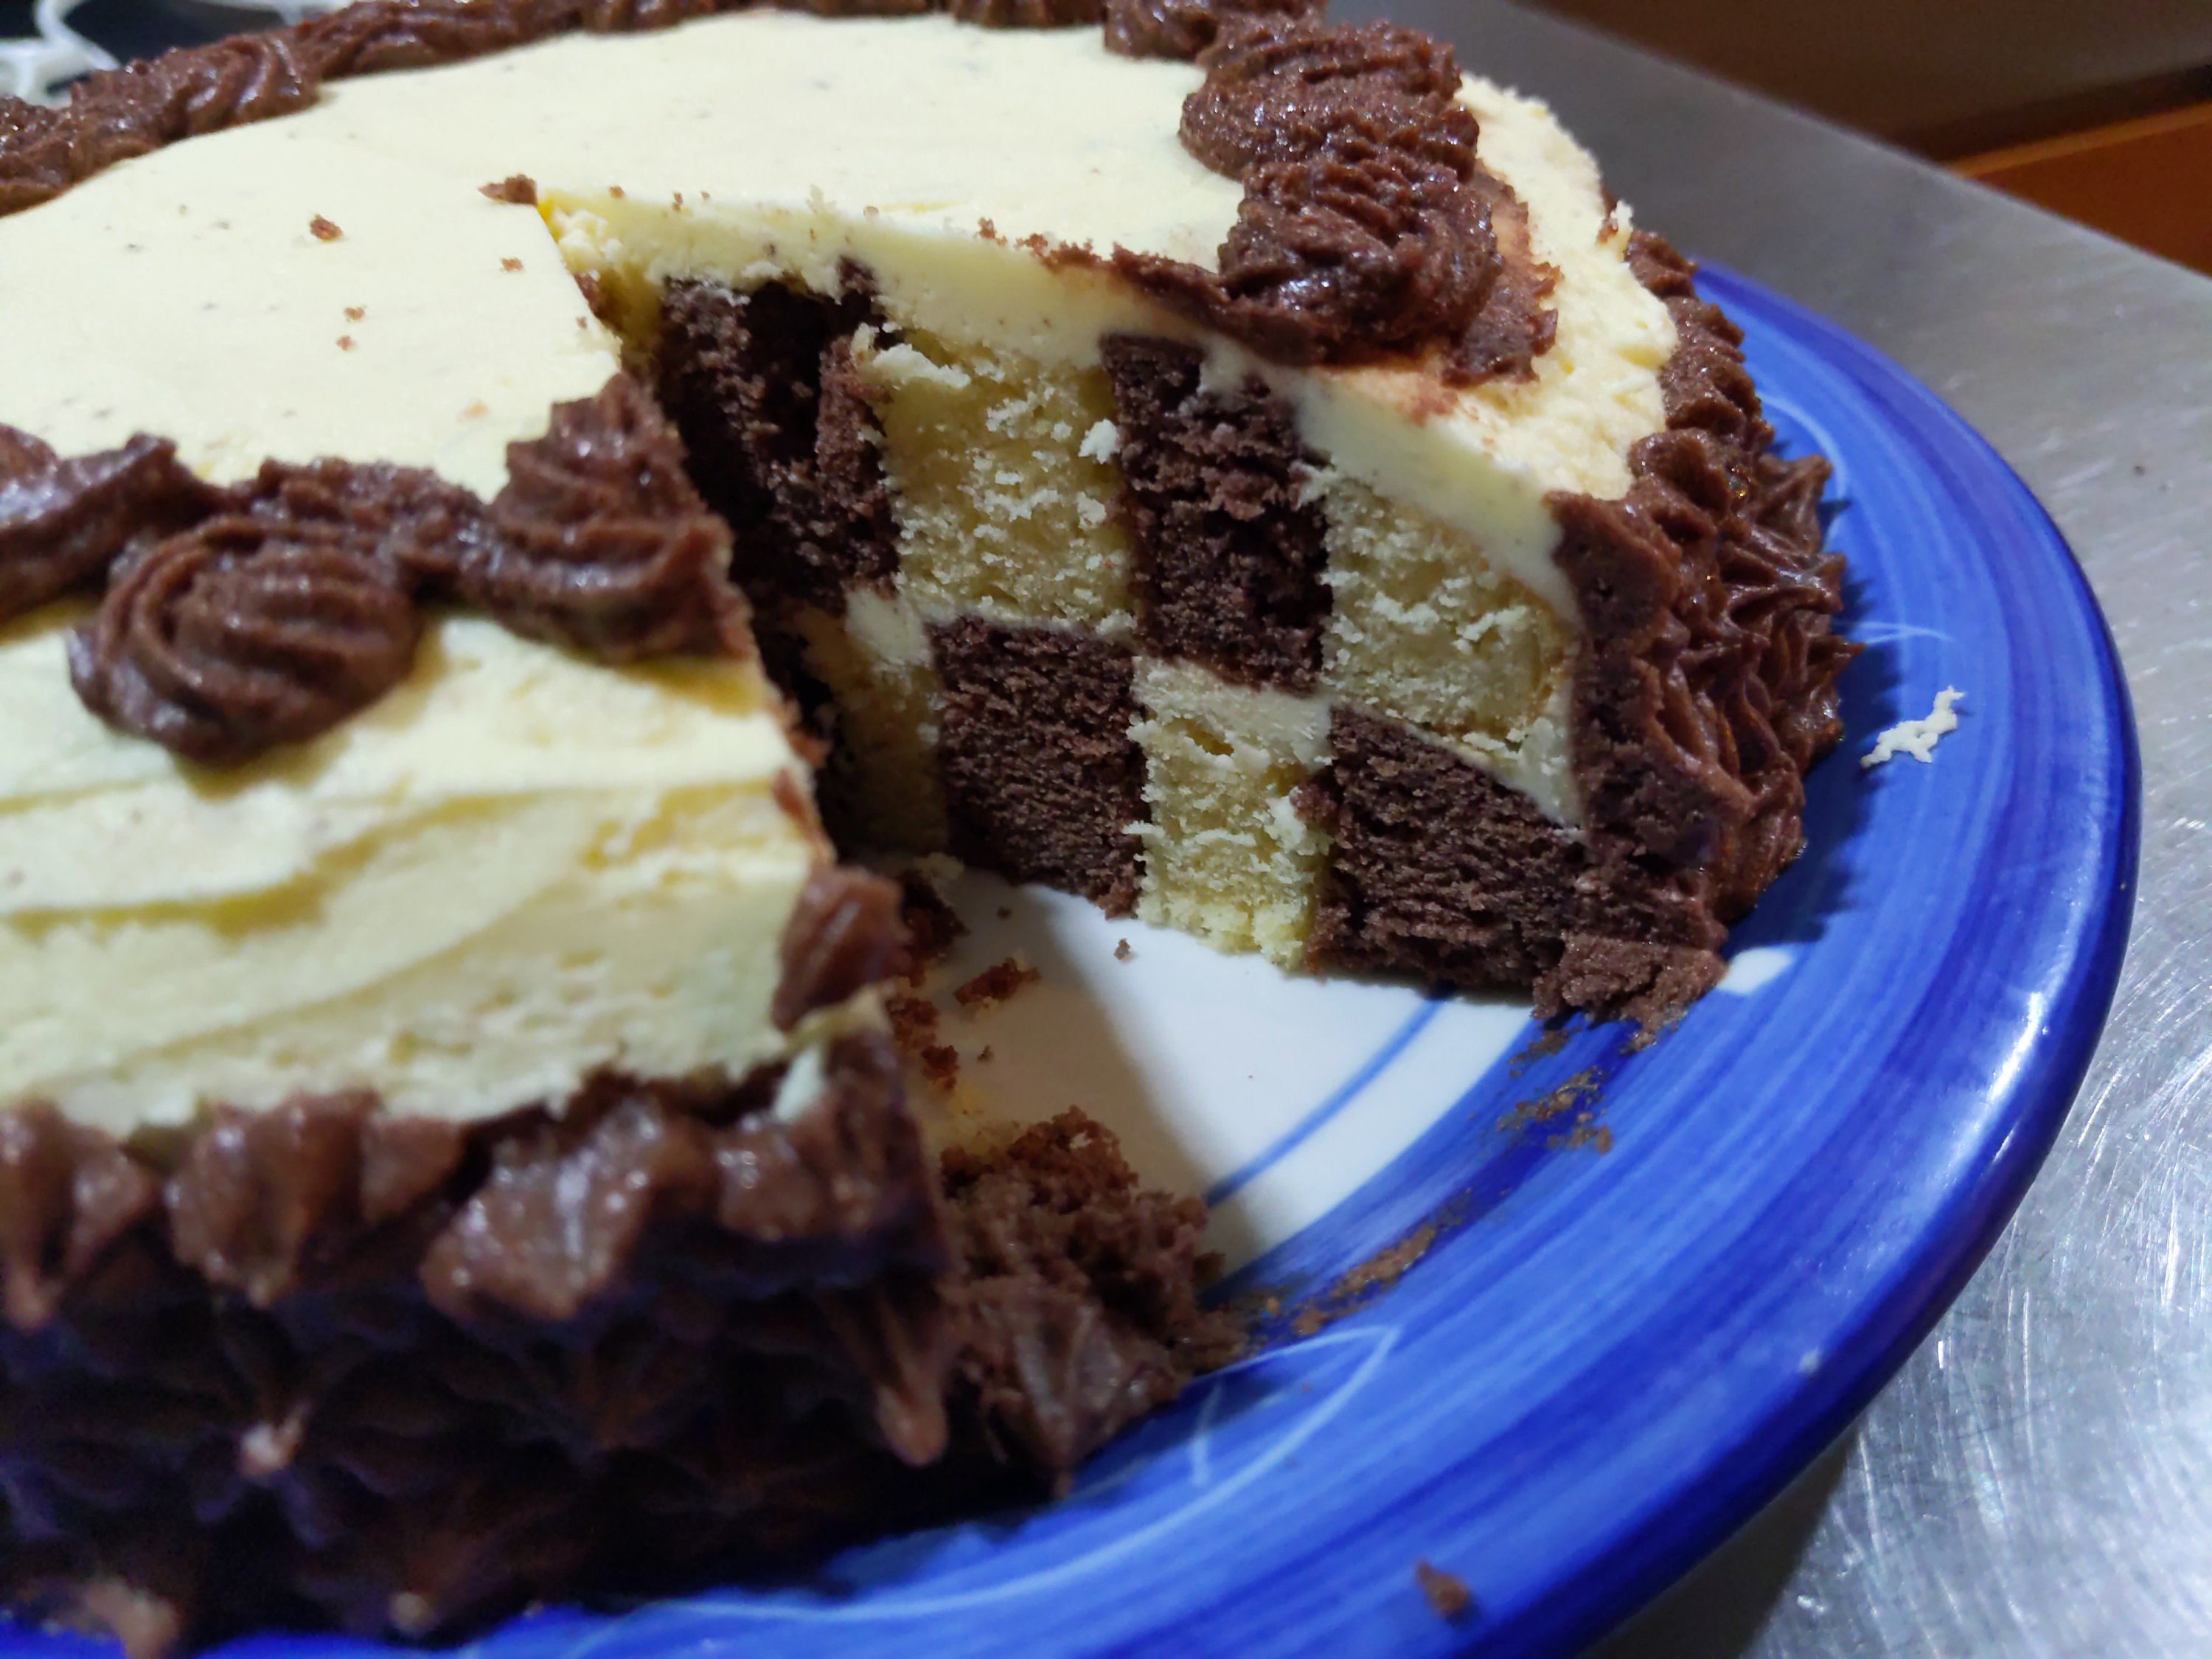
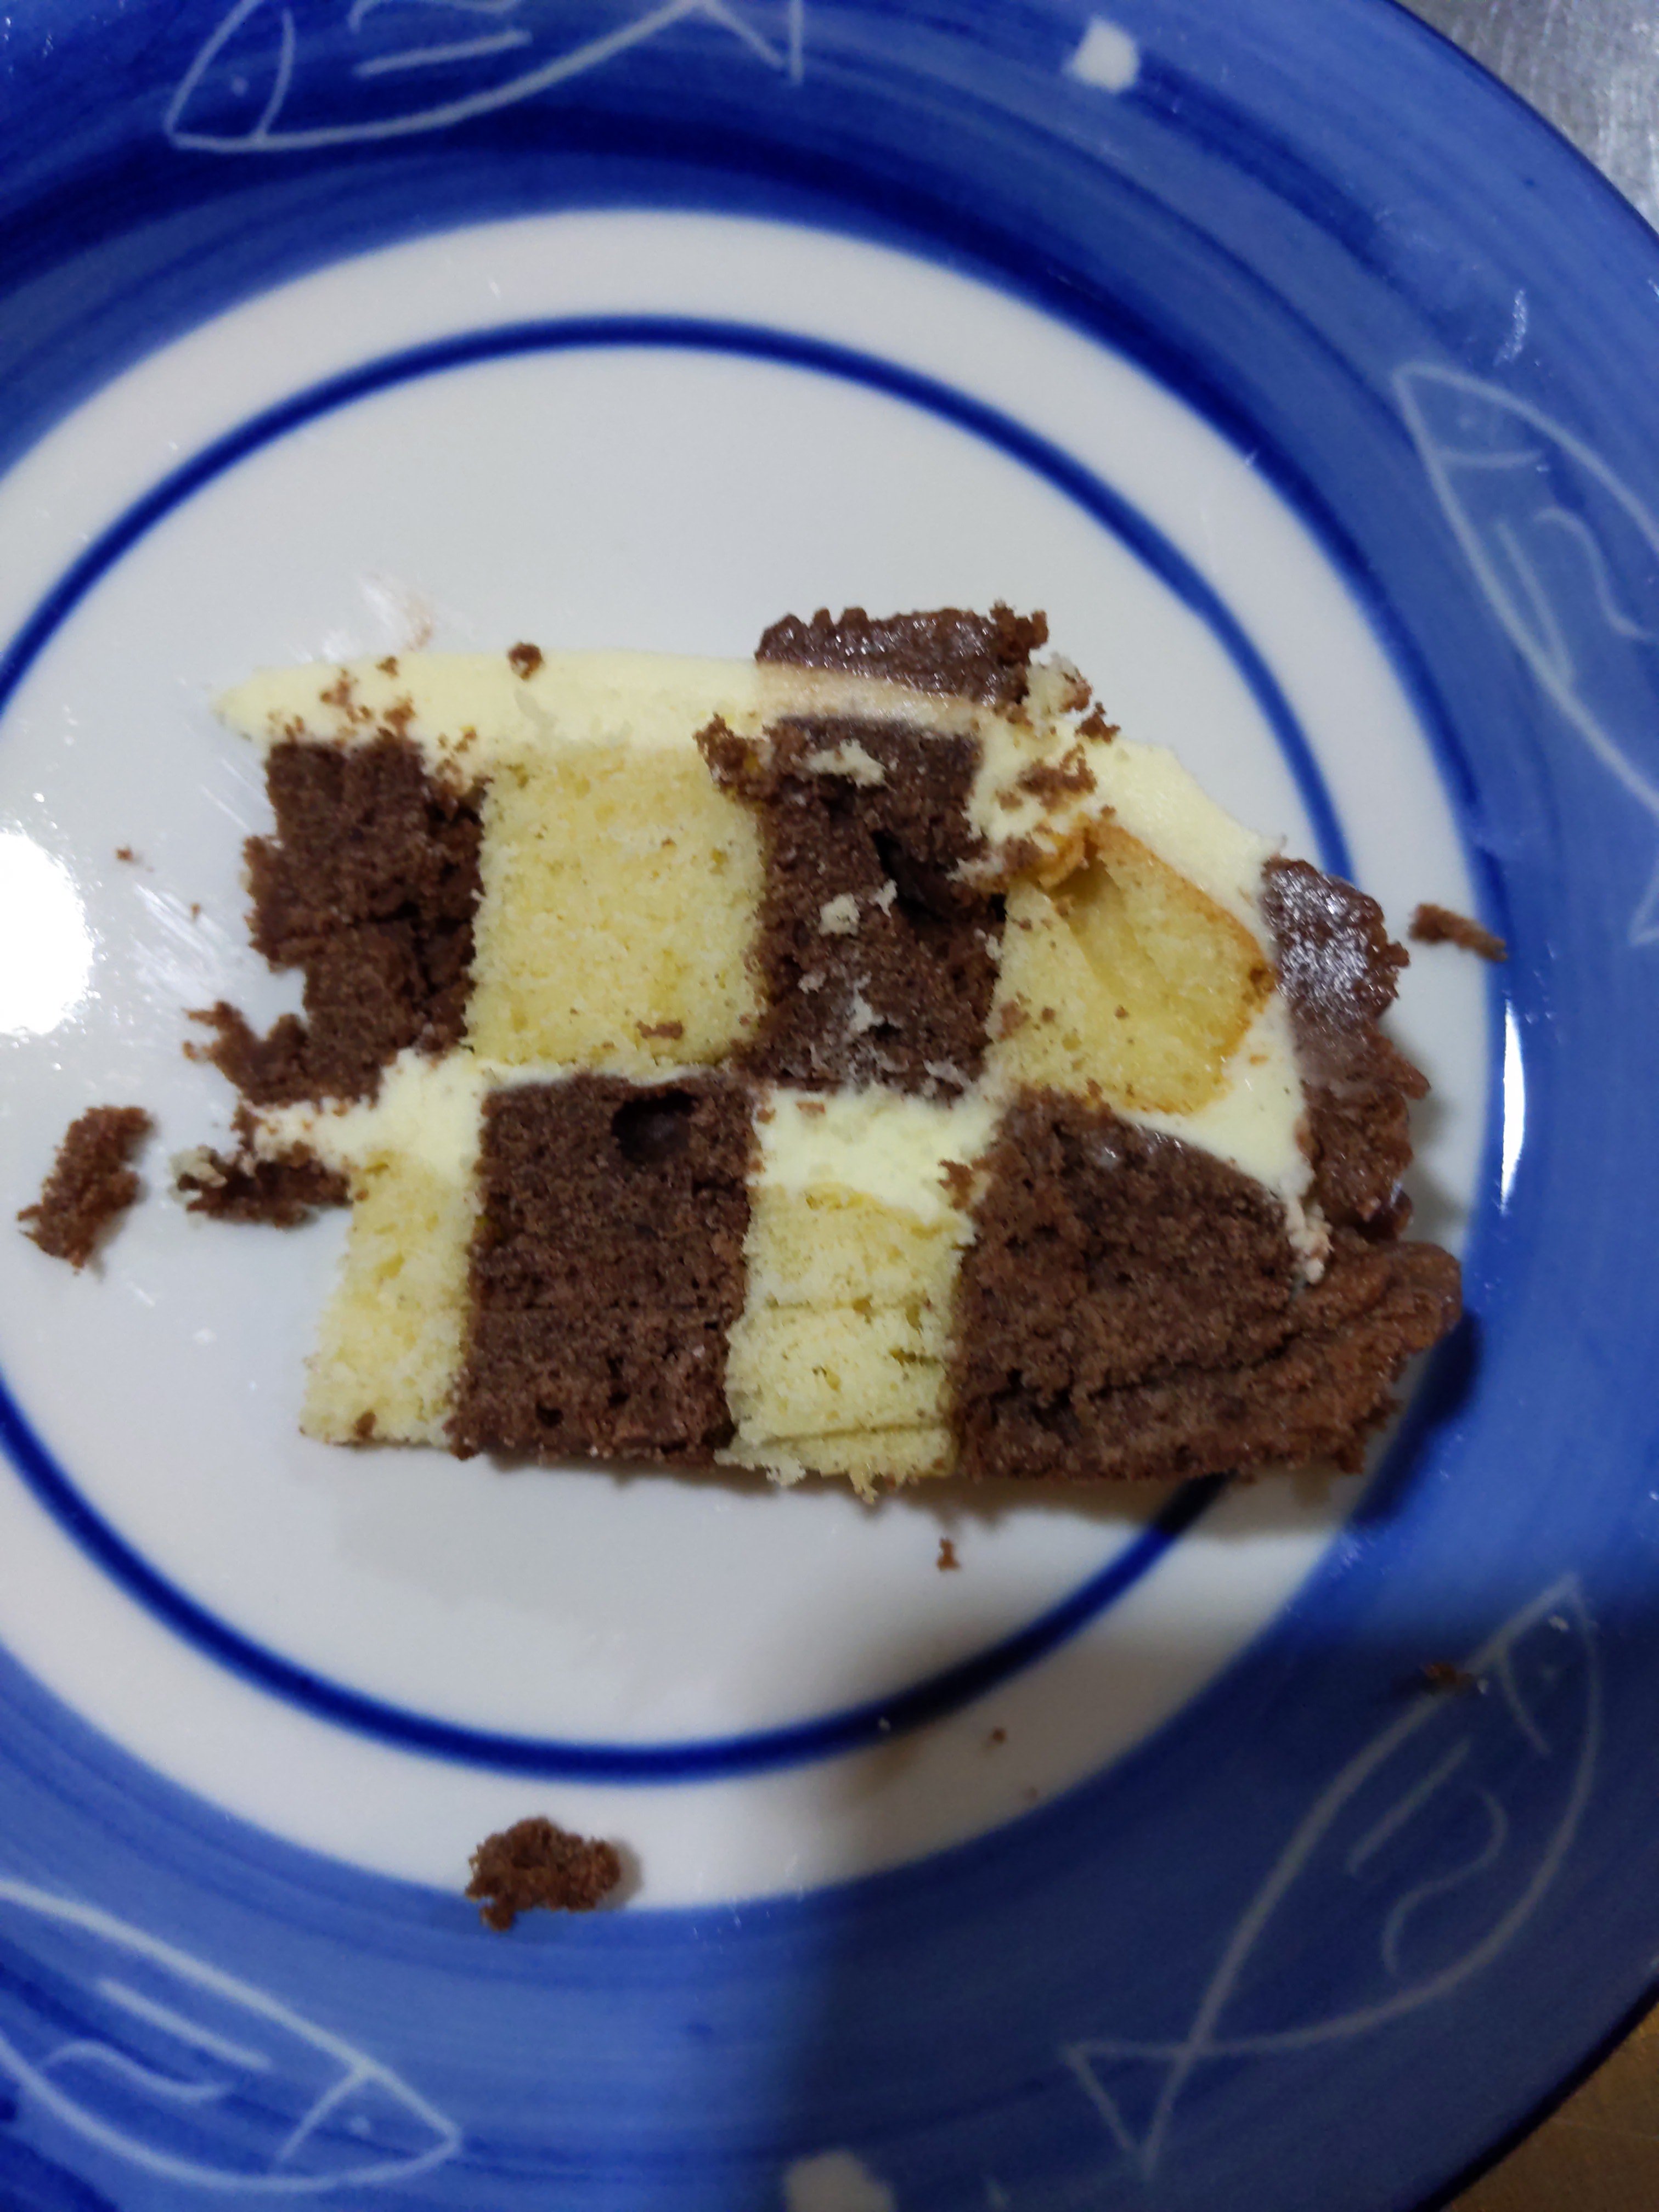
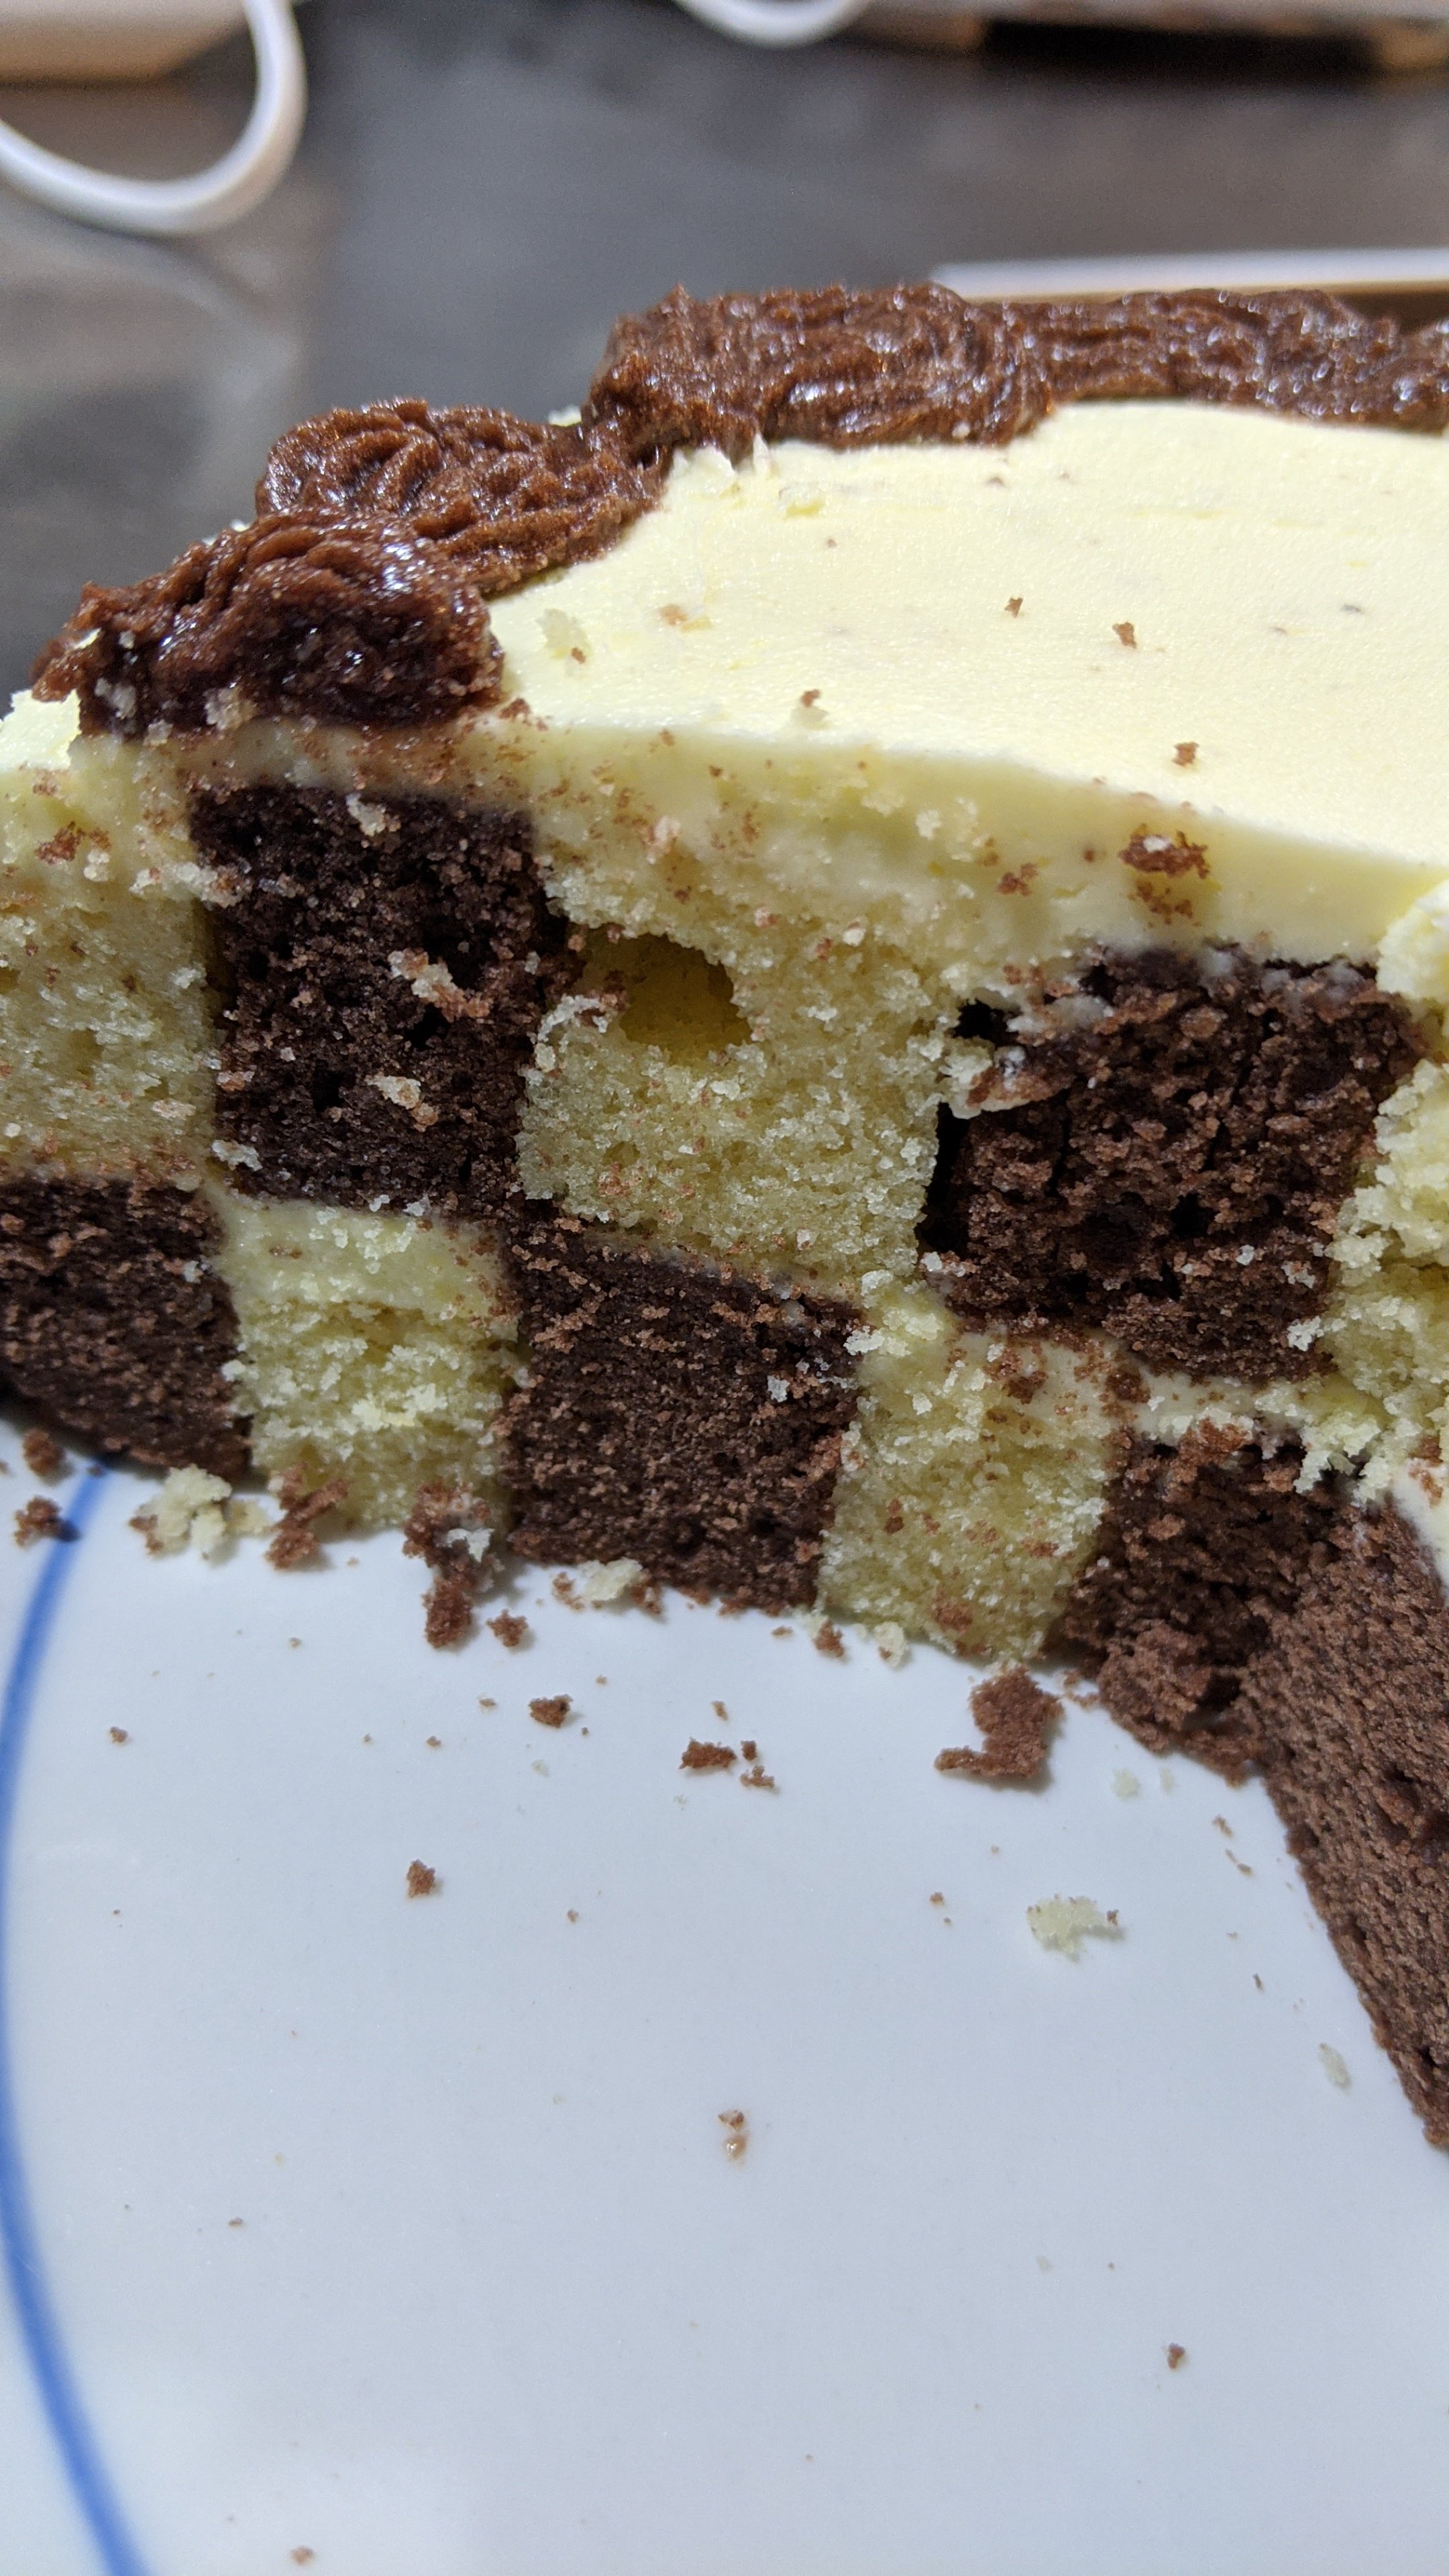
I wanted to make cake. But not just any cake. A fun cake. With a challenge (ish). I’ve wanted to try a checkered cake for years, so I finally did! And it turned out well!! A checkered cake lives up to it’s name, when cut it has a distinctive pattern, often in brown and white but can be in other colours too (even 3 colours or rainbows!).
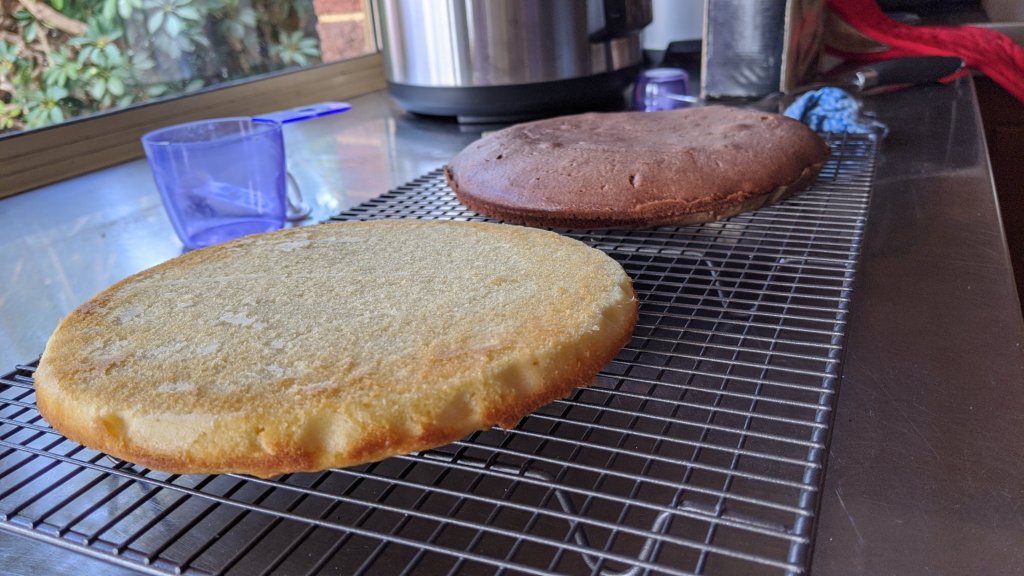
As there are only 2 people in my house, I didn’t want to make a huge cake. But this cake requires at lease 2 layers. Instead of making 2 batches, I divided 1 batch in half. It resulted in quite thin cakes, but this just meant a better buttercream to cake ratio!
Two kinda thin cakes, made from a single batch of batter
I used a simple butter cake recipe from Women’s Weekly Quick Mix Cakes (actually it’s a cupcake recipe but we’ve always used it for cakes too). I added cocoa to the second batch for colour and flavour, which didn’t change the texture too much.
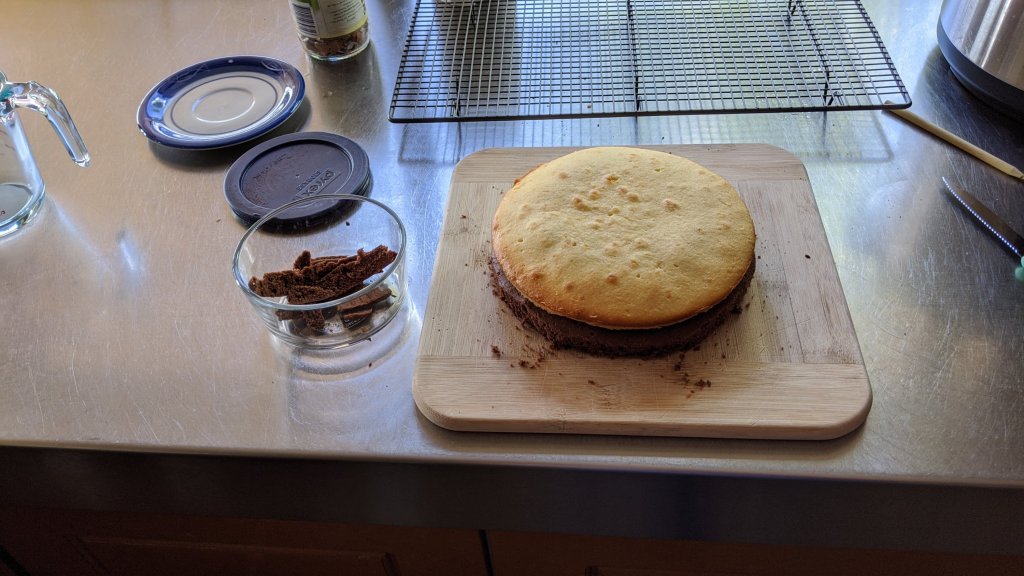
I baked in similar sized pans (I don’t have the same sized round pans), so after they cooked for 15 to 20 mins and were cool, I had to trim them to size. I also didn’t measure half the batter, so the vanilla cake was slightly lower than the chocolate. This was easily disguised by buttercream 😉 (if it were the reverse, I could have used chocolate buttercream to disguise it).
Note the different levels of the cakes
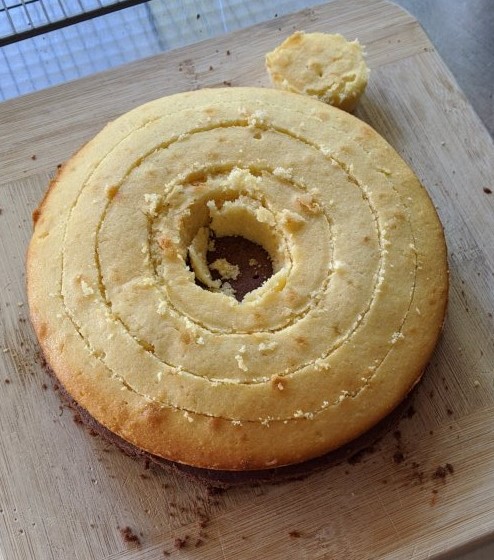
To assemble the checkered pattern, I had to cut concentric circles from the cakes of the same size, then swap the rings around so it alternated like in the picture above. I used various crockery as guides to cut my 2 stacked cakes. Then, very carefully, I separated the rings and restacked them as shown. A layer of buttercream and then the next layer of cake. My chocolate rings kept breaking in half, but it didn’t matter too much as they fit snugly together.
Stack and trim the edges, ready to be cut in concentric circles
Chop chop! I used crockery to help guide my circles
Oops. It broke. No worries, it still worked!
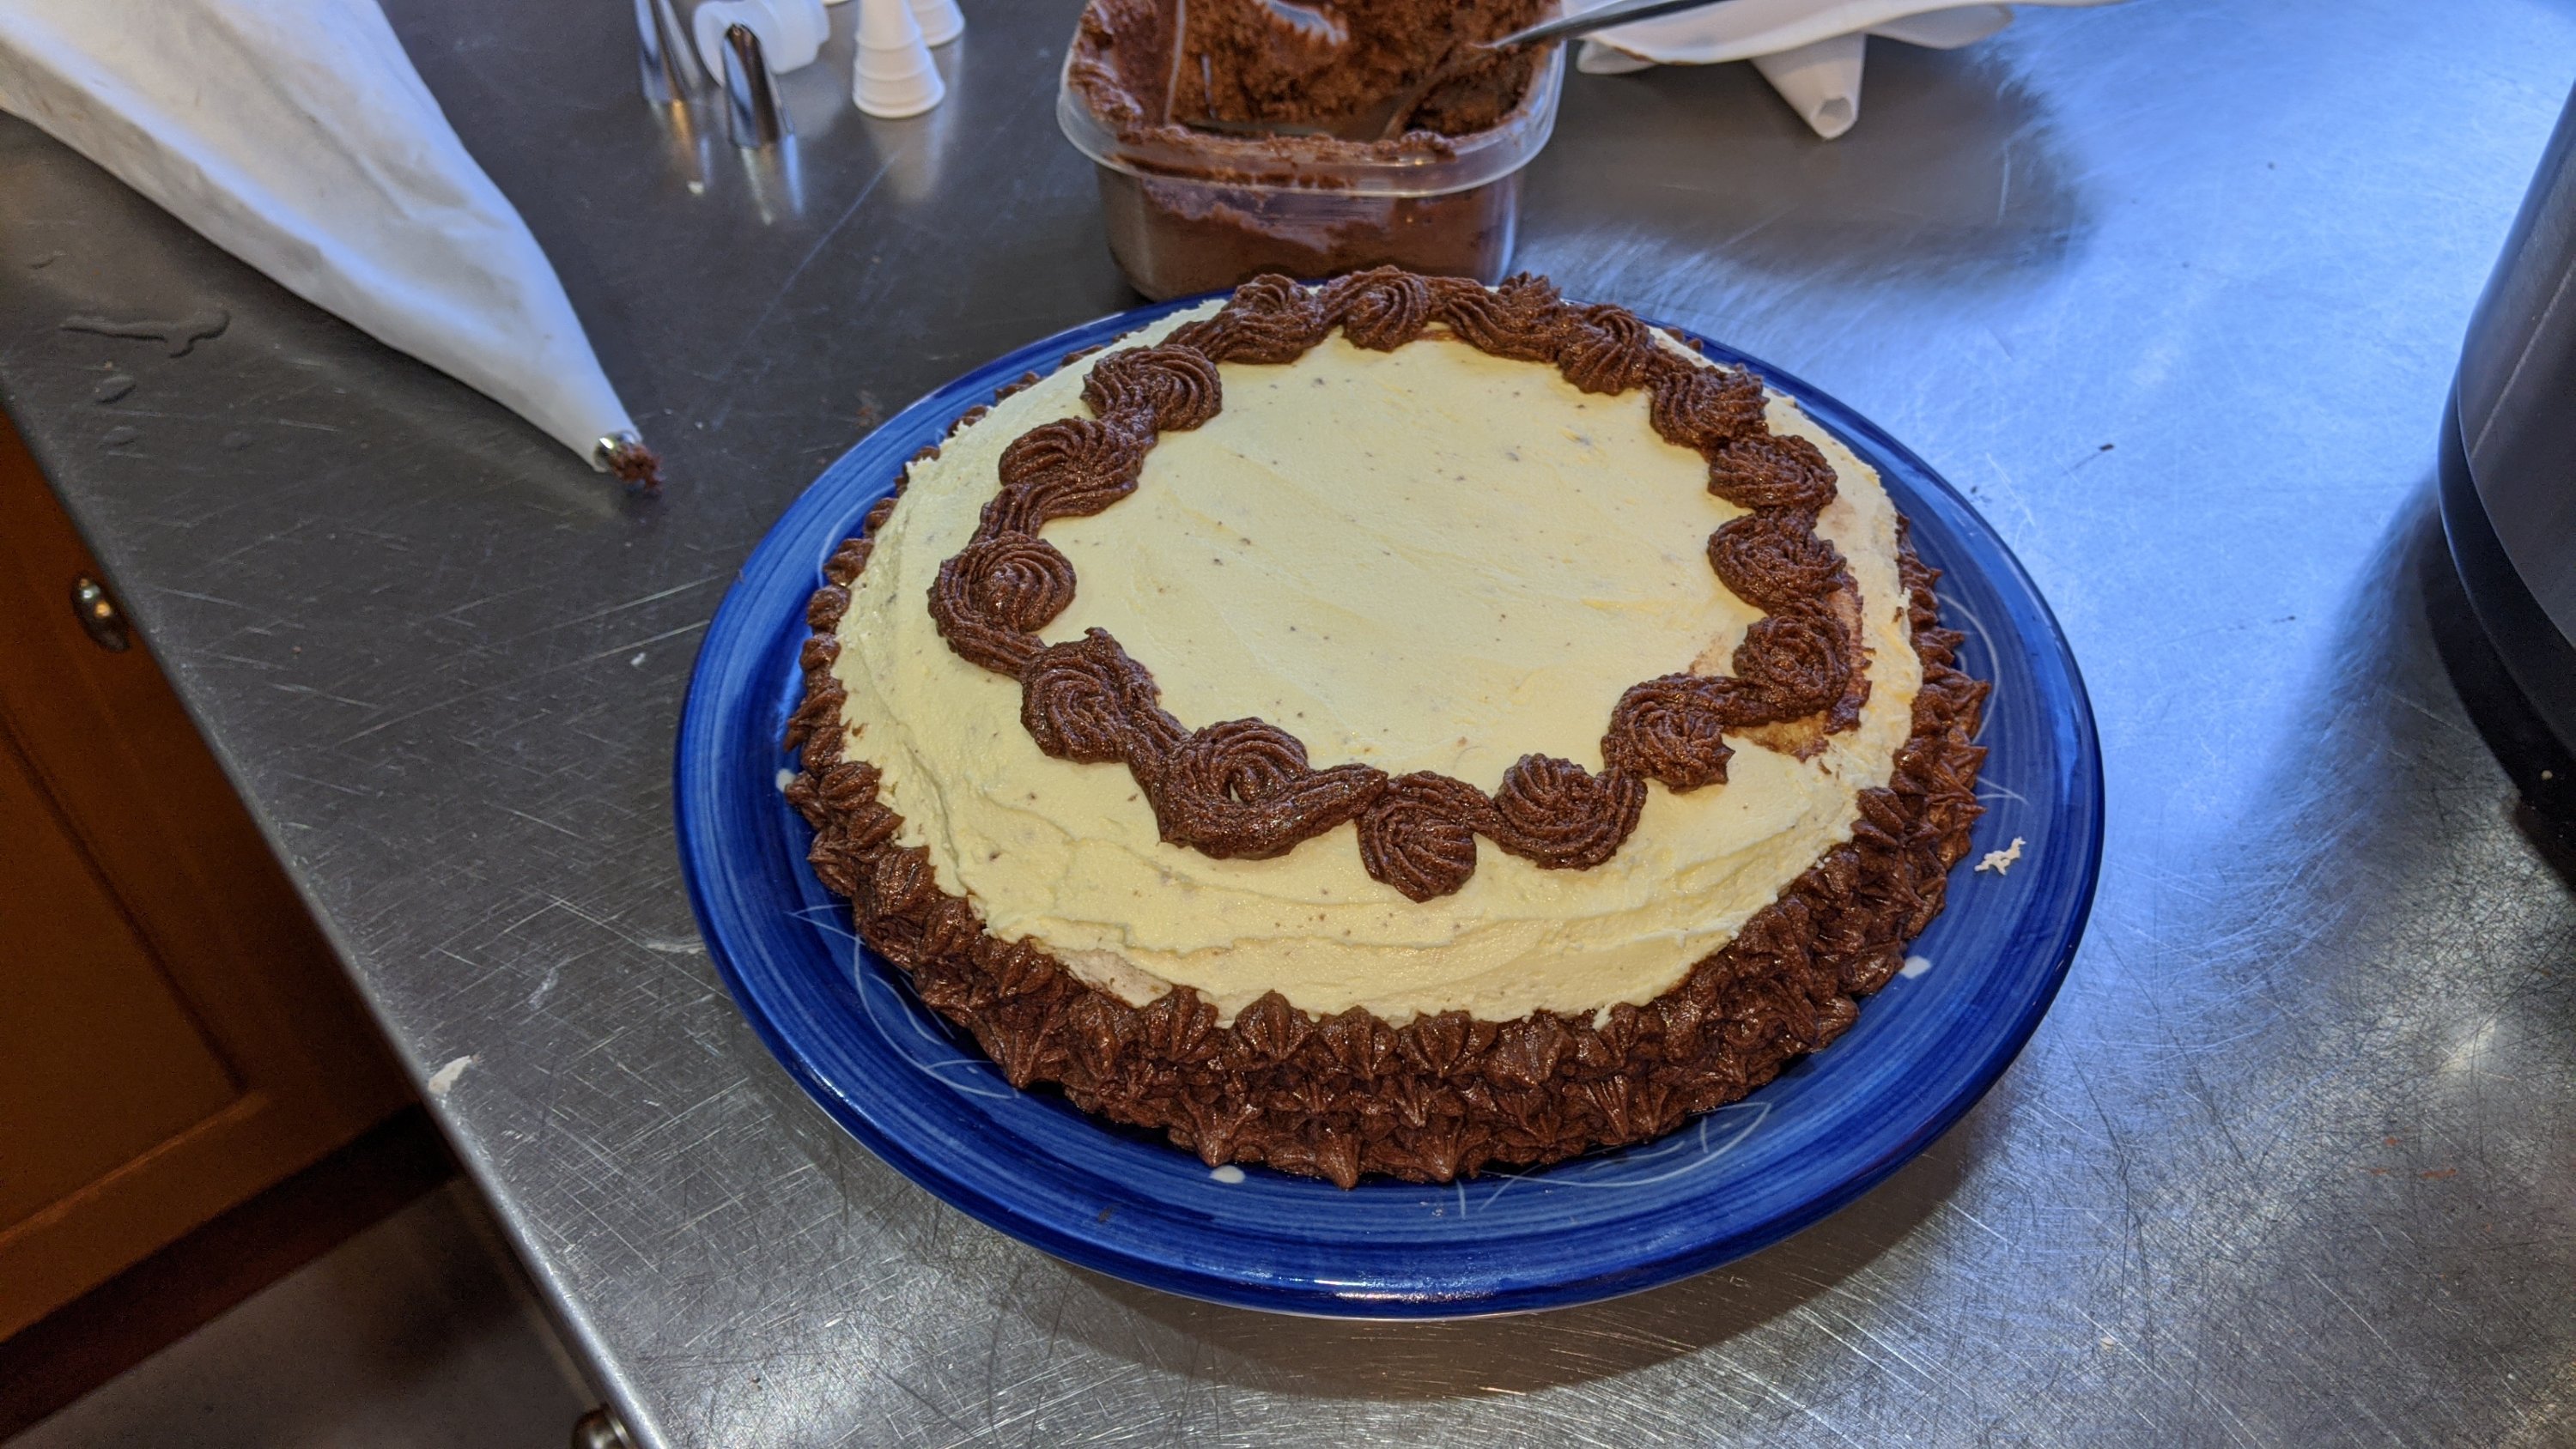
Finally, I iced it and used chocolate buttercream to decorate (and hide the lack of white buttercream around the edges). I wanted to have the edges covered so that cutting into it would reveal a surprise! I am impressed how well it stays together, considering there is nothing binding the rings together. I guess the layers of buttercream are strong in this one.
Ogres are… like onions. Because they stink? No. Oh, they make you cry? No! Onions have layers! Ogres have layers. Onions have layers. You get it? We both have layers. Hmmm. You know, not everyone likes onions… What about cakes? Cakes have layers and everybody loooooves cakes!
Ok, so I’m not growing ogres. I’m growing spring onions. But… Who doesn’t love some good old Shrek and Donkey?
I love gardening. I love the idea of having all the fruit and veg I need right outside my door. So, now that I have a bigger place I decided to start a vege patch. I’ll have beans and tomatoes, corn and broccoli, carrots and potatoes…and spring onions! I’m always using onions, and to me, spring onions are quite often easily substituted. The benefit to growing spring onion as opposed to brown onions and the like is that they’ll regrow after I cut their heads off… I mean trim the tops. That way I won’t have to resow/harvest/dry and all the other finicky things needed for keeping onions. The plan is to have a constant supply of spring onions available.
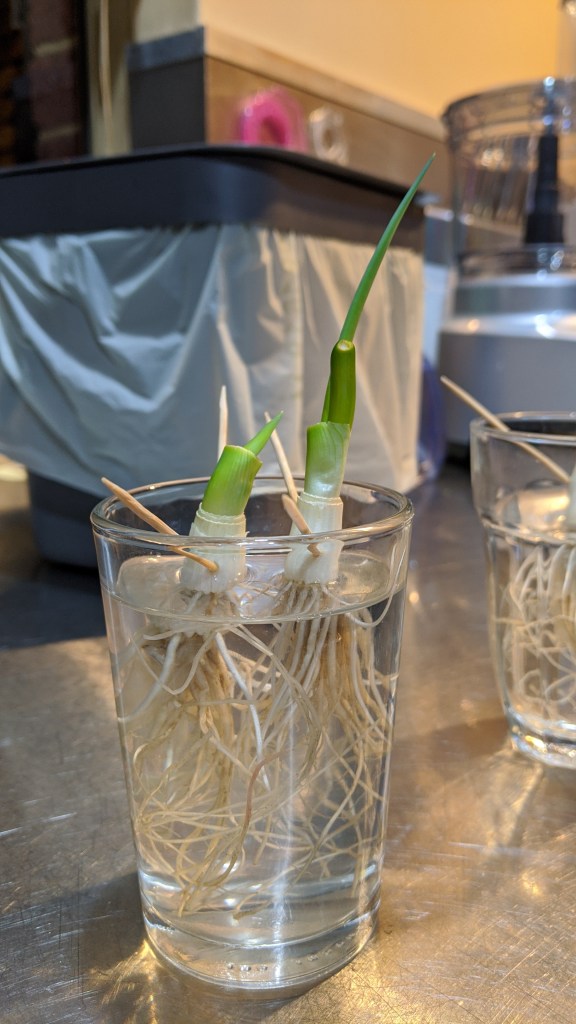
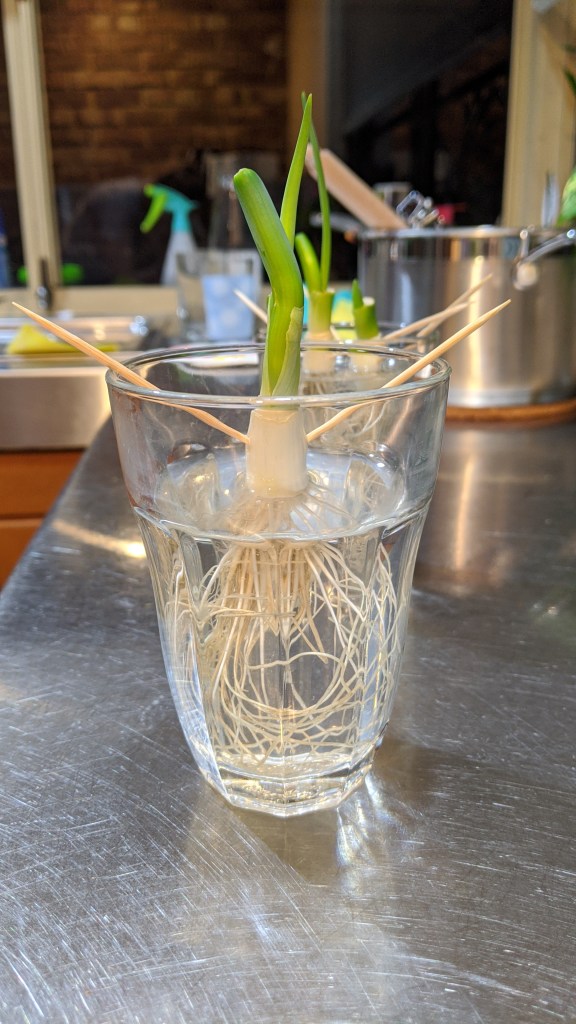
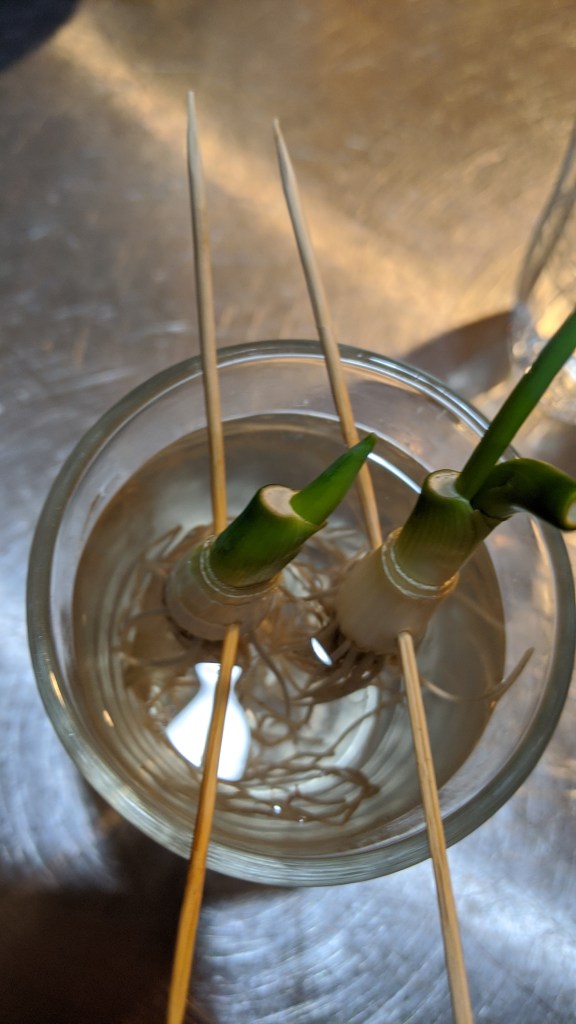
Now we all need to start somewhere. Instead of using seeds, I decided to utilise the ends of my store-bought spring onions, which were destined for landfill. It was really easy. All you do is get spring onions with the white bulb and roots still attached. Chop that off about 2cm from the roots and use the green bits as your heart desires. Get a cup, glass or jar. Grab 2 or 3 toothpicks and insert them into the onion base at an angle. Don’t poke them all the way through, just enough that they are holding the onion. You want to have the toothpicks angled so that the roots will sit below the lip of the cup. Get the roots and make sure all of them go into the cup. Fill the cup so that the roots are fully submerged, but the bulb is not. At this stage, the onion is pretty forgiving. After a day you’ll see your flat topped onion start to bulge. Wait a few more days and there will be green leaves. You may need to change the water and top it up over this time. You may even notice the toothpicks changing angles as the onion grows (re-position it as needed). Congrats, you’ve just saved your spring onion from landfill!
Best pals
Note the angle of the toothpicks
The spring onion will actually cap the “open” bits created by chopping off the green bit. Neat!
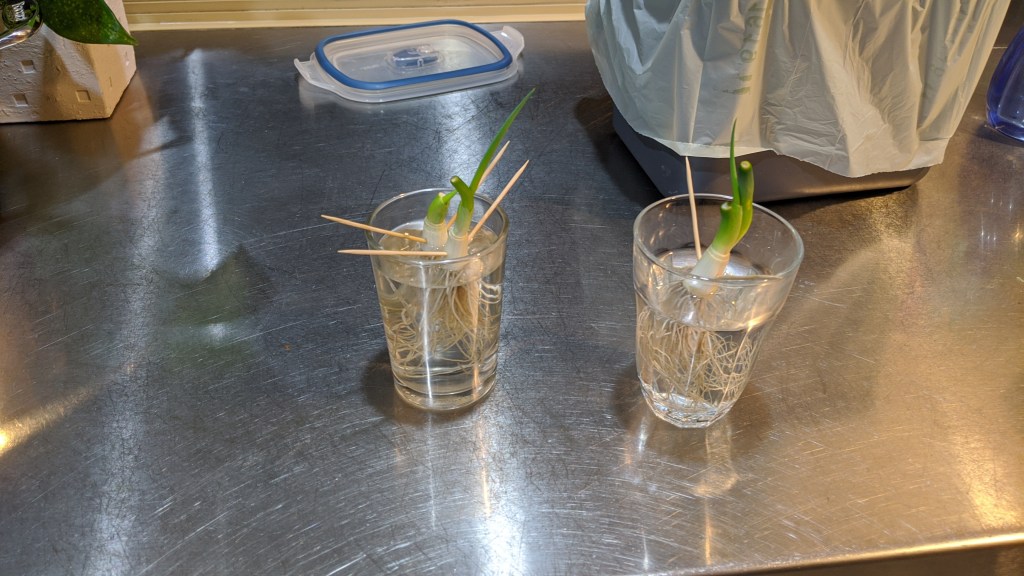
My new babies…Spring onions… after about a week of growing inside
At some point you’ll want to plant this into soil. This is where I killed my plants. Well, not at the transplanting stage, but at the over-loved stage. See, I think I buried the onions too deep. Instead of just covering the roots, I also put about 1cm of the bulb under the soil too. This caused my plants to rot and die 😥 But I soldier on and now have some new babies…onions… ready for transplanting! Wish me luck!
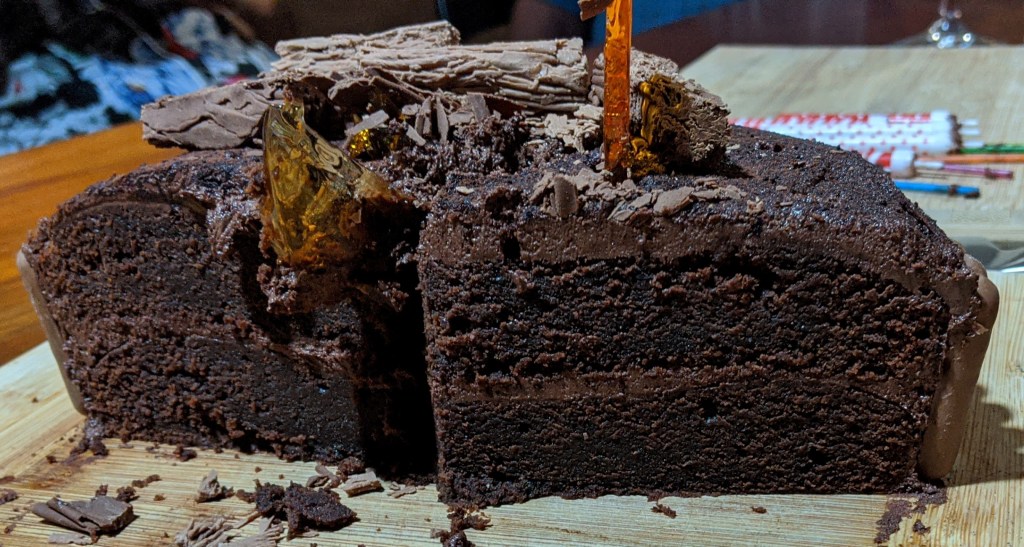
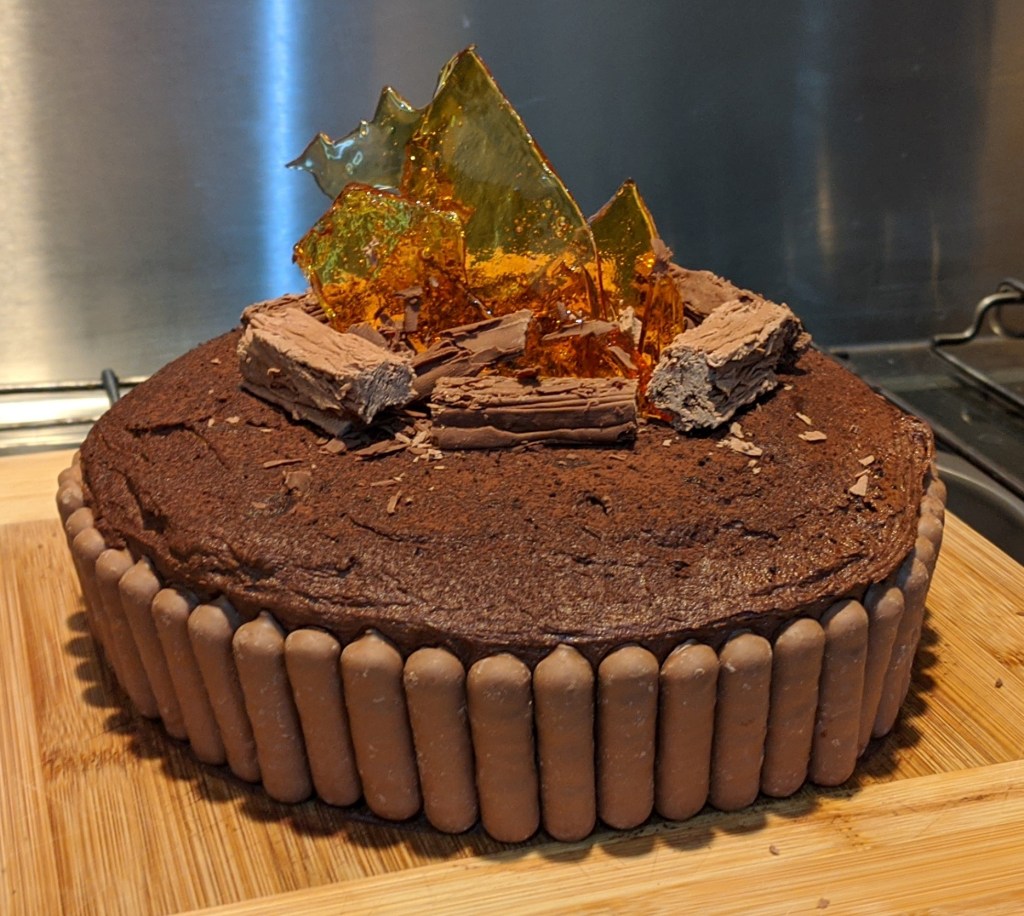
I made a pretty sweet cake for my birthday yesterday. You could say I was on fire 😛 I got my inspiration for this cake from the Women’s Weekly Best Ever Kid’s Cake book and used their dark chocolate mud cake recipe in the same book. It turned out to be a super dense, rich and delicious cake, but maybe I’ll have some cream on hand next time! I actually made the cakes themselves a few days in advance and froze them, which didn’t seem to affect the texture or taste at all. I also used spelt flour instead of regular wheat flour so I could eat as much as I wanted! Which wasn’t too much it turned out.
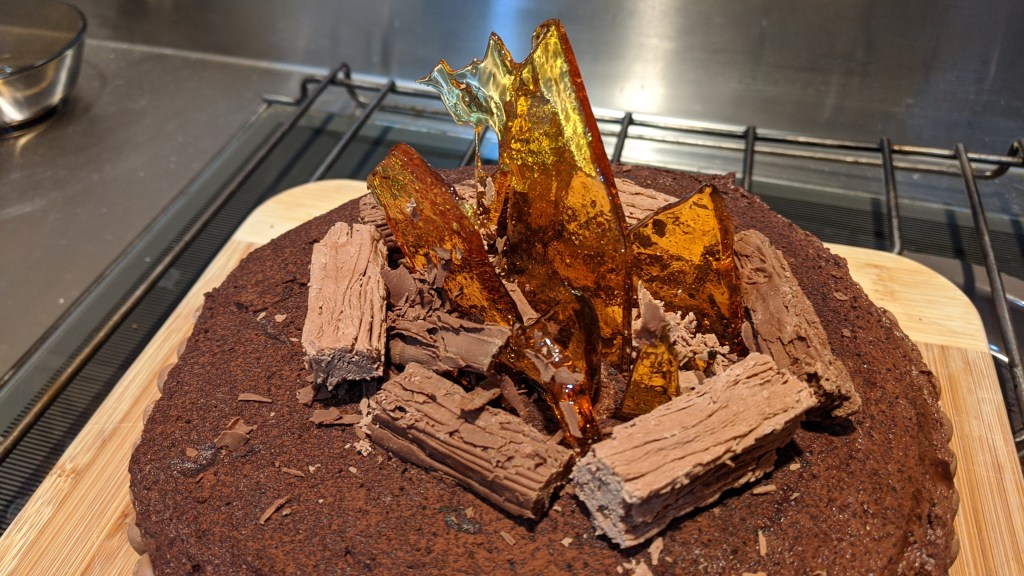
Campfire cake
I followed the recipe in the book (written here for your convenience) and poured the batter into 2 same sized round containers. The instructions were very vague on how to bake the cake, so I guess 180 degrees for about 20 mins. They turned out pretty good, but next time I might reduce the cooking time a bit to try and get an extra gooey (but still cooked) center. I also think that the cake may not need the extra cocoa as there are 2 blocks of chocolate in that cake! I’ll have to experiment. I cooled the cakes then popped them into a container in my freezer to keep.
I removed the cakes at the start of the day to give them plenty of time to defrost before the party. After going to work and while cooking all the other food for the party, I made the toffee (actually Mum made it and did a great job but don’t tell anyone). I followed the recipe in the Women’s Weekly Cooking Class Cookbook, but used apple cider vinegar instead of brown vinegar. This was definitely because I wanted to test it and not because I did not have the brown vinegar. Yup. It actually made toffee with a slight apple taste which was really nice! To get the colour of the flame we added 2 drops of yellow and 1 drop of red food colouring to the mix before it boiled. We needed the toffee to be the hard sort so it ended up boiling for about 20 mins. We spread it onto baking paper, allowed it to cool then broke it up to look a bit like flames.
Top of the campfire cake
Then came the icing and assembly. We made a basic buttercream and cocoa icing to go between the layers of cake and on top of the whole cake. I sifted some cocoa powder over the top of the cake to make it less shiny and look more like dirt (yum!). I used TV malt stick snacks to go around the outside (which made portioning the cake a dream!) and 1 milk and 1 dark flake to create the logs around the fire. Then shove the toffee pieces in artistically and some candles and voila! A yummy campfire cake 🙂 I used sparkler candles because… well… why not?
Bake on,
Beth
Guts of the cake. Note the two layers and density of the cake.
This is a recipe adapted from the Women’s Weekly Best Ever Kid’s Cake book. The toffee comes from Women’s Weekly Cooking Class Cookbook.
Total Time: 2 hours 20 mins approx.
Time for cake: 40 mins
Time for toffee: 30 mins + 1 hour to set
Makes 1 cake, enough to feed almost 20 people (small serves due to richness)
Ingredients
Cake
360g Yummy Dark Chocolate
Butter
water
Brown sugar
Spelt flour
Cocoa powder
Baking soda
(I’ll find the exact amounts soon)
Toffee
3 cups sugar
1 cup water
1/4 cup apple cider vinegar
2 drops of yellow food colouring, 1 drop of red
Other for assembly
TV snacks
Cocoa Buttercream icing
extra cocoa
1 dark flake (85g)
1 milk chocolate flake (85g)
Method
Preheat the oven to 180 degrees C
Combine the chocolate, butter, sugar and water over low heat until smooth, stirring continuously (sugar will burn quickly).
Sift together flour, cocoa and baking soda.
Add the liquid mix and stir until combined.
Line 2 same sized round baking pans with baking paper and oil. Divide mixture between pans evenly.
Cook for 15-20 mins until a skewer inserted comes out clean.
Cool on a wire rack.
Toffee
Place all ingredients in the smallest pot they fit in (they should fill about half the pot).
On low heat, dissolve the sugar, stirring continuously. As sugar gets deposited on the side of the pot use a pastry brush dipped in water to wash the sugar back down. This helps to avoid burning of those small amounts of sugar.
Once all sugar is dissolved, bring to a rapid boil for 15 or so minutes. To test if the toffee is done, use cold (fridge) water, drop a small amount of mixture in. If it “cracks” then the toffee is ready. If not, continue boiling and testing every minute or so. Be careful not to over-boil and burn the toffee.
When ready, immediately place the pan in a bath of cold (tap) water. This stops the cooking process. After a few minutes, pour the toffee onto a large sheet of baking paper. You can make different shapes by allowing non-uniform edges to be poured.
Allow to set on the bench top. Do not place in the fridge and avoid humid environs. This will cause the toffee to go sticky.
When set, break into fire shaped pieces (triangular/ wavy…).
Assemble
Create a cocoa butter cream icing.
Place one cake on the cake board and cover with icing.
Place the other cake on top and cover with icing. Use a wet spatula to help smooth the top of the cake, but don’t worry about the sides (just make them neat).
Sift some cocoa powder on top of the cake to make it look like dirt.
Place TV snacks around the cakes as shown.
Creatively place the broken toffee in the middle of the cake.
Cut flakes into thirds and arrange around the flames.
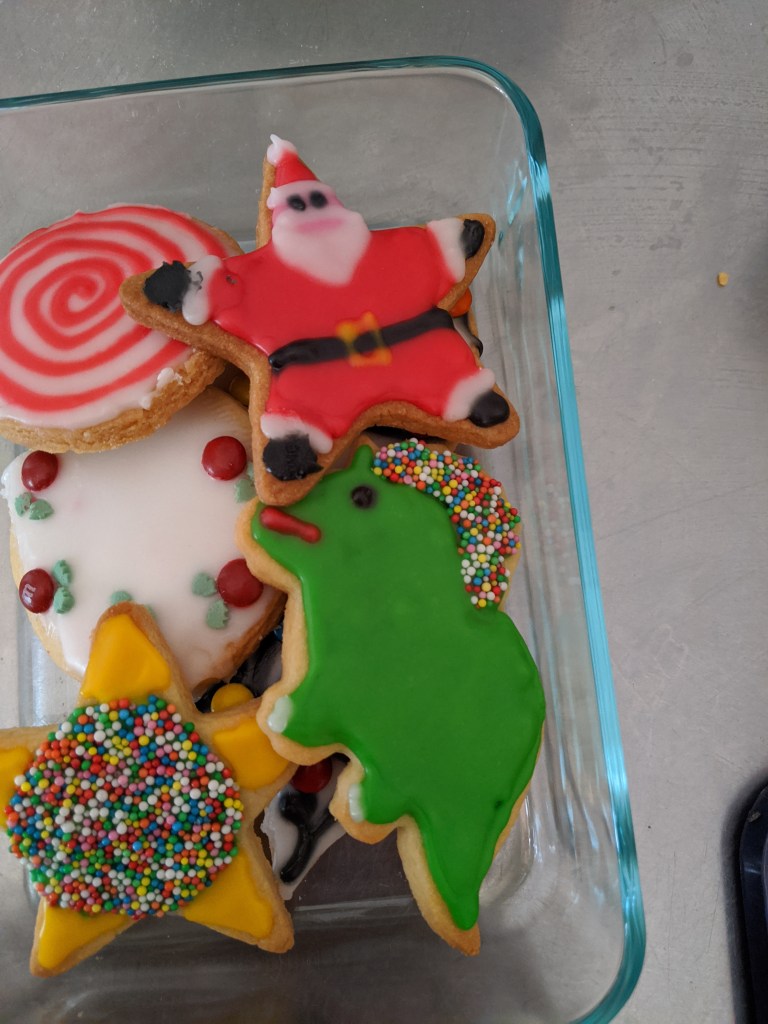
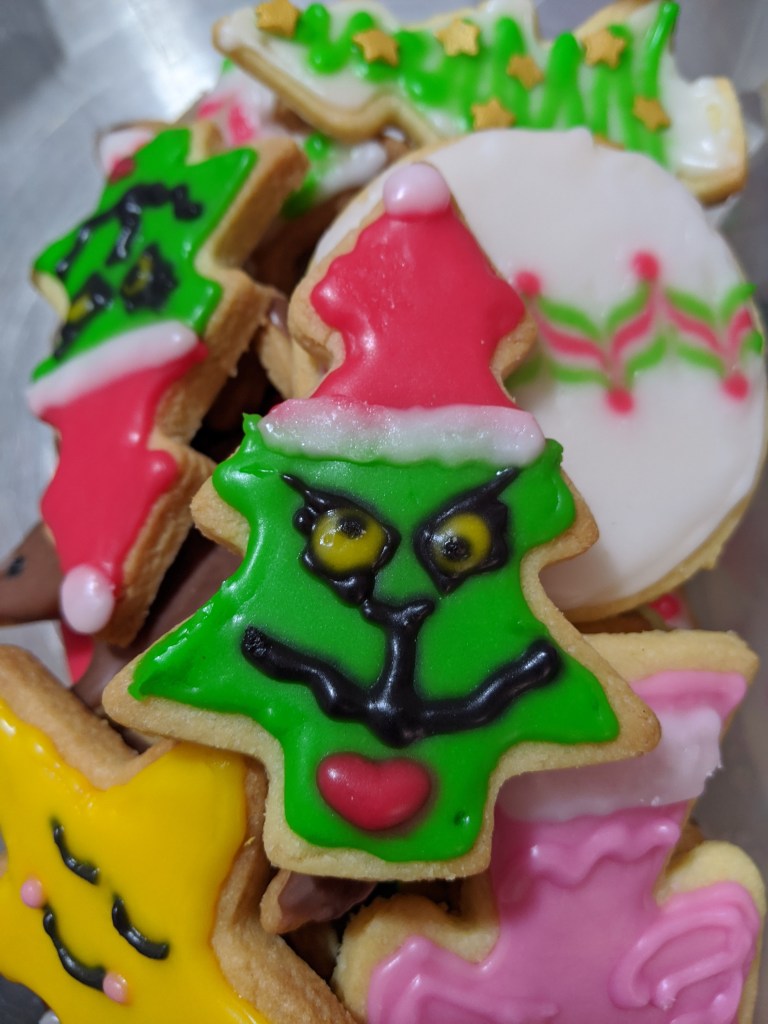
Sugar cookies are a staple for Christmas (for me anyway). But not so much the eating of them as the decorating. As kids we’d get a bunch of coloured icing, knives for spreading it and decorations like mini m&m’s, sprinkles and those shiny sugar balls. Now I’m all grown up and I finally have a decent sized kitchen to make these sugary treats. I used this recipe by Alton Brown to make the cookies, but I wanted to also share my tips on icing (well, mostly I just want to show off these cute things!).
My dough was pretty dry and was cracking as I tried to roll it out, so my support network (thanks Mum!) said I needed more butter, and all was good. I made the recipe twice and it made over 72 cookies… it took 4 hours to ice them all with my amazing support network. Just because it was Christmas didn’t stop me from enjoying some of the super cute cookie cutters I recently acquired – dinos for the win!!
The main this to start with when icing is having a good consistency with your icing mix. You want it to be fairly thick so that it holds it’s shape, but when you want to flood (fill in) a large area of the cookie, it needs to be runny enough that it will end up nice and smooth. Now, theoretically you should have 2 different lots of icing, one for decorating and one for flooding. But stuff that, that’s way too much effort for me. You just have to find a happy medium. Of course, after a day the icing starts bleeding into each other, but maybe it does that anyway?
Once you’ve got your happy medium, you need to outline the area that you’re decorating. Whether that is the whole cookie, or a certain section like in my disco dino design. I outlined the afro bit first, flooded it then dipped it in sprinkles. That’s why it has such a neat edge. Then I iced the rest of the cookie. That’s also how you do the Santa. Outline the red section and flood, then pink, white and finally black. That design is from here.
Dino cookie rocking a sweet disco afro
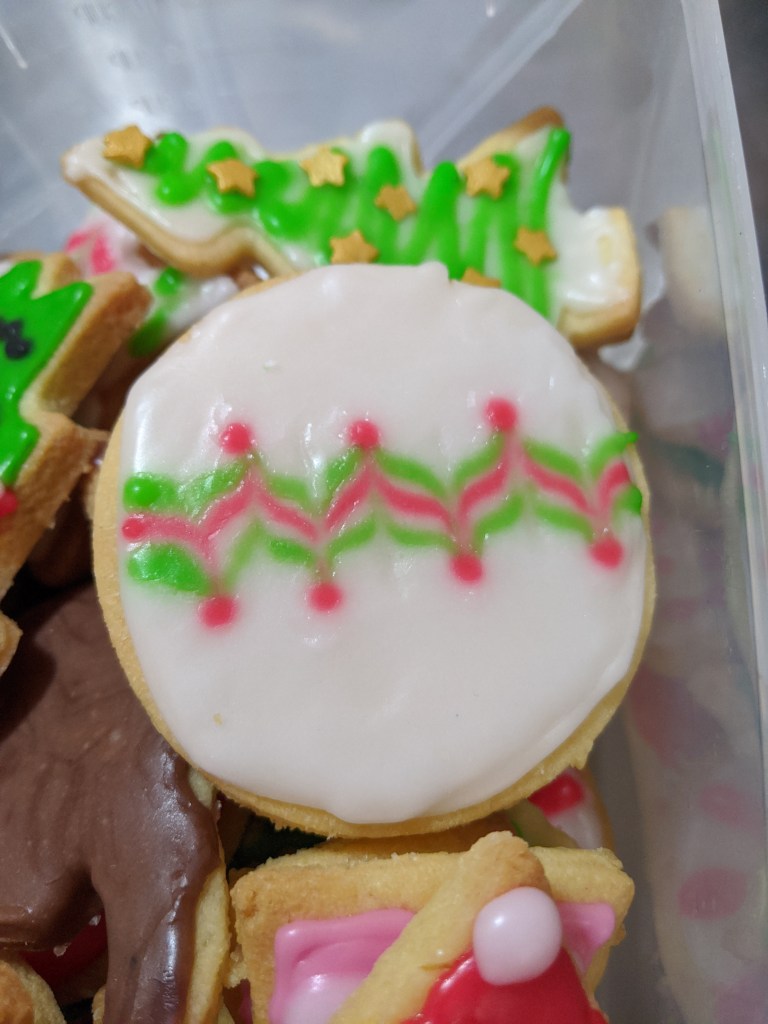
One of my favourite effects when icing is one that I learnt when making vanilla slices. All you do is draw straight lines over and iced surface and then run a skewer perpendicular to them. It creates a pretty wavy/zig-zaggy pattern like on this bauble cookie. I finished off the “points” with a small dot of red. This technique requires icing that is fairly runny, otherwise it will just crack and not flow to create the wave. You can also use this technique to make love hearts. Instead of a line, put a spot of icing on the cookie and run a skewer through it.
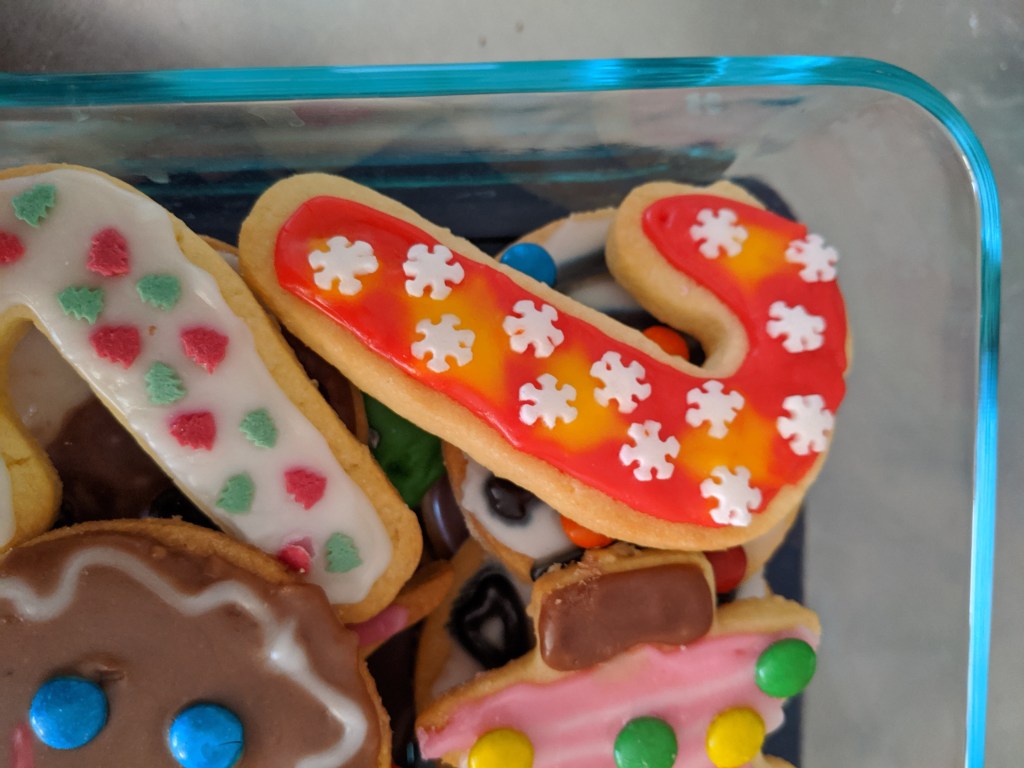
We also used various sprinkle shapes, which worked great at embellishing the cookies like the tree above. It also helped hide mistakes, like this candy cane.
Something I tried out was using icing as an embellishment in itself. By letting the background icing dry, I was able to pipe designs on top of that, and it stayed raised. I’ll have to keep testing this one out, initial attempts are a bit wonky for my liking 😉
Use icing to help embellish cookies. Maybe use a finer tip than mine…
Finally I just want to show off this super cute Grinch that I did. The design was from here.